1. Introduction
This manual provides detailed instructions for the setup, operation, and maintenance of your Sangean HDR-18 HD Radio. The HDR-18 is a high-quality table top radio featuring HD Digital Radio, FM-Stereo, and AM reception, housed in an acoustically tuned wooden cabinet. It includes 20 memory presets, a real-time clock with alarm and sleep functions, and a comprehensive information display.
2. Safety Instructions
- Read all instructions before operating the unit.
- Keep the unit away from water or moisture.
- Do not place the unit near heat sources such as radiators, heat registers, stoves, or other apparatus (including amplifiers) that produce heat.
- Only use attachments/accessories specified by the manufacturer.
- Unplug this unit during lightning storms or when unused for long periods of time.
- Refer all servicing to qualified service personnel. Servicing is required when the unit has been damaged in any way, such as power-supply cord or plug is damaged, liquid has been spilled or objects have fallen into the unit, the unit has been exposed to rain or moisture, does not operate normally, or has been dropped.
3. Package Contents
Please check that the following items are included in your package:
- Sangean HDR-18 HD Radio Unit
- Remote Control
- FM Telescoping Antenna
- AC Power Cord
4. Product Overview
4.1 Front Panel Controls and Display

Figure 4.1: Front Panel of the Sangean HDR-18
The front panel of the HDR-18 features a clear LCD display, a speaker grille, and various control buttons and knobs for easy operation. Key elements include:
- Speaker: Located on the left, providing audio output.
- LCD Display: Shows frequency, station information, time, and settings.
- Power Button (Blue LED): Turns the radio on or off. The blue LED indicates power status.
- BAND Button: Switches between FM, HD Radio, and AM bands.
- PRESET Buttons (1-10): For storing and recalling favorite stations.
- TUNE Knob: Used for manual tuning of radio frequencies.
- SEEK/SELECT Button: Initiates automatic station seeking or confirms selections in menus.
- VOLUME Knob: Adjusts the audio output level.
- TONE Button: Accesses bass and treble adjustment settings.
- FREQ Button: Toggles display between frequency and station name.
- NAP/T Button: Activates the nap timer or sets the time.
- MONO/S Button: Switches between mono and stereo audio output for FM.
- MENU/D Button: Accesses the system menu or sets the date.
- HD/A/S Button: Toggles HD Radio sub-channels or accesses alarm/sleep settings.
- Headphone Jack: For private listening with 3.5mm headphones.
- Aux-in Jack: For connecting external audio sources.
4.2 Internal Design Highlights

Figure 4.2: Exploded View of HDR-18 Internal Components
The HDR-18 is engineered with several features to enhance performance and sound quality:
- Acoustically Tuned Wooden Cabinet: Designed to minimize resonance and enhance audio fidelity.
- Reception Optimization: Fine-tuning and impedance matching between the RF amplifier and antenna for optimal reception.
- Speaker System: Features a high-quality one-way speaker with a neodymium magnet and Kapton coil for clear sound production.
- Electronic Circuit: Incorporates Dual DRC (Dynamic Range Compression), Digital Signal Processor (DSP), and unique noise reduction technologies for superior audio processing and signal quality.
- Passive Cooling System (PCS): Utilizes aluminum base materials for efficient heat dissipation.

Figure 4.3: Speaker System Details

Figure 4.4: Electronic Circuit Details
5. Setup
5.1 Power Connection
- Ensure the radio is placed on a stable, flat surface.
- Connect the AC power cord to the power input jack on the rear of the radio.
- Plug the other end of the power cord into a standard wall outlet.
5.2 Antenna Connection
For optimal reception, connect the supplied FM telescoping antenna to the FM antenna jack on the rear of the unit. Extend the antenna fully and adjust its position for the best FM signal. For AM reception, the radio has a built-in AM antenna. If AM reception is weak, try rotating the radio or consider using an external AM loop antenna (not included) if available.
5.3 Initial Power On
Press the Power button (with the blue LED) on the front panel to turn on the radio. The display will illuminate, and the radio will power on to the last selected band and station.
6. Operating Instructions
6.1 Power On/Off
Press the Power button once to turn the radio on. Press it again to turn the radio off.
6.2 Mode Selection (Band)
Press the BAND button repeatedly to cycle through FM, HD Radio (if available), and AM bands.
6.3 Tuning
- Manual Tuning: Rotate the TUNE knob to manually adjust the frequency.
- Seek Tuning: Press the SEEK/SELECT button to automatically scan for the next available strong station.
- HD Radio Sub-channels: When tuned to an HD Radio station, press the HD/A/S button to cycle through available HD1, HD2, HD3 sub-channels.
6.4 Preset Stations
The radio allows you to store 10 FM and 10 AM preset stations.
- Storing Presets: Tune to the desired station. Press and hold one of the PRESET buttons (1-10) until the display confirms the station has been saved.
- Recalling Presets: Briefly press the desired PRESET button (1-10) to recall a stored station.
6.5 Clock and Alarm Functions
- Setting Time and Date: Press and hold the NAP/T button for time settings or MENU/D for date settings. Use the TUNE knob to adjust values and SEEK/SELECT to confirm. The radio can also attempt to synchronize time from RDS (Radio Data System) broadcasts if available.
- Setting Alarms: Press the HD/A/S button to access alarm settings. Follow the on-screen prompts to set alarm time and source.
- Sleep Timer: Press the HD/A/S button repeatedly to cycle through sleep timer options (e.g., 15, 30, 60 minutes).
6.6 Display Information
The LCD display provides various information depending on the selected mode:
- Channel Frequency: The current tuning frequency.
- Call Sign / Station Name: Identifies the broadcast station.
- Radio Text: Scrolling text messages from the broadcaster (e.g., song title, artist).
- Audio Mode: Indicates Stereo or Mono reception.
- Service Mode: For HD Radio, indicates the current sub-channel (HD1, HD2, etc.).
- Signal Quality: A visual indicator of reception strength.
- Clock Time: Current time and date.
Press the FREQ button to toggle between frequency and station name display.
6.7 Audio Adjustments
- Volume Control: Rotate the VOLUME knob to increase or decrease the sound level.
- Bass and Treble: Press the TONE button to enter bass adjustment mode. Rotate the TUNE knob to adjust bass. Press TONE again to enter treble adjustment mode, then rotate TUNE. Press TONE a third time to exit.
- Mono/Stereo: For FM broadcasts, press the MONO/S button to switch between stereo and mono reception. Mono can improve reception quality for weak stereo signals.
6.8 Using the Remote Control
The included remote control provides convenient access to most radio functions from a distance. Refer to the remote control diagram (not pictured) for specific button layouts. Functions typically include power, band selection, tuning, presets, volume, mute, and menu navigation.
6.9 Auxiliary Input
Connect an external audio device (e.g., MP3 player, smartphone) to the Aux-in jack on the front panel using a 3.5mm audio cable. Select the AUX input mode (usually via the BAND button or a dedicated input button) to play audio from the connected device through the radio's speaker.
6.10 Headphone Output
Plug 3.5mm headphones into the Headphone jack on the front panel for private listening. The radio's speaker will automatically mute when headphones are connected.
7. Maintenance
7.1 Cleaning the Unit
Wipe the radio's surface with a soft, dry cloth. Do not use abrasive cleaners, waxes, or solvents as they may damage the finish. For stubborn marks, a slightly damp cloth can be used, followed by a dry cloth.
7.2 Care for the Wooden Cabinet
The wooden cabinet is a natural material. Avoid placing the radio in direct sunlight or near extreme heat sources, which can cause the wood to fade or warp. Regular dusting is recommended.
8. Troubleshooting
If you experience issues with your HDR-18, please consult the following common problems and solutions:
| Problem | Possible Cause | Solution |
|---|---|---|
| No power | Power cord not connected; Power outlet not active. | Ensure power cord is securely plugged into the radio and a working wall outlet. |
| Poor FM/HD Radio reception | FM antenna not extended or positioned correctly; Weak signal. | Fully extend and adjust the telescoping FM antenna. Try repositioning the radio. Switch to mono mode for weak FM stereo signals. |
| Poor AM reception | Radio orientation; Interference. | Rotate the radio for better AM signal. Move the radio away from electronic devices that may cause interference. Consider an external AM antenna. |
| Clock loses time after power loss | No internal battery backup for clock; RDS time signal inaccurate. | Manually set the time. If using RDS time synchronization, ensure the broadcasting station transmits accurate time. Consider a UPS for power backup if frequent outages occur. |
| No sound | Volume too low; Headphones connected; Mute activated. | Increase volume. Disconnect headphones. Check if mute is active (via remote). |
| Remote control not working | Batteries depleted; Obstruction; Remote out of range. | Replace remote control batteries. Ensure no obstructions between remote and radio. Operate remote within effective range. |
9. Specifications
- Brand: Sangean
- Model: HDR-18
- Tuner Type: AM, FM, HD Radio
- Power Source: Corded Electric
- Supported Radio Bands: AM, FM
- Display Type: LCD
- Item Weight: Approximately 5.1 pounds (2.3 kg)
- Dimensions (W x H x D): Approximately 24 cm x 11.2 cm x 19.33 cm
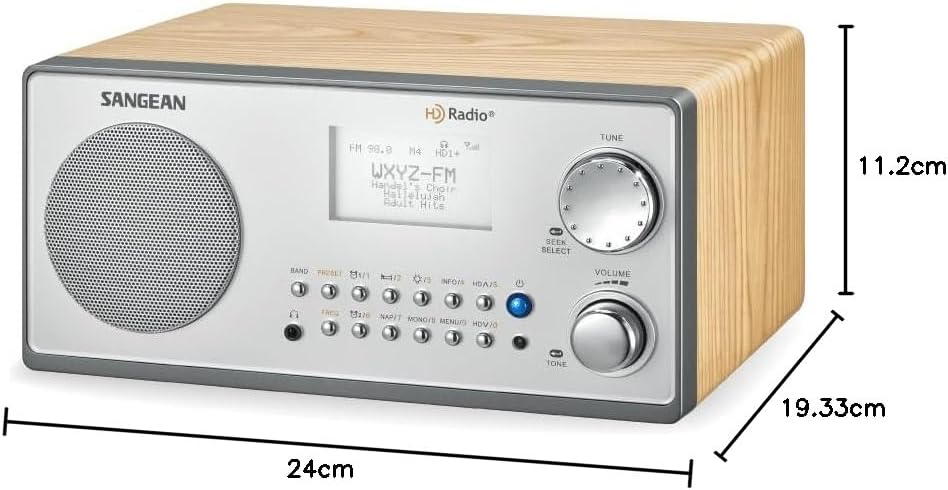
Figure 9.1: Sangean HDR-18 Dimensions
10. Warranty and Support
For warranty information or technical support, please refer to the warranty card included with your product or visit the official Sangean website. Keep your purchase receipt as proof of purchase for warranty claims.