Introduction
This manual provides detailed instructions for setting up, operating, and maintaining your AeroGarden Seed Starting System (Classic Harvest). This system allows you to germinate up to 31 seedlings indoors without soil, preparing them for transplanting into an outdoor garden.

Image: The AeroGarden Seed Starting System tray filled with young seedlings, positioned next to an AeroGarden unit. This illustrates the product in use, showing the tray's capacity and how it integrates with the main AeroGarden unit.
Package Contents
Before beginning, ensure all components are present:
- One reusable durable plastic seed starter tray
- 31 Biodegradable Grow Sponges
- One 3 ounce bottle of Specially Formulated Liquid Plant Food
- Seed Starting & Transplanting Guide (physical or digital)
- Note: Seeds are not included with this kit. An AeroGarden unit (Classic Harvest or Classic Harvest Elite) is required and sold separately.
Setup Instructions
Follow these steps to prepare your Seed Starting System:
- Prepare Grow Sponges: Gently insert one biodegradable Grow Sponge into each opening of the reusable seed starter tray. Ensure they are seated firmly.
- Add Seeds: Place 1-3 seeds of your chosen plant into the center hole of each Grow Sponge. The number of seeds depends on the germination rate and desired plant density. Refer to your seed packet for specific recommendations.
- Install Tray: Carefully place the filled seed starter tray into the designated opening of your AeroGarden Classic Harvest or Classic Harvest Elite unit. Ensure it sits securely.
- Fill Reservoir: Fill the AeroGarden reservoir with fresh tap water up to the indicated fill line.
- Add Plant Food: Add the recommended amount of AeroGarden Liquid Plant Food to the reservoir. Consult the included Seed Starting & Transplanting Guide or your AeroGarden unit's instructions for precise dosing based on your model and plant type.
- Power On: Ensure your AeroGarden unit is plugged in and powered on. The system will automatically manage light cycles and water circulation.
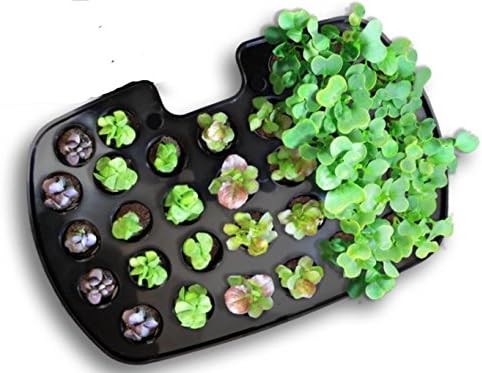
Image: A close-up view of the AeroGarden Seed Starting System tray, showcasing multiple compartments each containing small, healthy seedlings. This highlights the germination success and the compact nature of the system.
Operating Instructions
Once set up, the AeroGarden system will nurture your seedlings:
- Automatic Care: Your AeroGarden provides optimal light, water, and nutrients to your seedlings. The light cycle is pre-programmed for optimal growth.
- Monitor Water Levels: Regularly check the water level in your AeroGarden reservoir. Refill with fresh water when the indicator shows low.
- Add Nutrients: Follow the nutrient feeding schedule provided in your AeroGarden unit's manual or the Seed Starting & Transplanting Guide. Typically, nutrients are added every two weeks.
- Observe Growth: Seedlings typically germinate within 7-14 days and will be ready for transplanting in 2-4 weeks, depending on the plant type.
- Transplanting: When seedlings have developed a strong root system and several true leaves, they are ready to be gently removed from the Grow Sponges and transplanted into soil outdoors or into larger pots. The biodegradable Grow Sponges allow for easy transplanting with minimal root disturbance.
Instructional Video: AeroGarden Seed Starting Systems
Video: This official AeroGarden video demonstrates the setup process for the Seed Starting System, shows the rapid growth of seedlings, and illustrates how to easily transplant them once they are ready. It highlights the benefits of using the system for a head start on your outdoor garden.
Maintenance
Proper maintenance ensures the longevity and effectiveness of your Seed Starting System:
- Tray Cleaning: After each use, thoroughly clean the reusable plastic seed starter tray with warm, soapy water. Rinse well and allow to air dry before storing.
- AeroGarden Cleaning: Periodically clean your AeroGarden unit's reservoir and pump according to its specific instruction manual to prevent algae buildup and ensure proper function.
- Grow Sponge Disposal: Used biodegradable Grow Sponges can be composted or disposed of with general waste.
Troubleshooting
Here are solutions to common issues you might encounter:
| Problem | Possible Cause | Solution |
|---|---|---|
| Seeds not germinating | Old seeds, incorrect temperature, insufficient moisture. | Ensure seeds are fresh. Verify room temperature is suitable for germination. Check AeroGarden water level and pump function. |
| Mold growth on Grow Sponges | Excess humidity, poor air circulation, overwatering. | Ensure adequate ventilation around the AeroGarden. Avoid overfilling the reservoir. Gently remove visible mold with a clean cloth or cotton swab. |
| Slow or stunted growth | Insufficient nutrients, incorrect light exposure, water quality issues. | Verify plant food dosage and schedule. Ensure the AeroGarden light is functioning correctly and at the appropriate height. Use filtered water if tap water quality is poor. |
| Seed tray does not fit AeroGarden unit | Incompatibility with specific AeroGarden models, minor manufacturing variations. | This seed starting system is designed for Classic Harvest and Classic Harvest Elite models. If minor interference occurs, carefully inspect for small plastic tabs or edges that might be gently trimmed if they obstruct fit. Avoid forcing the tray. |
Specifications
| Feature | Detail |
|---|---|
| Product Dimensions | 13.13 x 3.13 x 7.5 inches |
| Item Weight | 1.28 pounds |
| Manufacturer | AeroGarden |
| Model Number | 800293-0100 |
| Seedling Capacity | Up to 31 seedlings |
| Compatibility | AeroGarden Classic Harvest, Classic Harvest Elite |
Warranty and Support
For specific warranty information regarding your AeroGarden Seed Starting System, please refer to the product packaging or visit the official AeroGarden website. For further assistance or technical support, contact AeroGarden customer service directly.
Official AeroGarden Website: AeroGarden.com