Introduction
Thank you for choosing the Power Products 12-Unit Rapid Charger. This multi-unit charger is designed to efficiently charge up to twelve batteries simultaneously, either on or off their compatible two-way radios. It supports various battery chemistries including NiCd, NiMH, Li-Ion, and LiPo, adapting to the specific charging pods installed. This manual provides essential information for the safe and effective use of your charger.
Important Safety Information
Please read all safety instructions carefully before operating the charger. Failure to follow these instructions may result in electric shock, fire, or serious injury.
- Use only the provided power supply with the charger.
- Do not expose the charger to rain or moisture.
- Do not operate the charger if it has been damaged in any way.
- Ensure proper ventilation around the charger during operation.
- Do not attempt to disassemble or modify the charger. Refer all servicing to qualified personnel.
- Only charge batteries specified as compatible with this charger and its installed pods.
- Keep out of reach of children.
Package Contents
Verify that all items are present in your package:
- 12-Unit Rapid Charger Base
- 6 Dual Charging Pods (pre-installed or separate, depending on configuration)
- External AC to DC Power Supply (100V – 240V)
- AC Power Cord (U.S. type)
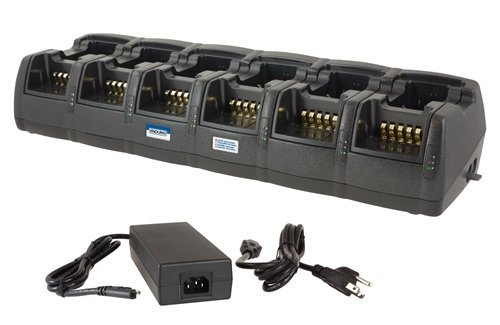
An image showing the Power Products 12-Unit Rapid Charger, a long black unit with twelve individual charging bays, each featuring gold-colored charging contacts. Below the charger, its external AC to DC power supply and power cord are visible.
Setup Instructions
Follow these steps to set up your 12-Unit Rapid Charger:
- Unpack the Charger: Carefully remove all components from the packaging.
- Place the Charger: Position the charger on a stable, flat surface in a well-ventilated area, away from direct sunlight or heat sources.
- Connect Power Supply: Connect the DC output cable from the external power supply to the DC input jack located on the back of the charger base.
- Connect AC Power Cord: Plug the AC power cord into the external power supply, then plug the other end of the AC power cord into a standard wall outlet (100V-240V).
- Verify Power: The bottom LED on each charging bay will illuminate to confirm the charger is receiving power when both front and rear positions are empty.
- Install Charging Pods (if necessary): Ensure the correct charging pods are securely installed in each bay for your specific radio and battery models. The charger supports replaceable pods for future compatibility.
Operating the Charger
The 12-Unit Rapid Charger is designed for ease of use, providing smart charging technology to prevent over-charging and automatically recharge when a radio remains powered-on.
Charging Procedure:
- Ensure the charger is powered on (bottom LEDs illuminated).
- Insert a compatible battery or a radio with its battery into an available charging bay. The charger can accommodate two batteries/radios per bay (front and rear positions).
- Observe the LED indicators for charging status.
- Once charging is complete, the LED will change state (typically green or off, depending on the pod). Remove the battery/radio from the bay.
LED Indicators:
- Bottom LED: Illuminates when the charger is receiving power and the bay is empty.
- Middle LED: Indicates the charging status of the battery/radio in the front position of the bay.
- Top LED: Indicates the charging status of the battery/radio in the rear position of the bay.
Refer to the specific charging pod's documentation for detailed LED color meanings (e.g., red for charging, green for charged).
Maintenance and Care
Proper maintenance ensures the longevity and optimal performance of your charger.
- Cleaning: Disconnect the charger from power before cleaning. Use a soft, dry cloth to wipe down the exterior. Do not use harsh chemicals or abrasive cleaners.
- Storage: When not in use for extended periods, store the charger in a cool, dry place, away from direct sunlight and extreme temperatures.
- Contact Points: Periodically inspect the charging contacts within each bay for any debris or corrosion. Clean gently with a cotton swab if necessary.
Troubleshooting
If you encounter issues with your charger, refer to the table below for common problems and solutions.
| Problem | Possible Cause | Solution |
|---|
| Charger LEDs do not illuminate. | No power, loose connection, faulty power supply. | Check power cord connection to outlet and charger. Ensure outlet has power. Test with another outlet if possible. |
| Battery/radio not charging. | Incorrectly seated, incompatible battery/pod, dirty contacts, faulty battery. | Reseat battery/radio firmly. Verify battery/radio compatibility with the installed pod. Clean charging contacts. Try charging a different battery/radio. |
| LEDs flash erratically. | Battery error, temperature issue. | Remove and reinsert the battery. Ensure battery and charger are within operating temperature range. If problem persists, the battery may be faulty. |
Product Specifications
| Feature | Detail |
|---|
| Product Type | 12-Unit Rapid Charger |
| Compatible Battery Chemistries | NiCd, NiMH, Li-Ion, LiPo (based on pod selected) |
| Input Voltage | 100V – 240V AC (via external power supply) |
| Dimensions (Approx.) | 20.0 x 5.8 inches (Ultra-compact footprint) |
| Approvals | FCC, CE, UL (power supply) |
| UPC | 751354991277 |
Warranty Information
Power Products warrants this product against defects in materials and workmanship under normal use for a specified period from the date of original purchase. This warranty does not cover damage caused by misuse, abuse, unauthorized modification, or natural disasters. Please retain your proof of purchase for warranty claims. For specific warranty terms and conditions, refer to the documentation included with your product or contact customer support.
Customer Support
If you have any questions, require technical assistance, or need to report an issue that cannot be resolved using the troubleshooting guide, please contact Power Products customer support. Contact information can typically be found on the manufacturer's official website or on the product packaging.
Please have your product model number (TWC12M) and purchase information ready when contacting support.


