1. Safety Information
Please read all instructions carefully before operating the appliance to ensure safe and efficient use. Retain this manual for future reference.
- Electrical Safety: Ensure the unit is connected to a properly grounded electrical outlet with the correct voltage as specified on the product label. Do not use extension cords.
- Ventilation: Maintain adequate clearance around the unit for proper ventilation. Blocked vents can lead to overheating and reduced efficiency.
- Heavy Appliance: This appliance is heavy. Use appropriate lifting techniques and equipment when moving to prevent injury.
- Cleaning: Disconnect power before cleaning or performing any maintenance. Use non-abrasive cleaners.
- Flammable Materials: Do not store explosive substances or flammable materials inside or near the refrigerator.
2. Product Overview
The True TUC-60-HC is a 60-inch two-section undercounter refrigerator designed for commercial use, featuring solid stainless steel doors and a robust construction for durability and performance.
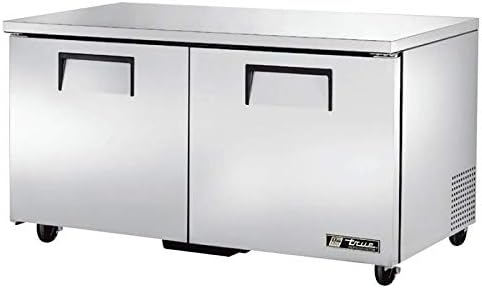
Front view of the True TUC-60-HC undercounter refrigerator, showcasing its stainless steel finish and two solid doors.
Key Features:
- 60-inch width, two-section design
- Solid stainless steel doors
- 15.5 Cubic Feet capacity
- Automatic defrost system
- Undercounter installation type
- Durable stainless steel construction
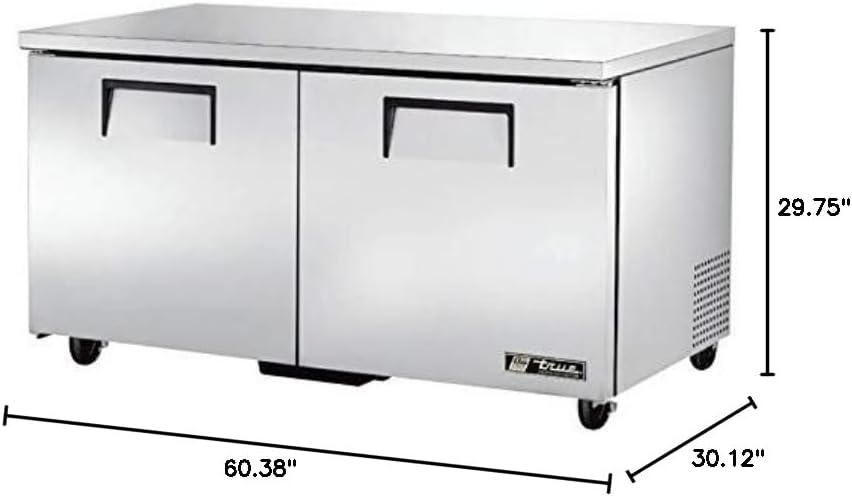
Diagram showing the dimensions of the True TUC-60-HC refrigerator: 60.38 inches width, 30.13 inches depth, and 29.75 inches height.
3. Setup
3.1 Unpacking
- Carefully remove all packaging materials, including tape and protective films.
- Inspect the unit for any shipping damage. Report any damage to the carrier immediately.
- Remove any internal packing materials and accessories.
3.2 Placement
- Place the refrigerator on a strong, level surface capable of supporting its weight when fully loaded.
- Ensure adequate air circulation around the unit. Do not block the condenser air intake or exhaust vents.
- Avoid direct sunlight or proximity to heat-generating appliances (ovens, stoves) to maintain optimal performance.
3.3 Electrical Connection
- Before plugging in, ensure the power supply matches the voltage and amperage requirements listed on the unit's serial tag.
- Plug the unit directly into a dedicated, grounded electrical outlet. Do not use adapter plugs or extension cords.
3.4 Initial Cleaning
- Before first use, clean the interior and exterior surfaces with a mild soap and water solution.
- Wipe dry with a soft cloth.
4. Operating Instructions
4.1 Powering On and Temperature Control
- After setup, plug in the unit. The compressor will start automatically.
- Allow the refrigerator to run for several hours (typically 2-4 hours) to reach its set temperature before loading products.
- Temperature settings are typically adjusted via a digital controller located on the front or interior of the unit. Refer to the specific controller's instructions for detailed adjustment procedures.
4.2 Loading the Refrigerator
- Distribute items evenly on the shelves to ensure proper air circulation.
- Do not overload shelves beyond their weight capacity.
- Avoid blocking the internal air vents to maintain consistent temperatures.
4.3 Door Operation
- Ensure doors close completely after each use to maintain internal temperature and energy efficiency.
- Check door gaskets regularly for wear or damage that could compromise the seal.
5. Maintenance
5.1 Regular Cleaning
- Interior: Clean the interior weekly with a mild, non-abrasive cleaner and warm water. Rinse thoroughly and dry.
- Exterior: Wipe down stainless steel surfaces regularly with a soft cloth and a stainless steel cleaner to maintain appearance.
- Condenser Coil: The condenser coil should be cleaned monthly or quarterly, depending on the operating environment. Disconnect power, locate the coil (usually at the rear or bottom), and use a brush or vacuum cleaner to remove dust and debris. A dirty coil reduces efficiency and can lead to compressor failure.
5.2 Gasket Inspection
- Inspect door gaskets monthly for cracks, tears, or stiffness. Damaged gaskets can lead to air leaks and increased energy consumption.
- Clean gaskets with warm, soapy water to keep them pliable and ensure a good seal.
5.3 Automatic Defrost
This unit features an automatic defrost system, eliminating the need for manual defrosting. Ensure the drain pan is clear and the drain line is not obstructed to allow proper water evaporation.
6. Troubleshooting
Before contacting service, review these common issues and solutions:
| Problem | Possible Cause | Solution |
|---|---|---|
| Unit not cooling | No power; thermostat set too high; dirty condenser coil; door left open | Check power supply; adjust thermostat; clean condenser coil; ensure door is closed |
| Excessive noise | Unit not level; loose components; fan obstruction | Level the unit; check for loose parts; clear fan obstruction |
| Water on floor | Clogged drain line; drain pan overflow | Clear drain line; ensure drain pan is correctly positioned |
7. Specifications
| Feature | Detail |
|---|---|
| Brand | TRUE |
| Model Number | TUC-60-HC |
| Product Dimensions | 30.13"D x 60.38"W x 29.75"H |
| Capacity | 15.5 Cubic Feet |
| Installation Type | Undercounter |
| Form Factor | Undercounter |
| Special Feature | Compact |
| Color | Stainless Steel |
| Defrost System | Automatic |
| Door Material Type | Stainless Steel |
| Number of Shelves | 5 |
| Number Of Doors | 2 |
| Certification | NEMA |
8. Warranty and Support
For warranty information or technical support, please refer to the warranty card included with your product or visit the official TRUE website. Contact details for customer service are typically available on the manufacturer's website.


