MindWare MW-24736
MindWare Dig It up! Triceratops Instruction Manual
Model: MW-24736
Introduction
Welcome to the exciting world of paleontology! The MindWare Dig It up! Triceratops kit allows you to experience the thrill of discovering and assembling a dinosaur skeleton. This kit provides all the necessary tools to excavate a plaster block and uncover the hidden bones of a Triceratops, which can then be assembled into a 12-inch model.

Image: The MindWare Dig It up! Triceratops kit box, showing the product name, a 3D skeleton image, and indicating it's for ages 8+.
What's Included:
- 1 x Fossil Block (containing 20 Triceratops skeleton pieces)
- 1 x Hammer Tool
- 1 x Flat Chisel Tool
- 1 x Point Chisel Tool
- 1 x Brush
- 1 x Sponge
- Instruction Manual
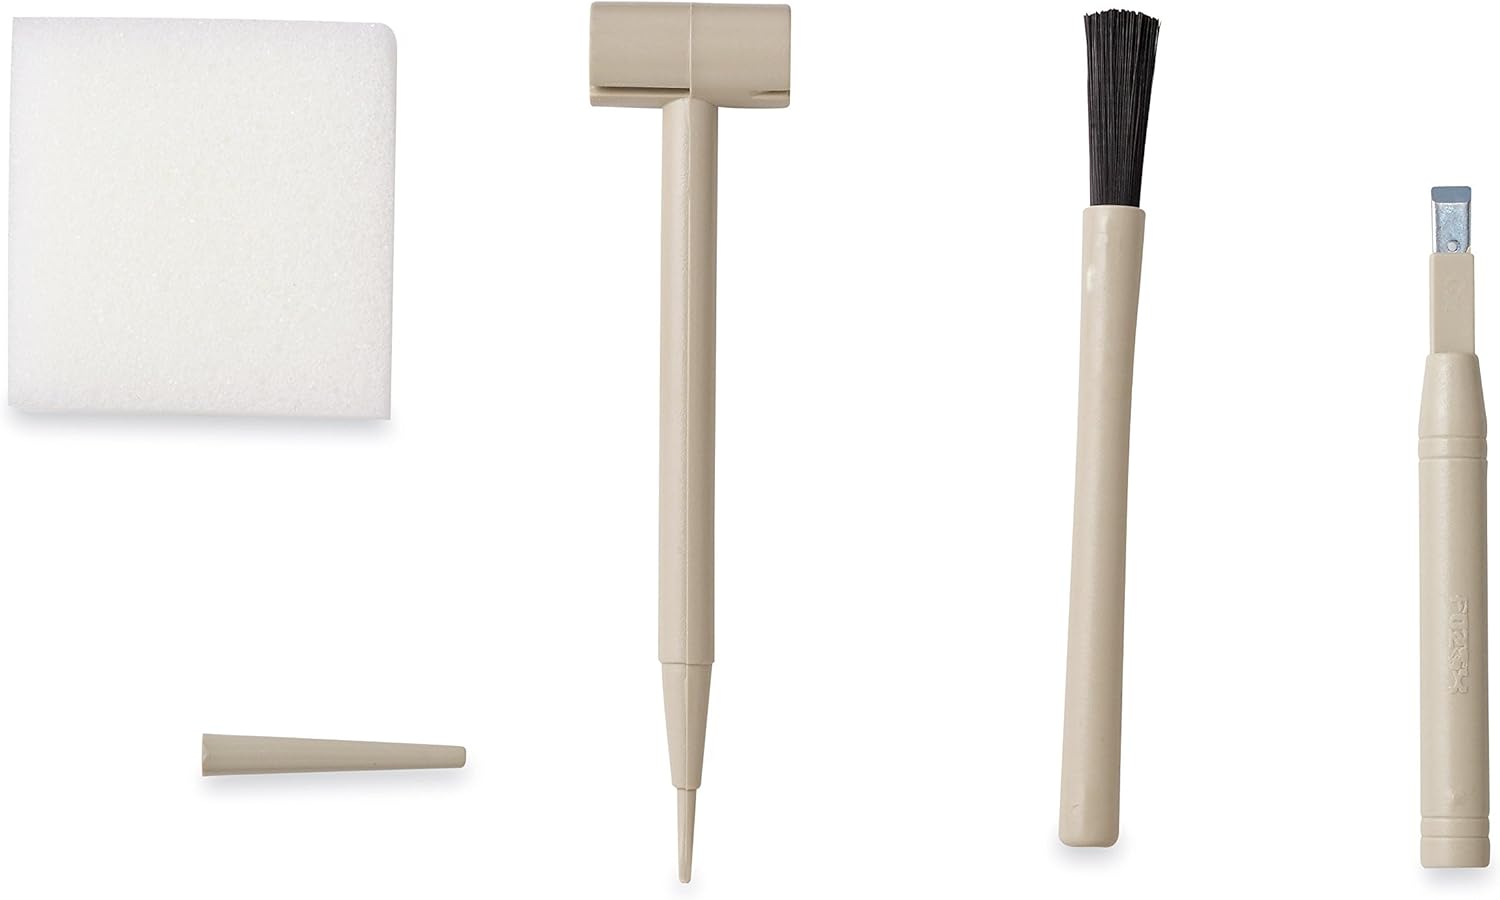
Image: A close-up of the excavation tools: a white sponge, a hammer tool, a brush, and two chisel tools.
Safety Information
WARNING: CHOKING HAZARD - Small parts. Not for children under 3 years.
- Recommended for ages 8 and up. Adult supervision is recommended, especially during excavation.
- The fossil block material may create dust. Perform excavation in a well-ventilated area or outdoors.
- Protect your work surface with newspaper or a plastic sheet to contain dust and debris.
- Avoid inhaling dust. If dust gets into eyes, rinse thoroughly with water.
- Do not ingest any parts of the kit.
- Handle tools with care to prevent injury.
Setup
- Choose a Work Area: Select a flat, stable surface. This activity can be messy, so it is highly recommended to work outdoors or cover your indoor work area with old newspapers, a plastic tablecloth, or a large tray.
- Gather Supplies: Have a small bowl of water ready for cleaning the tools and excavated pieces. A damp cloth can also be useful.
- Prepare the Fossil Block: Carefully remove the fossil block from its packaging.
Operating Instructions
1. Excavation
The goal is to carefully chip away the plaster block to reveal the hidden dinosaur skeleton pieces without damaging them.
- Begin Digging: Use the hammer tool to gently tap the chisel tools into the plaster block. Start from the edges and work your way inwards.
- Chip Away: Use the flat chisel for broader areas and the point chisel for more precise work around the bones.
- Clear Debris: As you excavate, use the brush to sweep away loose plaster dust and debris, revealing the bones.
- Moisten (Optional): If the plaster is too hard, you may lightly dampen the sponge with water and dab it onto the block to soften it. Do not soak the block, as this can make it muddy and difficult to work with.
- Locate All Pieces: Continue chipping and brushing until all 20 skeleton pieces are found. Be patient, as this process takes time and care.

Image: An overhead view of a fossil block being excavated, showing several bone pieces already uncovered and excavation tools nearby.
2. Cleaning the Bones
Once all pieces are excavated, they need to be cleaned before assembly.
- Rinse: Gently rinse each skeleton piece under running water to remove any remaining plaster dust.
- Brush Clean: Use the brush to scrub off stubborn bits of plaster.
- Dry: Allow all pieces to air dry completely before attempting assembly.
3. Assembly
The Triceratops skeleton consists of 20 pieces that snap together. Refer to the piece guide for assistance.
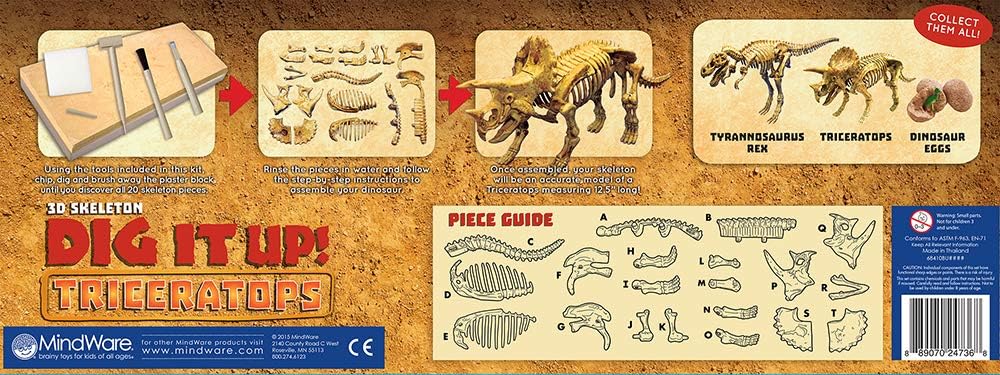
Image: The back of the product box, illustrating the excavation process, the individual bone pieces, and the final assembled Triceratops skeleton, along with a detailed piece guide.
- Identify Pieces: Lay out all 20 cleaned and dried pieces. Use the piece guide provided on the back of the product box (or a printed copy if available) to identify each part.
- Connect Joints: The bones are designed to snap together. Match the corresponding joints and gently push them until they click into place.
- Follow Sequence: It is often easiest to start with the main body sections (spine, rib cage) and then attach the legs, head, and tail.
- Final Assembly: Continue connecting pieces until the full Triceratops skeleton is formed. The assembled model will measure approximately 12 inches long.
- Reassembly: The skeleton can be disassembled and reassembled repeatedly for continued play or display.

Image: A fully assembled, light brown Triceratops skeleton model standing on a white background, showcasing its detailed bone structure.
Maintenance
- Cleaning: The skeleton pieces can be wiped clean with a damp cloth if they become dusty. Avoid harsh chemicals.
- Storage: Store the skeleton pieces or the assembled model in a dry place away from direct sunlight to prevent material degradation.
- Tool Care: Clean the excavation tools after each use and store them in a safe place.
Troubleshooting
| Problem | Solution |
|---|---|
| Plaster block is too hard to excavate. | Lightly dampen the sponge and dab it onto the block to soften the plaster. Do not over-wet. |
| Difficulty finding all 20 pieces. | Continue carefully chipping and brushing the entire block. Some pieces may be very small or deeply embedded. |
| Skeleton pieces do not snap together. | Ensure pieces are completely clean and dry. Refer to the piece guide to confirm correct matching. Apply gentle, firm pressure. |
| Excessive dust during excavation. | Work outdoors or in a well-ventilated area. Use newspaper or a plastic sheet to contain dust. Consider wearing a dust mask if sensitive. |
Specifications
- Product Dimensions: 17.7 x 6.9 x 2.2 inches
- Item Weight: 4.62 pounds
- Item Model Number: MW-24736
- Manufacturer Recommended Age: 8 years and up
- Country of Origin: China
- Manufacturer: MindWare
- Release Date: September 4, 2018
Warranty and Support
MindWare products are designed for quality and educational value. For any questions regarding your Dig It up! Triceratops kit, please contact MindWare customer support.
MindWare Contact Information:
- Website: www.mindware.com
- Customer Service: Refer to the MindWare website for current contact methods (phone, email, or contact form).
Please retain your purchase receipt for any warranty claims or support inquiries.
Ask a question about this manual
Ask about setup, troubleshooting, compatibility, parts, safety, or missing instructions. Manuals+ will review the question and use this page’s manual context to help answer it.