
1. Product Overview
The eMylo DC 12V 2X 2 Channels 433Mhz Wireless RF Relay Remote Control Switch system provides a reliable solution for wireless control of various electrical devices. This kit includes two transmitters and a receiver, designed for applications such as garage doors, motors, lights, and security systems. It utilizes RF technology for stable and long-distance signal transmission, offering flexible configuration and independent control without mutual interference.

Figure 1: eMylo Wireless RF Relay Remote Control Switch Kit, showing two white receiver modules and two black remote control transmitters with keychains.

Figure 2: Close-up view of the eMylo receiver module with its cover removed, revealing the internal circuit board, relays, and wiring terminals.
2. Setup and Installation
2.1. Wiring Diagrams
Proper wiring is crucial for the safe and correct operation of the eMylo RF Relay Switch. Refer to the diagrams below for common application scenarios. Ensure all power is disconnected before performing any wiring.

Figure 3: Comprehensive wiring diagrams for the eMylo receiver. Diagram I illustrates wiring for a light using 6/12/24V DC. Diagram II shows wiring for a motor using 6/12/24V DC. Diagram III details wiring for a light using 110V/240V AC, including live and null lines. Each diagram highlights power indicators, signal indicators, programming button, and output terminals.
- Diagram I: Wiring for Light (DC) - Connect the 6/12/24V DC power supply to the input terminals (Anode and Cathode). Connect the light to the output terminals (Light).
- Diagram II: Wiring for Motor (DC) - Connect the 6/12/24V DC power supply to the input terminals. Connect the motor to the output terminals (Motor).
- Diagram III: Wiring for Light (AC 110V/240V) - Connect the 110V/240V AC live line and null line to the designated input terminals. Connect the light to the output terminals.
Always ensure correct polarity for DC connections and proper live/null line connections for AC. If unsure, consult a qualified electrician.
3. Operation
3.1. Operating Modes
The eMylo RF Relay Switch supports three primary operating modes: Momentary, Latched, and Toggle. The available modes depend on the number of buttons on your transmitter and the number of channels on the receiver.

Figure 4: Visual representation of the three operating modes: Momentary, Latched, and Toggle. Each mode illustrates the interaction between the remote control and the receiver to control a light.
- Momentary Mode: The relay remains ON only while the transmitter button is pressed and held. Releasing the button turns the relay OFF. (e.g., Press A: ON, Release A: OFF)
- Latched Mode: Pressing a button turns the relay ON, and it stays ON until another specific button is pressed to turn it OFF. (e.g., Press A: ON, Press B: OFF)
- Toggle Mode: Pressing the same button once turns the relay ON, and pressing it again turns the relay OFF. (e.g., Press A: ON, Press A again: OFF)
3.2. Mode Setting Compatibility
The table below outlines the settable modes based on your transmitter's button count and receiver's channel count. The "Mode by Default" indicates the factory-set mode.

Figure 5: Table detailing the compatibility of operating modes (Momentary, Latched, Toggle) based on the number of buttons on the transmitter and channels on the receiver, for both single and multiple receiver setups.
| Key Number | Channel Number | Settable Mode | Mode by Default |
|---|---|---|---|
| Single Receiver | |||
| 2 Buttons | 2 Channels | Momentary Latched | Latched |
| 3 Buttons | 2 Channels | Momentary Latched Toggle | Toggle |
| Multiple Receivers | |||
| 2 x 2 Channels | Momentary Latched | Latched | |
| 3 x 2 Channels | Momentary Latched | Latched | |
| 4 x 2 Channels | Momentary Latched | Latched | |
| 6 x 2 Channels | Momentary Latched | Latched | |
Note: The available operating modes depends on the number of buttons on the Transmitter and the number of channels on the receiver.
3.3. Switching Mode & Pairing Transmitter and Receiver
The transmitter and receiver are typically paired at the factory. If you need to change the operating mode or re-pair, follow these steps:
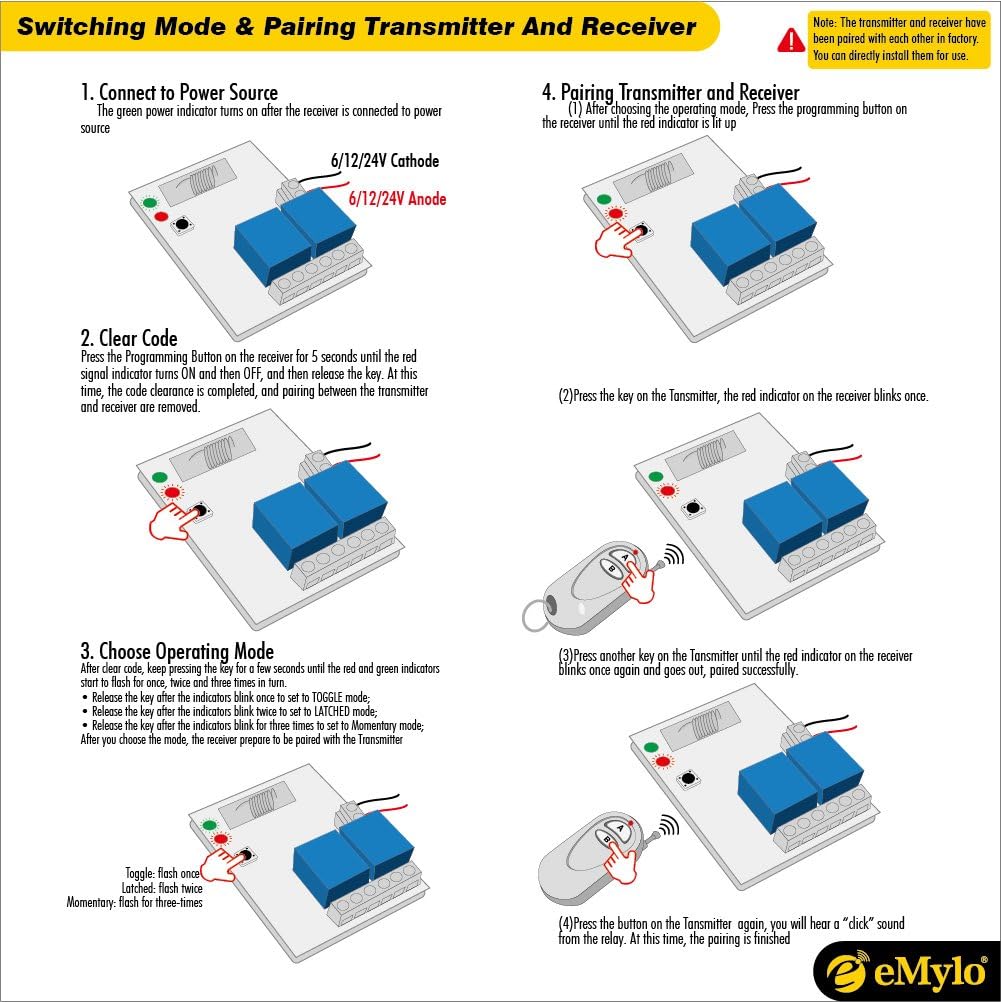
Figure 6: Step-by-step visual guide for connecting power, clearing codes, choosing operating modes, and pairing the transmitter with the receiver.
- Connect to Power Source: Ensure the green power indicator on the receiver turns ON after connecting to the power source.
- Clear Code: Press the Programming Button on the receiver for 5 seconds until the red signal indicator turns ON and then OFF. Release the key. At this point, the code clearance is completed, and any previous pairing between the transmitter and receiver is removed.
- Choose Operating Mode: After clearing the code, press the Programming Button again for a short duration (e.g., 1-3 seconds) to cycle through modes. The red indicator will flash to confirm the mode:
- Flash once: Toggle mode
- Flash twice: Latched mode
- Flash three times: Momentary mode
- Pairing Transmitter and Receiver: After choosing the operating mode, press the Programming button on the receiver until the red indicator lights up. Then, press any key on the Transmitter. The red indicator on the receiver will blink once. Press another key on the Transmitter until the red indicator blinks once again and goes out. Finally, press the button on the Transmitter you wish to use for control; you should hear a "click" sound from the relay, indicating successful pairing.
4. Maintenance
To ensure the longevity and optimal performance of your eMylo RF Relay Remote Control Switch, follow these maintenance guidelines:
- Keep Dry: Protect the receiver and transmitters from moisture and humidity. Water can damage internal electronic components.
- Clean Gently: Use a soft, dry cloth to clean the devices. Avoid using harsh chemicals or abrasive cleaners.
- Check Connections: Periodically inspect all wired connections to the receiver to ensure they are secure and free from corrosion.
- Battery Replacement (Transmitter): While batteries are not included with the product, if you install them, replace them when the remote's range decreases or it becomes unresponsive. The transmitter typically uses an A27 type battery.
- Avoid Extreme Temperatures: Do not expose the devices to extremely high or low temperatures, as this can affect performance and lifespan.
5. Troubleshooting
If you encounter issues with your eMylo RF Relay Remote Control Switch, refer to the following common problems and solutions:
| Problem | Solution |
|---|---|
| Remote control does not work or has short range. |
|
| Device connected to relay does not turn ON/OFF. |
|
| Receiver red indicator does not light up during pairing. |
|
| Relay clicks but device does not respond. |
|
If the problem persists after trying these solutions, please contact customer support.
6. Product Specifications
Detailed technical specifications for the eMylo DC 12V 2X 2 Channels 433Mhz Wireless RF Relay Remote Control Switch:
| Feature | Detail |
|---|---|
| Brand | eMylo |
| Model Number | EBM114C4E |
| ASIN | B01A6VOVJ8 |
| Connector Type | Through Hole |
| Contact Type | Normally Open |
| Current Rating | 10 Amps |
| Mounting Type | DIN Rail Mount |
| Operation Mode | Manual (for programming) |
| Coil Resistance | 433 Milliohms |
| Coil Voltage | 12 Volts |
| Contact Current Rating | 10 Amps |
| Maximum Switching Current | 10 Amps |
| Maximum Switching Voltage | 12 Volts (DC) |
| Minimum Switching Voltage | 12 Volts (DC) |
| Specification Met | CE |
| Item Weight | 8.1 ounces |
| Package Dimensions | 6.38 x 3.39 x 2.32 inches |
| Item Package Quantity | 1 |
| Measurement System | Imperial, Metric |
| Batteries Included? | No |
| Batteries Required? | No (for receiver), Yes (for transmitter, A27 type) |
| Date First Available | January 13, 2016 |
7. Warranty and Customer Support
7.1. Return Policy
This product is subject to a 30-day refund/replacement policy from the date of purchase. Please refer to the retailer's specific return guidelines for detailed information.
7.2. Customer Support
For further assistance, technical support, or inquiries regarding your eMylo product, please contact the manufacturer or seller directly. You can typically find contact information on the product packaging or through the online retailer's platform where the product was purchased.
Manufacturer: eMylo
Seller: eMylo® (via Amazon)
For general information about eMylo products, you may visit the eMylo Store on Amazon.