1. Introduction
The Rockville RXA-F1 is a high-performance 4-channel car amplifier designed to deliver powerful and clear audio. This manual provides essential information for proper installation, operation, and maintenance to ensure optimal performance and longevity of your amplifier.

Figure 1: Rockville RXA-F1 4-Channel Car Amplifier
2. What's in the Box
- Amplifier
- High Level Input Wire
- Fuse
- Mounting Screws
- User Manual
Figure 2: Amplifier and included accessories. The image displays the Rockville RXA-F1 amplifier along with its high-level input wire, fuse, mounting screws, and user manual.
3. Features
- Powerful 4-Channel Performance: 1600W peak, Dyno-Certified 400W RMS for high-quality sound; bridgeable to 2 channels for 200W each at 4 ohms.
- High-Speed MOSFET Power & Bipolar Transistors: Features a MOSFET power supply and bipolar output stage transistors for stable, efficient power.
- Precision Audio Control: Fully adjustable 12dB bass EQ, 12dB/octave crossovers, and band-pass control offer complete sound customization.
- Versatile Installation Options: High-level inputs allow connection to factory or aftermarket receivers; auto-start feature eliminates remote wiring needs.
- Premium Components for Clear Sound: Equipped with ELNA audiophile-grade capacitors and full IC-controlled protection for crisp, distortion-free audio.

Figure 3: Internal view of the amplifier highlighting ELNA audiophile capacitors. These components contribute to precise, high-fidelity sound by reducing distortion and enhancing audio clarity.

Figure 4: Diagram illustrating the amplifier's internal components and protection features, including MOSFET Power Supply, Under/Over Voltage Protection, Bipolar Output Stage Transistors, Mute and Delay Soft Start, and RCA Preamp Line Output.
4. Setup & Installation
Proper installation is crucial for the performance and safety of your amplifier. Ensure the vehicle's battery is disconnected before beginning installation.
4.1 Power Connections
Connect the +12V terminal to the positive terminal of the car battery using a suitable gauge power cable. Connect the GND terminal to a solid chassis ground point. The REM (Remote) terminal should be connected to the remote turn-on output of your head unit. The amplifier features a 60-Amp Maxi Fuse for protection.

Figure 5: Rear panel of the amplifier showing power input terminals (+12V, REM, GND) and the 60-Amp Maxi Fuse. This panel also includes speaker output terminals for channels 1-4.
4.2 Speaker Connections
The RXA-F1 is a 4-channel amplifier. Connect your speakers to the CH1, CH2, CH3, and CH4 output terminals. The amplifier supports 2-ohm stable stereo and 4-ohm mono bridgeable configurations. Refer to the diagram on the amplifier for bridging instructions.

Figure 6: Close-up of the amplifier's rear panel, detailing the 60-Amp Maxi Fuse and the speaker output terminals. The panel indicates minimum impedance for 2-ohm stereo and 4-ohm mono bridged configurations.
4.3 Input Connections
Use RCA cables to connect your head unit's preamp outputs to the amplifier's RCA inputs (CH1/CH2 and CH3/CH4). If your head unit does not have RCA outputs, use the provided high-level input wire to connect to your speaker-level outputs.
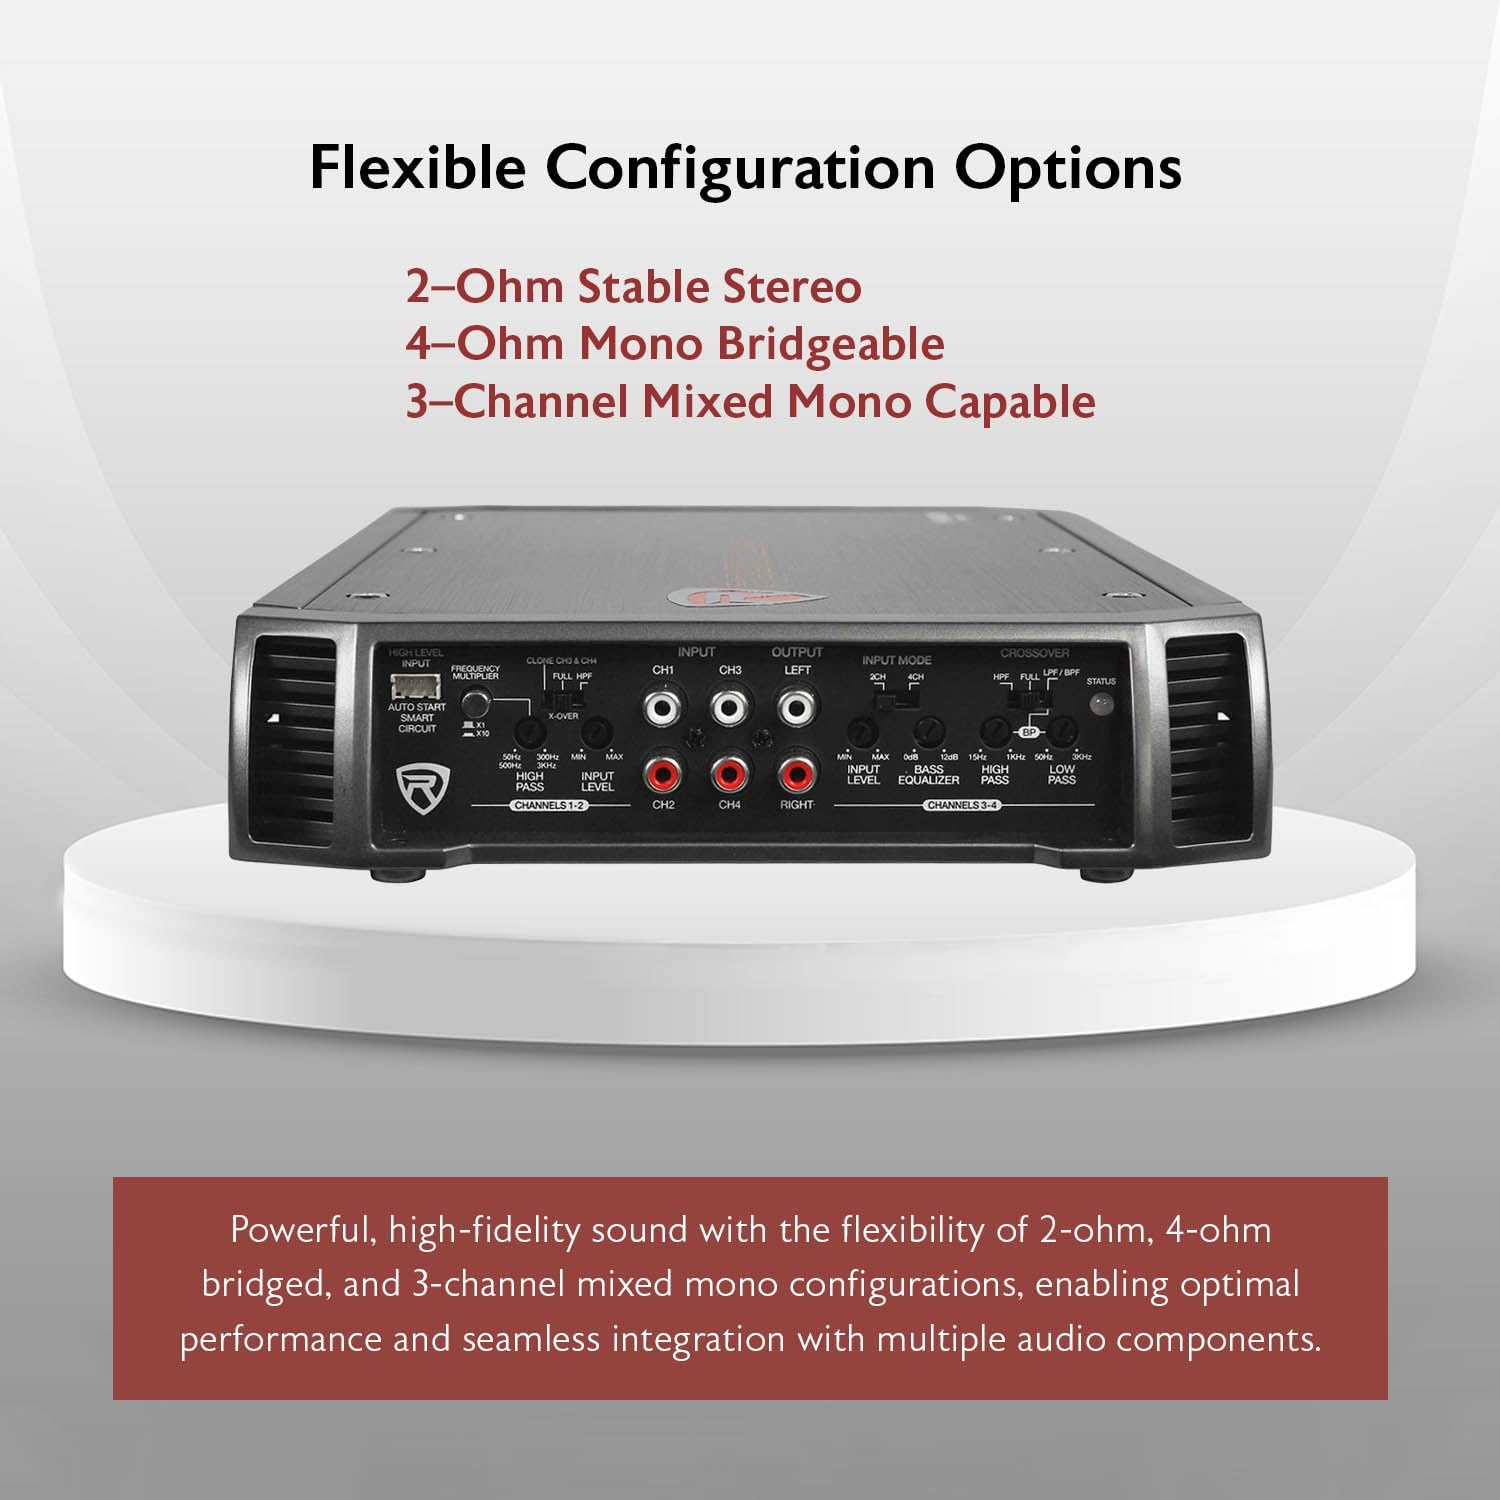
Figure 7: Front panel of the amplifier showing RCA inputs (CH1/CH2, CH3/CH4), RCA outputs, and the high-level input connector. This panel also features various audio control knobs and switches.
4.4 Auto-Start Smart Circuit
The amplifier features an auto-start smart circuit. When using high-level inputs, this circuit detects an audio signal from your head unit and automatically turns the amplifier on, eliminating the need for a separate remote turn-on wire.
5. Operating Instructions
The RXA-F1 offers extensive controls for fine-tuning your audio system.
5.1 Input Level Control
Adjust the Input Level knob to match the output voltage of your head unit. Start with the gain at minimum and slowly increase until you hear distortion, then back off slightly.
5.2 Bass Equalizer
The fully adjustable 12dB Bass Equalizer allows you to boost or cut bass frequencies to your preference.
5.3 Crossover Controls
The amplifier features a fully adjustable 12dB/Octave crossover with differential circuitry. You can select between High Pass Filter (HPF), Low Pass Filter (LPF), or Full Range modes for each pair of channels (CH1/CH2 and CH3/CH4).
- CH3 & CH4 Low Pass: 50Hz - 3KHz
- CH3 & CH4 High Pass: 15Hz - 1KHz
- CH1 & CH2 High Pass: 50Hz - 300Hz, 500Hz - 3Khz (x10)

Figure 8: Front panel of the amplifier, illustrating the various crossover and equalizer controls. These controls allow for precise filtering of low and high frequencies to optimize audio output for different speaker types.
5.4 Input Mode Switch
The 2 CH / 4 CH Input Mode Switch allows you to select how the input signals are routed to the amplifier's channels.
5.5 Status LED Indicator
The Status Mode LED Indicator provides visual feedback on the amplifier's operational status.
Video 1: An overview of the Rockville RXA-F1 amplifier, detailing its features, connections, and controls. This video provides a visual guide to understanding and operating the amplifier.
6. Maintenance
To ensure the longevity and optimal performance of your RXA-F1 amplifier, follow these maintenance guidelines:
- Cleaning: Regularly clean the amplifier's exterior with a soft, dry cloth. Avoid using harsh chemicals or abrasive cleaners.
- Ventilation: Ensure the amplifier has adequate ventilation. Do not block the cooling fins or install the amplifier in an enclosed space without proper airflow.
- Connections: Periodically check all power, ground, remote, and speaker connections to ensure they are secure and free from corrosion.
- Fuse Replacement: If the amplifier's fuse blows, replace it only with a fuse of the same type and rating (60-Amp Maxi Fuse). Using an incorrect fuse can damage the amplifier or cause a fire.
7. Troubleshooting
If you experience issues with your RXA-F1 amplifier, consult the following troubleshooting guide:
- No Power:
- Check the main fuse and replace if blown.
- Verify +12V, GND, and REM connections are secure and receiving proper voltage.
- Ensure the auto-start smart circuit is functioning correctly if using high-level inputs.
- No Sound:
- Check all RCA or high-level input connections.
- Verify speaker connections are secure and not shorted.
- Adjust input level (gain) settings.
- Check head unit output.
- Distorted Sound:
- Reduce input level (gain) settings.
- Check speaker impedance; ensure it matches amplifier capabilities.
- Adjust crossover settings to prevent speakers from playing frequencies they cannot handle.
- Amplifier Overheating:
- Ensure adequate ventilation around the amplifier.
- Check speaker impedance; running below minimum impedance can cause overheating.
- Reduce volume or gain settings.
8. Specifications
| Item Model Number | RXA-F1 |
| Brand | Rockville |
| Number of Channels | 4 |
| Output Power (CEA-2006 Compliant) | 65W x 4 @ 4 Ohms, 95W x 4 @ 2 Ohms (<1% THD) |
| RMS Output (Non-CEA) | 4 x 200W @ 2 Ohms, 2 x 400W @ 4 Ohms (Bridged) |
| Peak Output | 1600W |
| Minimum THD | < 0.05% |
| Frequency Response | 10Hz - 40KHz |
| Damping Factor | > 200 @ 100Hz |
| Maximum Supply Voltage | 12 Volts (DC) |
| Minimum Supply Voltage | 12 Volts (DC) |
| Item Dimensions (L x W x H) | 13" x 8.5" x 1.8" |
| Item Weight | 13 ounces |
| Fuse | 60 Amp Maxi Fuse |

Figure 9: Amplifier highlighting key performance metrics: Dyno-Certified RMS Power (4 x 95 Watts @ 2 Ohm), Frequency Response (10Hz–40KHz), and Damping Factor (>200 @ 100 Hz).
9. Warranty and Support
The Rockville RXA-F1 amplifier comes with a 1-Year Warranty from the date of purchase. For technical support, troubleshooting assistance, or warranty claims, please contact Rockville customer service. Ensure you have your proof of purchase and product model number available when contacting support.
For further assistance, please visit the official Rockville website or contact your authorized dealer.