
Introduction
This manual provides instructions for the proper installation, operation, and maintenance of the Cole-Parmer In-line Double-Junction pH Electrode, Model AO-27001-90. This electrode is designed for continuous pH measurement in various industrial and laboratory applications. Please read this manual thoroughly before using the electrode to ensure safe and efficient operation.
Safety Information
Observe the following safety precautions to prevent injury and damage to the electrode:
- Always handle the electrode with care to avoid physical damage to the glass bulb.
- Ensure proper electrical connections are made according to the pH meter's specifications.
- Do not exceed the specified operating temperature and pressure limits.
- Wear appropriate personal protective equipment (PPE) when handling chemicals or working in a laboratory environment.
- Dispose of used calibration solutions and cleaning agents according to local regulations.
Product Overview
The Cole-Parmer Model AO-27001-90 is an in-line, double-junction pH electrode featuring a robust PVC housing and a 10-foot cable with a BNC connector. It is designed for continuous pH monitoring in process lines.
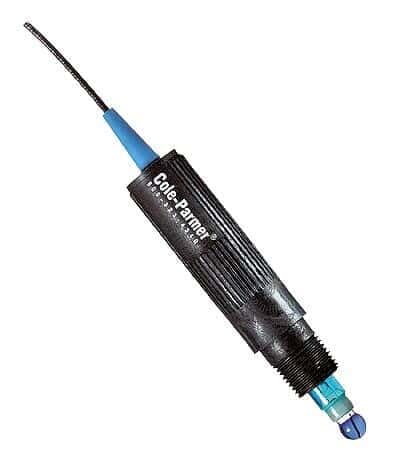
Figure 1: Cole-Parmer In-line Double-Junction pH Electrode (Model AO-27001-90). This image shows the black PVC housing with the Cole-Parmer logo, the blue BNC connector cable, and the glass pH sensing bulb at the tip.
Key Features:
- In-line Design: Suitable for direct installation into process piping.
- Double-Junction: Provides enhanced resistance to contamination, extending electrode lifespan in challenging samples.
- PVC Housing: Chemical-resistant housing with 1/2'' NPT thread for secure mounting.
- Wide Operating Range: Measures pH from 0 to 13.
- Temperature Range: Operates from 0 to 100 °C (32 to 212 °F).
- BNC Connector: Standard connector for compatibility with most pH meters.
Setup and Installation
- Unpacking: Carefully remove the electrode from its packaging. Inspect for any visible damage.
- Rinsing: Rinse the electrode tip with distilled or deionized water to remove any storage solution.
- Mounting:
- The electrode features a 1/2'' NPT thread for in-line installation.
- Ensure the mounting point is secure and provides adequate access for maintenance.
- Use appropriate sealing materials (e.g., PTFE tape) on the threads to prevent leaks.
- The electrode extends 1'' beyond the housing when installed. Ensure sufficient clearance within the process line.
- Connecting to pH Meter:
- Connect the BNC connector of the electrode cable to the corresponding BNC input on your pH meter.
- Ensure the connection is tight and secure.
- Initial Soaking: For optimal performance, soak the electrode tip in a pH 7 buffer solution for at least 30 minutes before initial use or after prolonged dry storage.
Operation
Once installed and connected, the pH electrode continuously measures the pH of the solution it is immersed in. The pH meter will display the reading.
General Operating Guidelines:
- Ensure the electrode tip is fully immersed in the sample or process stream during measurement.
- Allow sufficient time for the reading to stabilize before recording.
- Regularly check the pH meter's manual for specific operating instructions and settings.
- This electrode does not feature Automatic Temperature Compensation (ATC). If temperature fluctuations are significant, manual temperature compensation or a separate ATC probe may be required for accurate readings.
Calibration
Regular calibration is essential for accurate pH measurements. Refer to your pH meter's instruction manual for detailed calibration procedures. A typical two-point or three-point calibration is recommended using fresh pH buffer solutions.
Recommended Calibration Procedure (General):
- Prepare fresh pH buffer solutions (e.g., pH 4.01, 7.00, 10.00).
- Rinse the electrode with distilled or deionized water before and after each buffer.
- Initiate the calibration mode on your pH meter.
- Immerse the electrode in the first buffer (e.g., pH 7.00) and allow the reading to stabilize. Confirm the reading on the meter.
- Rinse the electrode.
- Immerse the electrode in the second buffer (e.g., pH 4.01 or 10.00) and allow the reading to stabilize. Confirm the reading.
- (Optional) For three-point calibration, rinse and immerse in the third buffer.
- Exit calibration mode.
Note: The frequency of calibration depends on the application, required accuracy, and sample characteristics. For continuous in-line monitoring, periodic checks against a known standard are advisable.
Maintenance and Storage
Cleaning:
- Routine Cleaning: Rinse the electrode tip with distilled or deionized water after each use or periodically during continuous operation to prevent sample buildup.
- Stubborn Deposits: For protein deposits, soak the electrode in a pepsin/HCl solution. For inorganic deposits, soak in a dilute acid solution (e.g., 0.1 M HCl). For oil/grease, clean with a mild detergent solution. Always follow with thorough rinsing.
- Avoid abrasive cleaning methods that can damage the glass bulb.
Storage:
- When not in use, keep the electrode tip moist. Store it in a pH electrode storage solution or a pH 4 buffer solution.
- DO NOT store the electrode in distilled or deionized water, as this can deplete the electrolyte and shorten its lifespan.
- Ensure the protective cap is securely placed over the electrode tip during storage.
Troubleshooting
| Problem | Possible Cause | Solution |
|---|---|---|
| Slow or Drifting Readings |
|
|
| Inaccurate Readings |
|
|
| No Reading / Erratic Reading |
|
|
Specifications
| Parameter | Value |
|---|---|
| Model Number | AO-27001-90 |
| pH Range | 0 to 13 |
| Temperature Range | 0 to 100 °C (32 to 212 °F) |
| Junction Type | Double-Junction |
| Electrode Body Material | PVC (Polyvinyl Chloride) |
| Housing Dimensions | 4'' length x 15/16'' diameter |
| Thread Size | 1/2'' NPT |
| Electrode Extension | 1'' beyond housing |
| Maximum Pressure | 100 psi |
| Cable Length | 10 feet |
| Connector Type | BNC |
| Automatic Temperature Compensation (ATC) | No (external ATC required if needed) |
Warranty and Support
For information regarding warranty coverage, technical support, or replacement parts for your Cole-Parmer pH electrode, please contact Cole-Parmer customer service or visit the official Cole-Parmer website. Ensure you have your model number (AO-27001-90) available when seeking support.
Cole-Parmer Website: www.coleparmer.com