Introduction
This manual provides detailed instructions for the safe and efficient operation, maintenance, and parts identification for your ATLAS 15-inch Drill Press. Please read this manual thoroughly before operating the machine to ensure proper usage and to prevent injury or damage. Understanding the contents of this manual is crucial for maximizing the lifespan and performance of your drill press.
Safety Instructions
Always follow basic safety precautions to reduce the risk of fire, electric shock, and personal injury. Keep your work area clean and well-lit. Do not operate power tools in explosive atmospheres, such as in the presence of flammable liquids, gases, or dust. Keep children and bystanders away from the operating machine. Wear appropriate personal protective equipment, including eye protection, hearing protection, and suitable clothing.
- Always wear safety glasses or a face shield to protect against flying debris.
- Secure the workpiece firmly to the drill press table using clamps or a vise before drilling to prevent rotation or movement.
- Do not wear loose clothing, gloves, or jewelry that can get caught in moving parts of the drill press. Tie back long hair.
- Ensure the drill bit is properly installed and tightened in the chuck before starting the machine.
- Disconnect power from the drill press before making any adjustments, changing accessories, or performing maintenance.
- Never leave the drill press running unattended.
- Use the correct speed for the material being drilled and the size of the drill bit.
Setup
Carefully unpack all components and verify them against the packing list. Place the drill press on a sturdy, level workbench capable of supporting its weight. Secure the base of the drill press to the workbench using appropriate fasteners to prevent tipping or movement during operation.
Assembly
- Attach the Column to the Base: Align the column with the mounting holes on the base and secure it using the provided bolts and washers.
- Mount the Table Support and Table: Slide the table support onto the column, followed by the table. Tighten the locking mechanisms to hold the table at the desired height.
- Install the Drill Head Assembly: Carefully lower the drill head assembly onto the top of the column and secure it according to the instructions.
- Attach the Motor and Belt Guard: Mount the motor to its bracket and install the drive belt. Secure the belt guard to cover all moving belt components.
- Connect Power: Plug the power cord into a grounded electrical outlet. Ensure the power supply matches the specifications of the drill press.
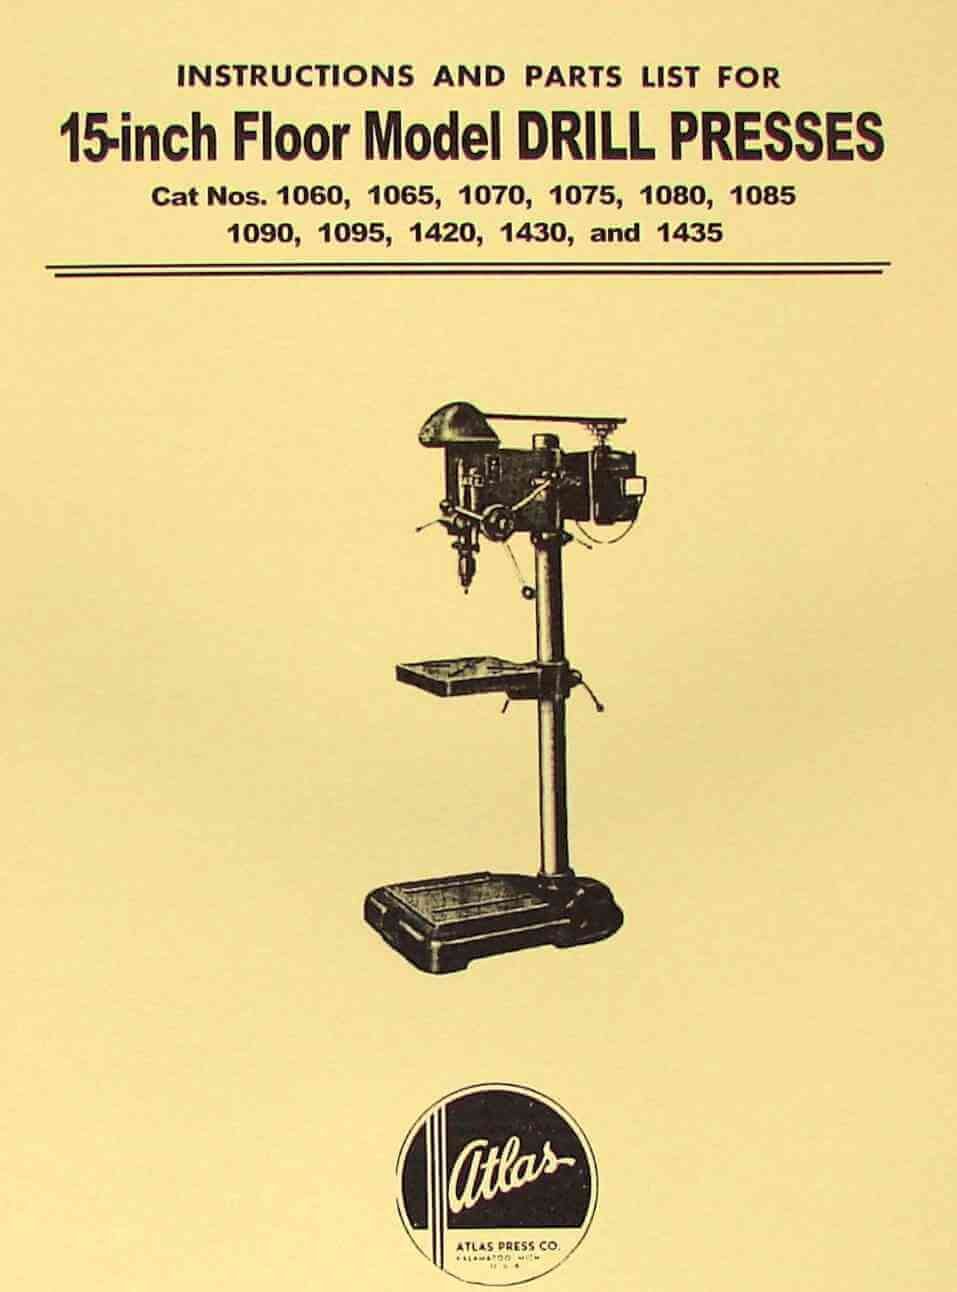
Figure 1: Main view of the ATLAS 15-inch Drill Press. This image illustrates the complete assembly of the drill press, including the sturdy base, vertical column, adjustable table, and the drill head with motor and belt guard.
Operating Instructions
Before Operation
- Inspect the drill press for any visible damage, loose parts, or missing guards. Do not operate if any issues are found.
- Ensure all guards are in place and securely fastened.
- Select the correct drill bit for the material you are drilling and the desired hole size. Ensure the drill bit is sharp.
- Adjust the table height and angle as needed for your workpiece. Lock the table securely in position.
- Set the appropriate spindle speed by adjusting the belt position on the pulleys (refer to the speed chart, if available, in the original manual).
Drilling Procedure
- Mark the precise drilling location on your workpiece.
- Secure the workpiece to the drill press table using appropriate clamps or a vise. Ensure it cannot shift during drilling.
- Lower the drill bit manually to the workpiece to align the tip with your marked drilling location.
- Turn on the drill press using the power switch. Allow the spindle to reach full speed before engaging the workpiece.
- Slowly feed the drill bit into the workpiece, applying steady, even pressure. Avoid excessive force, which can dull the bit or damage the motor.
- Retract the drill bit once the hole is complete, allowing it to clear the workpiece.
- Turn off the drill press and wait for the spindle to come to a complete stop before removing the workpiece or making any adjustments.
Maintenance
Regular maintenance ensures the longevity, optimal performance, and safe operation of your ATLAS 15-inch Drill Press. Always disconnect power from the machine before performing any maintenance or cleaning procedures.
- Cleaning: Keep the machine clean and free of dust, chips, and debris. Use a brush or shop vacuum to remove accumulated material. Avoid using compressed air, which can embed debris into bearings.
- Lubrication: Periodically lubricate moving parts such as the quill, column, and table elevating mechanism. Refer to the detailed parts diagram (if available in the original manual) for specific lubrication points and recommended lubricants.
- Belt Tension: Check and adjust belt tension regularly. A properly tensioned belt ensures efficient power transfer and reduces wear. The belt should have approximately 1/2 inch of deflection when pressed firmly.
- Chuck Maintenance: Keep the chuck jaws clean and lightly oiled to ensure smooth operation and secure gripping of drill bits. Periodically remove the chuck and clean the taper.
- Inspection: Regularly inspect all fasteners, bolts, and nuts for tightness. Check the power cord for any signs of damage or fraying.
Troubleshooting
This section provides solutions to common operational issues. If you encounter a problem not listed here, or if the suggested solutions do not resolve the issue, contact customer support.
| Problem | Possible Cause | Solution |
|---|---|---|
| Motor does not start | No power supply; tripped circuit breaker; faulty power switch; motor overload. | Check power connection and outlet; reset circuit breaker; inspect power switch for damage; allow motor to cool if overloaded. |
| Excessive vibration or noise | Loose components (e.g., head, table, motor); unbalanced drill bit; worn bearings; incorrect belt tension. | Tighten all fasteners; replace or sharpen drill bit; inspect and replace bearings if necessary; adjust belt tension. |
| Drill bit not cutting efficiently or burning wood | Dull or incorrect drill bit; incorrect spindle speed; improper feed rate; workpiece not secured. | Sharpen or replace drill bit; adjust speed according to material; adjust feed rate (slower for harder materials); ensure workpiece is clamped securely. |
| Quill sticks or is difficult to move | Lack of lubrication; dirt or debris in quill housing; damaged return spring. | Clean and lubricate the quill; inspect for obstructions; replace return spring if damaged. |
Parts List and Diagrams
This section typically contains detailed exploded-view diagrams and a comprehensive list of all replacement parts for your ATLAS 15-inch Drill Press. These diagrams are essential for identifying specific components when ordering replacement parts or performing complex repairs.
Note: Specific part numbers, exploded views, and detailed assembly diagrams are generally provided in the original physical manual. For precise diagrams and part identification, please consult the original printed manual that came with your drill press or contact ATLAS customer support directly.
Specifications
The following are general specifications for the ATLAS 15-inch Drill Press. Please refer to your specific model's documentation for exact details, as specifications may vary slightly between models.
- Model Numbers Covered: 1060, 1065, 1070, 1075, 1080, 1085, 1090, 1095, 1420, 1425, 1430, 1435
- Drill Press Size: 15-inch (referring to the swing, which is twice the distance from the column to the center of the chuck)
- Motor: Typically 1/2 HP to 3/4 HP (Horsepower)
- Voltage: 120V, 60Hz, Single Phase
- Spindle Travel: Approximately 4 to 5 inches
- Chuck Capacity: 1/2 inch or 5/8 inch (key chuck)
- Spindle Taper: Morse Taper (MT2 or similar)
- Number of Speeds: Typically 5 to 16 speeds, adjustable via belt changes
- Table Size: Approximately 10 x 10 inches (may vary)
- Weight: Varies by model, typically 100-150 lbs
Warranty and Support
For specific warranty information, technical support, or to order replacement parts, please contact ATLAS customer service or the authorized dealer from whom you purchased your drill press. When contacting support, please have your model number and purchase date readily available to expedite assistance.
Note: This manual is a reproduction. For official warranty details and the most current support information, always refer to the original product documentation provided at the time of purchase or contact the manufacturer directly.