Introduction
The AmScope SM-3T-30WY is a 7X-45X zoom stereo microscope designed for detailed observation and inspection. It features super-widefield optics, a trinocular photo port, a versatile single-arm boom stand, and a 30W LED illuminator with dual gooseneck fiber optics. This instrument provides a 4-inch (100mm) working distance and is suitable for various applications including engineering, research, engraving, gemology, and semiconductor/electronic industries.
This manual provides essential information for the proper setup, operation, and maintenance of your AmScope SM-3T-30WY stereo microscope to ensure optimal performance and longevity.
Setup Instructions
1. Unpacking and Inspection
Carefully remove all components from the packaging. Verify that all parts listed in the packing list are present and undamaged. Keep the original packaging for future transport or storage.
2. Assembling the Boom Stand
- Place the heavy base on a stable, level surface.
- Insert the vertical pillar into the designated hole on the base and secure it with the locking screw.
- Attach the horizontal arm to the vertical pillar using the provided clamp and locking knob. Ensure it is securely tightened.

Figure 1: The AmScope SM-3T-30WY stereo microscope mounted on its boom stand. This image shows the trinocular head, zoom body, and the adjustable boom arm assembly.
3. Mounting the Microscope Head
- Loosen the locking screw on the microscope head holder.
- Carefully slide the microscope's zoom body into the holder on the horizontal arm.
- Tighten the locking screw to secure the microscope head in place.
4. Installing Eyepieces
- Remove the protective caps from the eyepiece tubes on the trinocular head.
- Insert the WF10X/20 eyepieces into the tubes.
- Replace the rubber eye guards onto the eyepieces for comfortable viewing.
5. Connecting the LED Illuminator
- Connect the dual gooseneck fiber optics to the 30W LED illuminator unit.
- Position the gooseneck lights to illuminate the specimen area.
- Plug the illuminator's power cord into a suitable electrical outlet.
Operating Instructions
1. Powering On and Illumination
- Turn on the 30W LED illuminator using its power switch.
- Adjust the intensity of the LED light using the variable-intensity control knob on the illuminator.
- Position the dual gooseneck fiber optics to achieve optimal lighting for your specimen, minimizing shadows and glare.
2. Placing a Specimen
Place the specimen directly under the microscope's objective lens on the working stage. Ensure it is stable and within the working distance of 4 inches (100mm).
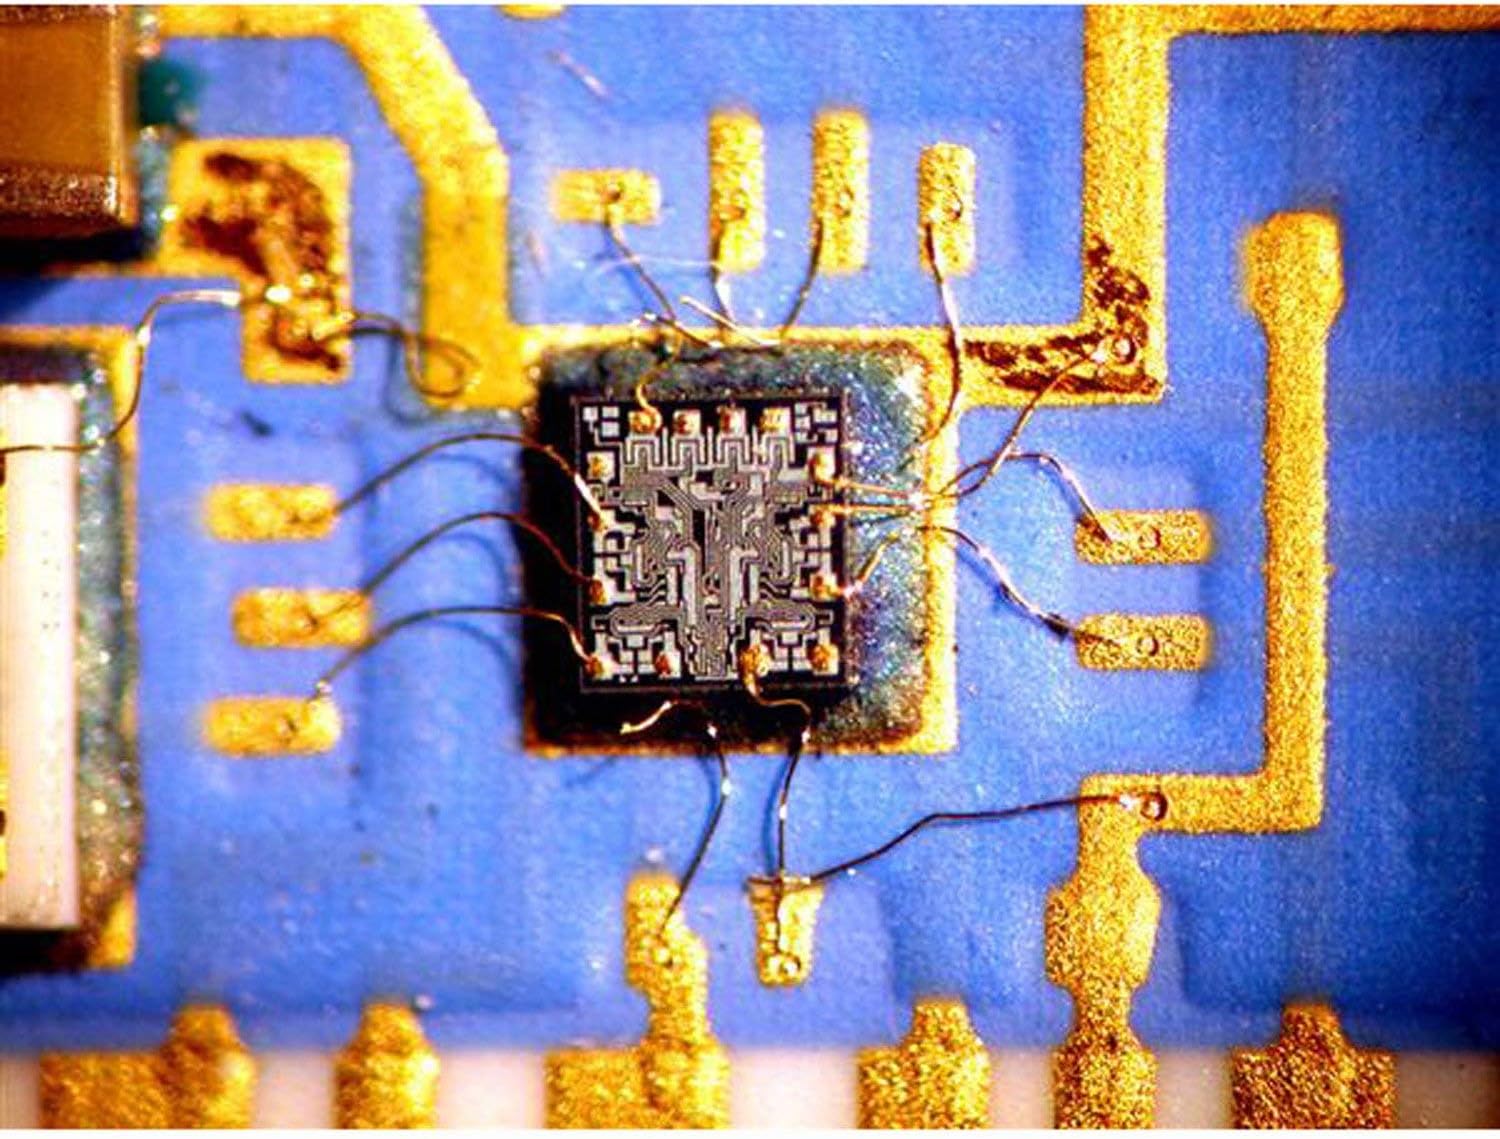
Figure 2: A magnified view through the microscope showing the intricate details of a microchip with fine wire bonding. This demonstrates the clarity and magnification capabilities.
3. Focusing and Magnification Adjustment
- Adjust the interpupillary distance by moving the eyepiece tubes closer or further apart until a single, clear circular field of view is observed.
- Use the diopter adjustment ring on one eyepiece to compensate for differences in vision between your eyes. Look through the eyepiece without the diopter adjustment, focus with the main focus knob, then switch to the other eyepiece and adjust its diopter until sharp.
- Rotate the zoom knob on the microscope head to change the magnification from 7X to 45X.
- Use the coarse and fine focus knobs on the boom stand to bring the specimen into sharp focus.

Figure 3: An even closer magnified view of a microchip, highlighting the precision of the microscope's optics. The AmScope watermark is visible, indicating the source of the image.
4. Using the Trinocular Port
The trinocular port allows for the attachment of a camera (sold separately) for digital imaging or video recording. Remove the protective cap from the trinocular port and attach your camera adapter and camera as per the camera's instructions.
Maintenance
1. Cleaning Optics
- Use a soft brush or compressed air to remove dust from lens surfaces.
- For smudges or fingerprints, use a lens cleaning solution specifically designed for optical instruments and a clean, soft lint-free cloth. Apply solution to the cloth, not directly to the lens.
- Avoid touching optical surfaces with bare hands.
2. General Cleaning
- Wipe the microscope body and stand with a soft, damp cloth. Do not use harsh chemicals or abrasive cleaners.
- Keep the microscope covered with a dust cover when not in use.
3. Storage
Store the microscope in a clean, dry environment, away from direct sunlight and extreme temperatures. If storing for an extended period, remove eyepieces and cover all openings with protective caps.
Troubleshooting
| Problem | Possible Cause | Solution |
|---|---|---|
| No illumination | Power cord not connected; illuminator switch off; LED bulb failure. | Check power connection; turn on switch; contact support for bulb replacement. |
| Image unclear/blurry | Improper focus; incorrect interpupillary distance; dirty lenses; diopter not adjusted. | Adjust focus knobs; adjust interpupillary distance; clean lenses; adjust diopter. |
| Dark spots in field of view | Dust on eyepieces or objective lens. | Clean eyepieces and objective lens. |
| Difficulty changing magnification | Zoom mechanism stiff. | Apply a small amount of silicone grease to the zoom mechanism if accessible, or contact support. |
Specifications
- Model: SM-3T-30WY
- Magnification Range: 7X-45X (Zoom Stereo)
- Head: 45° Inclined Trinocular
- Eyepieces: Super Widefield 30mm WF10X/20
- Working Distance: 4 inches (100mm)
- Illumination: 30W LED with Dual Gooseneck Fiber Optics
- Light Source Type: LED
- Color Temperature: 6400 Kelvin (Daylight-balanced)
- Stand: Versatile Single-Arm Boom Stand
- Objective Lens Description: Achromatic
- Power Source: Corded Electric
- Voltage: 240 Volts
- Item Weight: 75 Pounds
- Manufacturer: United Scope, LLC
- UPC: 840979101762
Warranty Information
The AmScope SM-3T-30WY Stereo Microscope comes with an Excellent Five (5) Year Factory Warranty. Please retain your proof of purchase for warranty claims. For detailed terms and conditions, refer to the warranty documentation included with your product or contact AmScope customer support.
Customer Support
For technical assistance, spare parts, or warranty service, please contact AmScope customer support. You can also visit the official AmScope store for more information and resources:


