1. Introduction
Thank you for choosing the CEVIK CE-HV651 HVLP Paint Turbine. This manual provides essential information for the safe and efficient operation, maintenance, and troubleshooting of your new paint sprayer. Please read these instructions carefully before initial use and keep them for future reference.
The CEVIK CE-HV651 is designed for applying various coatings, including enamels and other solvent-based paints, with a high-volume, low-pressure (HVLP) system, ensuring a fine finish and reduced overspray.
2. Safety Instructions
Always observe basic safety precautions when using electrical appliances to reduce the risk of fire, electric shock, and personal injury.
- Read all instructions: Familiarize yourself with the controls and proper use of the equipment.
- Work area: Ensure the work area is well-ventilated, clean, and well-lit. Keep children and bystanders away.
- Personal protective equipment: Always wear appropriate safety glasses, a respirator mask, gloves, and protective clothing.
- Flammable materials: Do not spray flammable materials near open flames, pilot lights, or other ignition sources.
- Electrical safety: Ensure the power cord is undamaged. Do not operate in wet conditions.
- Maintenance: Disconnect the power supply before cleaning or performing maintenance.
3. Product Overview
The CEVIK CE-HV651 HVLP Paint Turbine consists of a turbine unit that generates air pressure and a spray gun for paint application. Key components include the motor housing, air hose, spray gun, and paint container.

Image 1: The CEVIK CE-HV651 HVLP Paint Turbine, showing the main unit, spray gun, and air hose.
4. Setup
4.1. Workspace Preparation
- Ensure the work area is clean, dry, and free from dust.
- Cover adjacent areas and objects with drop cloths or masking tape to protect them from overspray.
- Provide adequate ventilation to disperse paint fumes.
4.2. Paint Preparation
- Always refer to the paint manufacturer's instructions for thinning recommendations.
- Strain the paint through a paint filter to remove any lumps or debris that could clog the nozzle.
- Fill the paint container with the prepared paint, ensuring it does not exceed the maximum fill line.
4.3. Assembly
- Connect the air hose to the turbine unit and the spray gun, ensuring a secure fit.
- Attach the paint container to the spray gun by screwing it firmly into place.
- Select the appropriate nozzle for your paint type and desired spray pattern.
5. Operating Instructions
5.1. Powering On
Plug the power cord into a grounded electrical outlet. Turn on the turbine unit using the power switch. The turbine will begin to generate air pressure.
5.2. Adjusting Spray Pattern
The spray gun typically allows for adjustment of the spray pattern (horizontal, vertical, or round) by rotating the air cap. Test the pattern on a piece of scrap material before applying to your project.
5.3. Spraying Technique
- Hold the spray gun perpendicular to the surface, maintaining a consistent distance (typically 6-10 inches).
- Move the spray gun in smooth, even strokes, overlapping each pass by approximately 50%.
- Release the trigger at the end of each stroke to avoid paint buildup.
- Apply multiple thin coats rather than one thick coat for a smoother finish and to prevent drips.

Image 2: A user applying paint to a wooden fence, demonstrating a typical application scenario.

Image 3: A user spraying a garage door, illustrating the use of the paint turbine for larger surfaces.
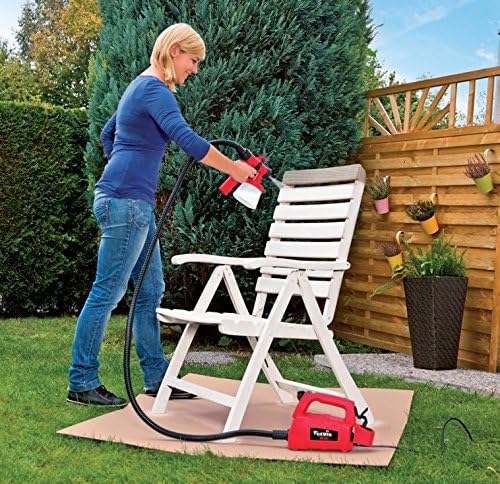
Image 4: A user painting a chair, showing the versatility of the paint turbine for various objects.
6. Maintenance and Cleaning
Proper cleaning after each use is crucial for the longevity and performance of your paint turbine.
- Empty paint container: Pour any remaining paint back into its original container.
- Rinse: Fill the paint container with an appropriate cleaning solution (water for latex paints, mineral spirits for oil-based paints). Spray the solution through the gun until it runs clear.
- Disassemble: Disconnect the spray gun from the air hose and disassemble the nozzle, air cap, and paint container.
- Clean components: Thoroughly clean all disassembled parts with the appropriate cleaning solution and a brush. Pay close attention to the nozzle and air cap to remove all paint residue.
- Dry and reassemble: Allow all parts to dry completely before reassembling the spray gun.
- Store: Store the paint turbine and spray gun in a clean, dry place.
7. Troubleshooting
| Problem | Possible Cause | Solution |
|---|---|---|
| No paint spray | Clogged nozzle; paint too thick; empty paint container | Clean nozzle; thin paint according to manufacturer's instructions; refill container |
| Uneven spray pattern | Partially clogged nozzle; incorrect air cap adjustment | Clean nozzle thoroughly; adjust air cap for desired pattern |
| Paint drips or runs | Applying too much paint; holding gun too close to surface; paint too thin | Apply thinner coats; increase distance from surface; thicken paint if necessary |
| Motor not starting | No power; faulty switch | Check power connection; contact customer support if switch is faulty |
8. Specifications
| Feature | Specification |
|---|---|
| Brand | Cevik |
| Model Number | CE-HV651 |
| Power | 280 W |
| Air Flow | 120 LT/MIN |
| Package Dimensions | 34.4 x 30 x 19.4 cm |
| Weight | 2.08 kg |
| Batteries Included | No |
| Batteries Required | No |
9. Warranty and Support
For warranty information or technical support, please refer to the documentation provided with your purchase or contact CEVIK customer service. Keep your proof of purchase for any warranty claims.