1. Important Safety Information
- Ventilation: Ensure adequate ventilation around the projector. Do not block ventilation openings. Overheating can cause damage.
- Power Supply: Use only the specified power adapter. Disconnect power during thunderstorms or when unused for long periods.
- Moisture: Do not expose the projector to rain, moisture, or liquids.
- Cleaning: Clean the projector with a soft, dry cloth. Avoid abrasive cleaners.
- Lens Care: Handle the lens with care. Clean gently with a lens cleaning cloth.
- Placement: Place the projector on a stable, level surface. Avoid direct sunlight or heat sources.
- Eye Protection: Do not look directly into the projector lens when the lamp is on.
2. Product Overview
2.1. Projector Dimensions
The Excelvan EHD02 projector has compact dimensions, making it portable. The approximate dimensions are 152mm (width) x 220mm (depth) x 76mm (height).
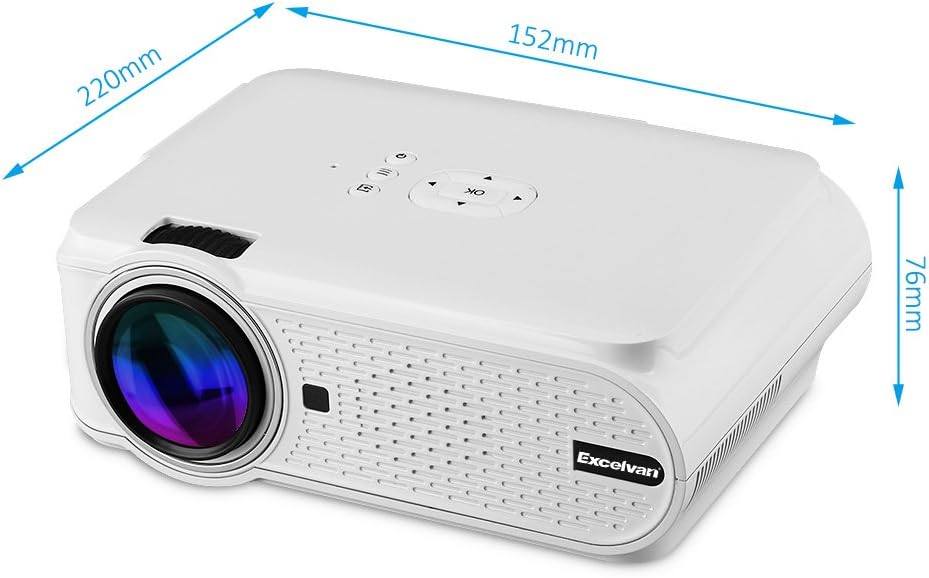
Figure 1: Excelvan EHD02 Mini Projector with labeled dimensions.
2.2. Projector Components and Interfaces
Familiarize yourself with the various ports and controls on your projector for proper setup and operation.

Figure 2: Top controls and rear panel interfaces of the Excelvan EHD02 Projector.
- Top Controls: OK button, Up/Down/Left/Right navigation, Back, Menu, Power.
- Rear Interfaces: VGA port, USB port, Power plug, AV input, 3.5mm Audio port, IR receiver, HDMI port, Keystone adjustment, SD Card slot, TV antenna input.
3. Setup
3.1. Placement
Position the projector on a flat, stable surface. The projection distance determines the image size. For optimal viewing, ensure the projector is centered with the screen or projection surface.
- Projection Distance: 1.2 to 3.8 meters (approximately 3.9 to 12.5 feet).
- Image Size: 37 to 130 inches (diagonal).
- Projection Methods: Supports front, rear, and ceiling projection.
3.2. Power Connection
- Connect the power cord to the projector's power input.
- Plug the other end of the power cord into a suitable electrical outlet.
- The power indicator light will illuminate.

Figure 3: Power cord and remote control for the projector.
3.3. Connecting Input Sources
The projector supports multiple input sources:
- HDMI: Connect to devices like laptops, Blu-ray players, or gaming consoles using an HDMI cable.
- USB: Insert a USB flash drive to play media files directly.
- SD Card: Insert an SD card to play media files.
- AV: Use the provided AV cable to connect to older devices with composite video output.
- VGA: Connect to computers using a VGA cable.
- TV: Connect a TV antenna for analog TV reception.
- 3.5mm Audio: Connect external speakers or headphones.
3.4. Focus and Keystone Correction
- Focus Adjustment: Rotate the focus ring on the projector lens until the image appears sharp and clear.
- Keystone Correction: If the projected image appears trapezoidal (wider at the top or bottom), use the keystone adjustment dial (typically on the side or rear) to correct the image shape. The projector supports ±12° vertical manual keystone correction.
4. Operating Instructions
4.1. Powering On/Off
- Power On: Press the Power button on the projector or the remote control.
- Power Off: Press the Power button again. The projector will go into standby mode.
4.2. Menu Navigation and Input Selection
- Use the navigation buttons (Up, Down, Left, Right) and the OK button on the projector or remote to navigate through the on-screen menu.
- Press the "Input" or "Source" button (if available on remote, or navigate through menu) to select your desired input source (HDMI, USB, SD, AV, VGA, TV).
4.3. Smartphone Connection
Connecting smartphones requires specific cables:
- iPhone/iPad: Requires an original Apple composite AV cable.
- Android Phone: Requires an MHL cable, and the phone must support MHL (Mobile High-Definition Link).
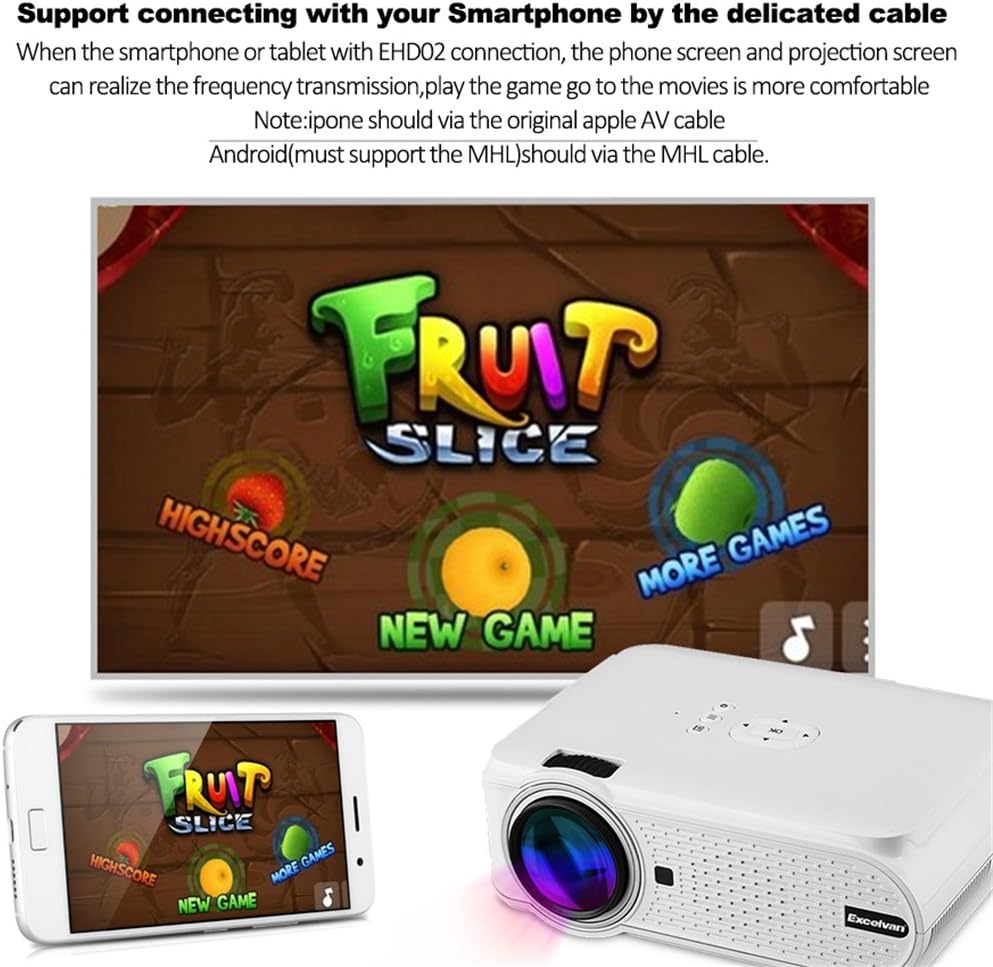
Figure 4: Example of smartphone connection for content projection.
4.4. 3D Playback
The Excelvan EHD02 projector supports red-blue 3D content only. To view 3D content:
- Obtain red-blue 3D source content.
- Use red-blue 3D glasses for viewing.
5. Maintenance
- Lens Cleaning: Use a soft, lint-free cloth specifically designed for optical lenses to gently wipe the projector lens. Avoid touching the lens with bare hands.
- Dust Removal: Periodically clean the projector's exterior with a soft, dry cloth. Ensure ventilation openings are free from dust and obstructions to prevent overheating.
- Storage: When not in use for extended periods, store the projector in a cool, dry place, protected from dust.
6. Troubleshooting
| Problem | Possible Cause | Solution |
|---|---|---|
| No image projected |
|
|
| Image is blurry |
|
|
| Image is trapezoidal |
|
|
| No sound |
|
|
| Remote control not working |
|
|
| Projector is noisy or hot |
|
|
7. Specifications
| Feature | Detail |
|---|---|
| Model | Excelvan EHD02 |
| Display Type | TFT- Single LCD Panel + LED Technology |
| Native Resolution | 800 x 480 pixels |
| Supported Resolution | Up to 1080p (1920 x 1080) |
| Brightness | 1000 Lumens |
| Projection Lens | F=126mm, Manual Focus |
| Contrast Ratio | 1000:1 |
| Aspect Ratio | 4:3 / 16:9 |
| Built-in Speaker | 4Ω 2W |
| LED Lamp Life | 20,000 hours |
| Displayable Colors | 1.67 Million Colors (Full Color) |
| Menu Languages | English, Spanish, French, German, Portuguese, Italian, Chinese, etc. |
| Projection Methods | Front, Rear, Ceiling |
| Interfaces | 1x VGA, 1x USB, 1x SD, 1x HDMI, 1x 3.5mm Audio, 1x AV, 1x TV |
| Image Size (Diagonal) | 37 - 130 inches |
| Projection Distance | 1.2 - 3.8 meters |
| Screen Adjustment | Horizontal and Vertical Flip; Image Zoom |
| Keystone Correction | ±12° Vertical (Manual) |
| Dimensions (L x W x H) | 220mm x 152mm x 76mm |
| Weight | 1.44 kg |
8. Warranty and Support
The Excelvan EHD02 Mini Portable LED Projector comes with a 2-year warranty from the date of purchase.
For technical support, warranty claims, or further assistance, please contact your retailer or the Excelvan customer service department. Please have your model number (EHD02) and purchase information ready when contacting support.

