Introduction
The Ersa Basic Tool 80W soldering iron, model 0810CDJ, is a high-quality, 24V soldering tool designed for professional and industrial use. It features an 80W heating element and comes equipped with a 2.2 mm chisel-shaped soldering tip (0832CDLF). This soldering iron is compatible with Ersa soldering stations including the RDS 80, Analog 80, ELS 8000, and MS 8000. This manual provides essential information for the safe and effective operation, maintenance, and troubleshooting of your Ersa Basic Tool 80W soldering iron.
Safety Instructions
Always observe the following safety precautions to prevent injury and damage to the equipment:
- Read the entire manual: Familiarize yourself with the product's functions and safety warnings before use.
- Use in a well-ventilated area: Soldering fumes can be harmful. Ensure adequate ventilation or use a fume extractor.
- Wear protective eyewear: Solder can splatter. Protect your eyes from molten solder and fumes.
- Avoid contact with hot surfaces: The soldering tip and heating element reach high temperatures. Always use the soldering iron stand and allow the iron to cool completely before handling the tip.
- Disconnect power: Always unplug the soldering station from the mains before performing maintenance, changing tips, or when the tool is not in use.
- Use appropriate tools: Only use genuine Ersa replacement parts and accessories.
- Keep out of reach of children: This is not a toy.
- Do not use near flammable materials: High heat can ignite flammable liquids, gases, or materials.
Product Overview
The Ersa Basic Tool 80W soldering iron consists of a handle, heating element, and a replaceable soldering tip. It connects to a compatible soldering station via a multi-pin connector.
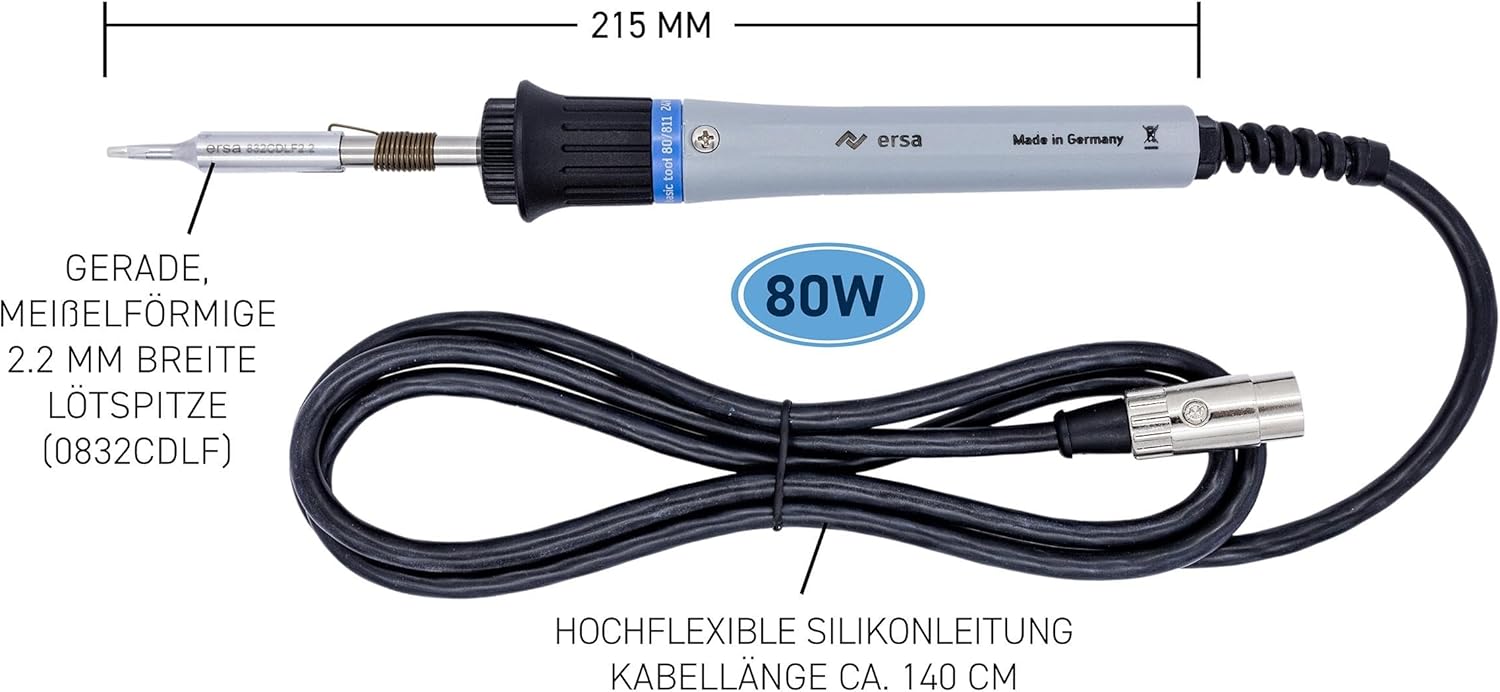
Figure 1: Ersa Basic Tool 80W Soldering Iron with key dimensions and components labeled. The image shows the overall length of 215mm, the 80W power rating, the 2.2mm chisel tip (0832CDLF), and the highly flexible silicone cable with a length of approximately 140cm.

Figure 2: The Ersa Basic Tool 80W soldering iron, showcasing its ergonomic design and robust construction. This image provides a clear view of the soldering iron itself, highlighting its grey handle and black grip.

Figure 3: A hand holding the Ersa Basic Tool 80W soldering iron, demonstrating its comfortable grip and balanced feel during use. This perspective emphasizes the user experience and the tool's practical handling.

Figure 4: Close-up view of the soldering iron's tip assembly and the multi-pin connector. This image highlights the precision-engineered tip and the secure connection mechanism to the soldering station.
Setup
- Unpack: Carefully remove the soldering iron and any accessories from the packaging.
- Inspect: Check the soldering iron and cable for any visible damage. Do not use if damaged.
- Connect to Soldering Station:
- Ensure your soldering station (e.g., RDS 80, Analog 80, ELS 8000, MS 8000) is powered off and unplugged from the mains.
- Align the multi-pin connector of the soldering iron cable with the corresponding port on your Ersa soldering station.
- Gently push and twist the connector until it is securely seated. Do not force the connection.
- Place in Stand: Always place the soldering iron in a suitable, heat-resistant soldering iron stand when not in active use.
Operating Instructions
This soldering iron is controlled by its compatible soldering station. Refer to your soldering station's manual for specific instructions on power, temperature setting, and calibration.
- Power On: Plug your soldering station into a suitable power outlet and turn it on. The soldering iron will begin to heat up to the set temperature.
- Tinning the Tip: Before first use, and periodically during operation, "tin" the soldering tip. Apply a small amount of solder to the hot tip. This protects the tip from oxidation and ensures efficient heat transfer.
- Soldering Process:
- Ensure the components and PCB pads are clean.
- Apply the hot, tinned soldering tip to both the component lead and the PCB pad simultaneously.
- After a second or two, apply solder to the junction of the tip, lead, and pad. The solder should flow smoothly and create a shiny, concave joint.
- Remove the solder, then remove the soldering iron. Allow the joint to cool undisturbed.
- Power Off: When finished, turn off your soldering station and unplug it from the mains. Allow the soldering iron to cool completely in its stand before storing.

Figure 5: Demonstrating the Ersa Basic Tool 80W soldering iron in action, used to solder components onto a circuit board. This image illustrates the practical application of the tool in an industrial or hobbyist setting.
Maintenance
Regular maintenance ensures optimal performance and extends the lifespan of your soldering iron.
- Tip Cleaning:
- During operation, wipe the hot tip on a damp sponge or brass wool cleaner to remove excess solder and flux residue.
- Always re-tin the tip immediately after cleaning to prevent oxidation.
- Tip Replacement:
- Ensure the soldering iron is cool and unplugged from the station.
- Unscrew the retaining nut or collar that holds the tip in place.
- Carefully remove the old tip.
- Insert the new Ersa 0832CDLF or compatible tip and secure it by tightening the retaining nut/collar. Do not overtighten.
- Always tin a new tip immediately after heating it for the first time.
- General Cleaning:
- Wipe the handle and cable with a damp cloth. Do not use abrasive cleaners or solvents.
- Ensure no moisture enters the electrical connections.
Troubleshooting
| Problem | Possible Cause | Solution |
|---|---|---|
| Soldering iron not heating up. |
|
|
| Solder not melting or poor joints. |
|
|
| Tip turns black quickly. |
|
|
Specifications
| Feature | Detail |
|---|---|
| Model Number | 0810CDJ |
| Power | 80 Watts |
| Voltage | 24 V (Operates with compatible Ersa stations) |
| Included Soldering Tip | 0832CDLF (Chisel-shaped, 2.2 mm wide) |
| Compatible Soldering Stations | RDS 80, Analog 80, ELS 8000, MS 8000 |
| Dimensions (L x W x H) | 23 x 3 x 3 cm (approximate) |
| Weight | 226 grams (approximate) |
| Handle Material | Plastic (Heat-resistant) |
| Heating Element Type | Nichrome |
| Cable Length | Approx. 140 cm (Highly flexible silicone) |
| Intended Use | Industrial Use |
Warranty and Support
Ersa products are manufactured to high-quality standards. For warranty information, please refer to the documentation provided with your soldering station or visit the official Ersa website. For technical support, spare parts, or service inquiries, please contact your local Ersa distributor or Ersa customer service. Keep your purchase receipt as proof of purchase for warranty claims.
Official Ersa Website: www.ersa.com