Nuby 1564
Nuby One-Touch 2-in-1 Electric Baby Bottle Warmer & Sterilizer User Manual
Model: 1564
Introduction
Thank you for choosing the Nuby One-Touch 2-in-1 Electric Baby Bottle Warmer & Sterilizer. This versatile appliance is designed to simplify your feeding routine by safely warming breast milk, formula, and baby food, as well as providing a convenient method for sterilizing bottles and pacifiers. Its intuitive one-touch operation ensures ease of use for busy parents.
Please read this instruction manual thoroughly before first use and keep it for future reference. Proper use and maintenance will ensure the longevity and optimal performance of your unit.
Important Safety Instructions
WARNING: To reduce the risk of electric shock, do not immerse the appliance, cord, or plug in water or other liquid.
- Always ensure the appliance is placed on a stable, level, heat-resistant surface, away from the edge of the countertop, to prevent tipping.
- Do not operate any appliance with a damaged cord or plug, or after the appliance malfunctions or has been damaged in any manner. Contact customer support for assistance.
- Close supervision is necessary when any appliance is used by or near children. Keep the appliance out of reach of children, especially when in operation, as surfaces can become extremely hot.
- Do not touch hot surfaces. Use handles or knobs. Always use caution when handling hot water or steam.
- Unplug from outlet when not in use and before cleaning. Allow to cool before putting on or taking off parts.
- Do not use outdoors. This appliance is for household use only.
- Do not place on or near a hot gas or electric burner, or in a heated oven.
- Do not use the appliance for anything other than its intended use.
- Always ensure the correct amount of water is added for warming or sterilizing to prevent overheating or damage to the unit.
- The unit operates by boiling water. Be aware that the unit will get very hot very fast. Exercise extreme caution when removing items after a cycle.
Product Components
The Nuby One-Touch 2-in-1 Electric Baby Bottle Warmer & Sterilizer includes the following parts:
- Main Warmer Unit
- Bottle Basket
- Lid
- Measuring Cup (often integrated or attached to the unit)
- Cleaning Brush (included in some sets)

The main unit houses the heating element and control button. The bottle basket is used to safely insert and remove bottles or food jars. The lid helps to contain steam for efficient warming and sterilizing. A measuring cup is provided to ensure accurate water levels for different functions, and a cleaning brush assists with maintenance.
Setup
- Unpack: Carefully remove all components from the packaging. Retain packaging for future storage or transport if needed.
- Initial Cleaning: Before first use, wipe the main warmer unit with a damp cloth. Wash the bottle basket, lid, and measuring cup in warm, soapy water, then rinse thoroughly and allow to air dry. Do not immerse the main unit in water.
- Placement: Place the warmer on a flat, stable, heat-resistant surface, away from the reach of children. Ensure the power cord is not dangling where it can be pulled.
- Power Connection: Plug the power cord into a standard electrical outlet. The unit is now ready for use.

Operating Instructions
A. Warming Bottles & Food Jars
The warmer is designed to evenly and safely warm breast milk, formula, and baby food, preserving vital nutrients.
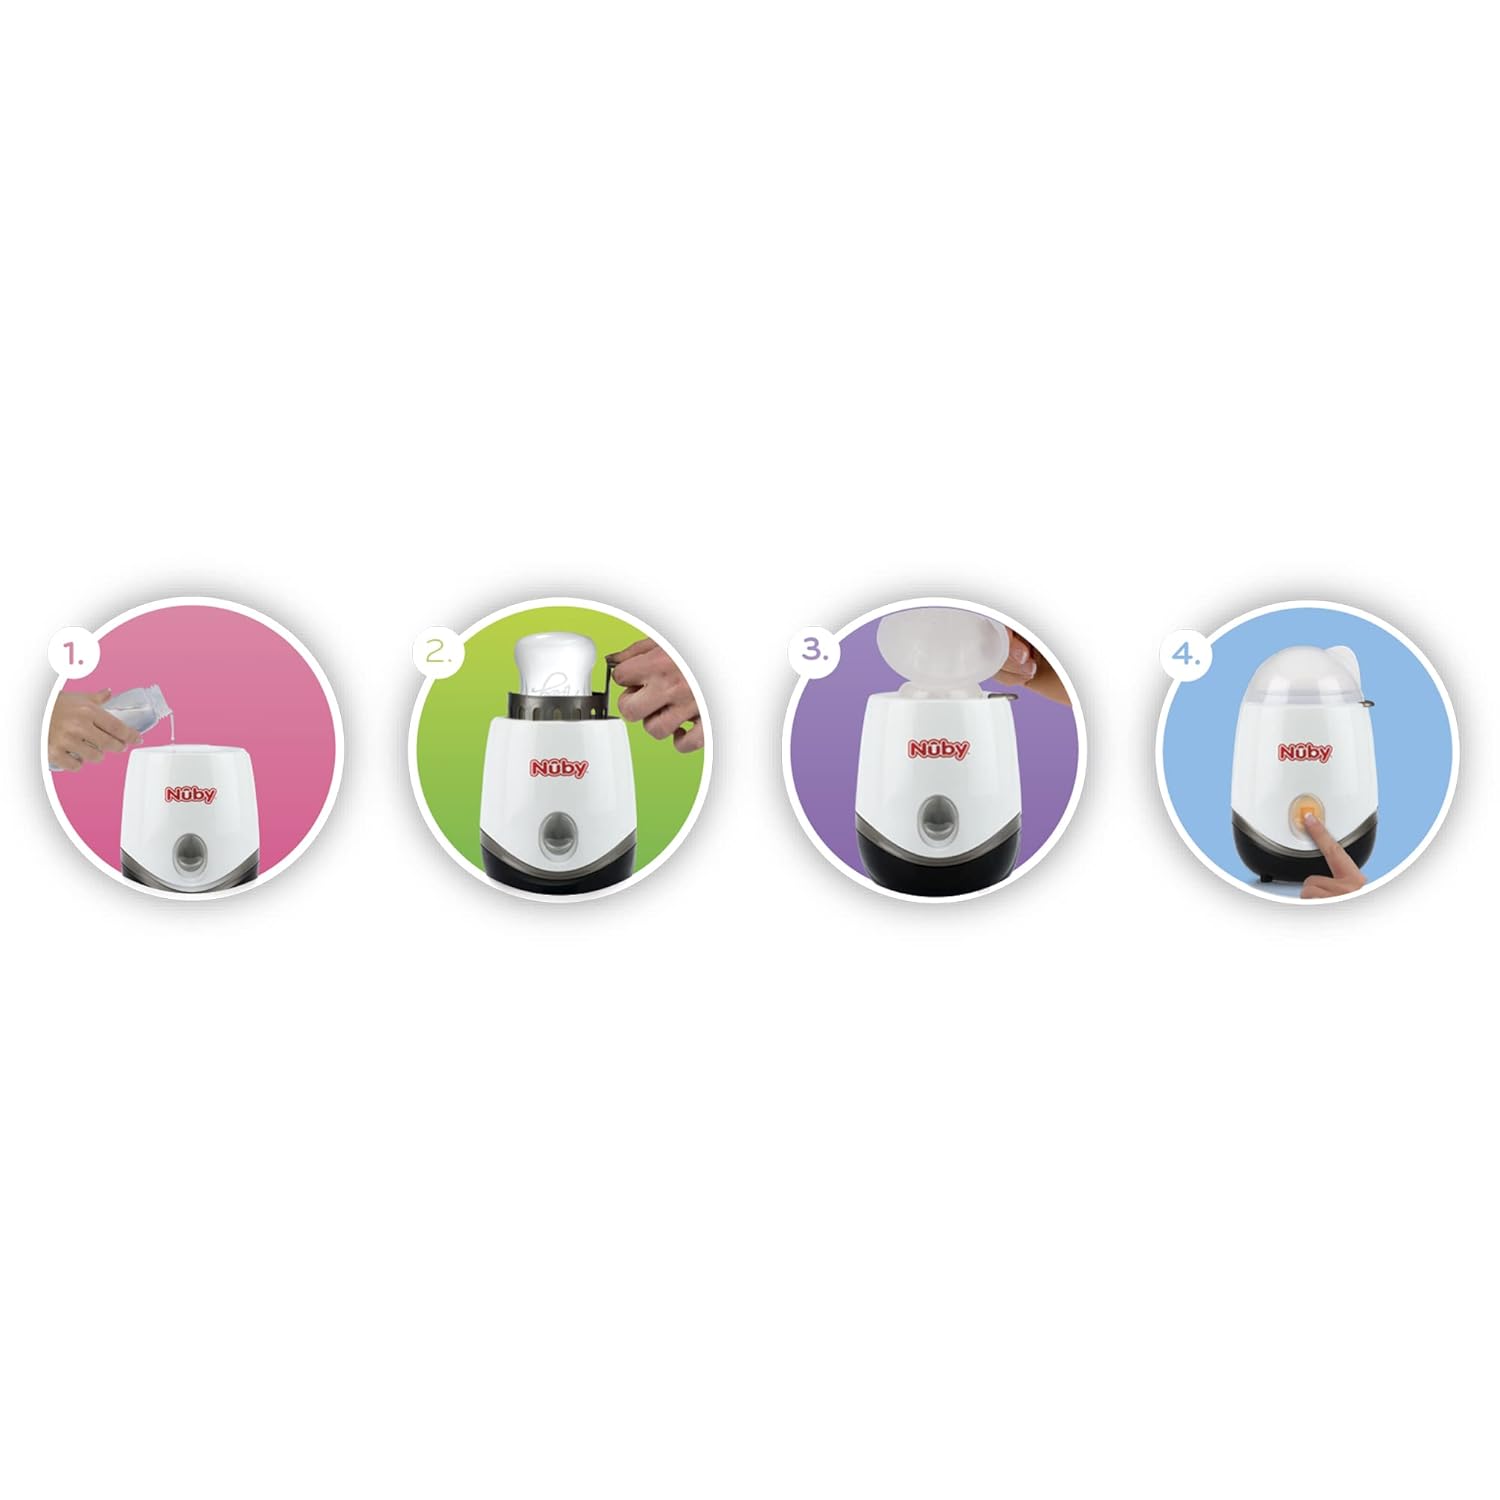
- Add Water: Using the included measuring cup, add the recommended amount of water into the heating chamber of the warmer. Refer to the warming chart provided with your product for precise water quantities based on bottle size and starting temperature (room temperature, refrigerated, or frozen).
- Insert Bottle/Jar: Place the bottle or baby food jar into the bottle basket. Then, carefully lower the basket with the bottle/jar into the warmer's heating chamber.
- Cover: Place the lid securely on top of the warmer unit.
- Start Warming: Press the one-touch button located on the front of the unit. The indicator light will illuminate, signaling that the warming cycle has begun.
- Cycle Completion: The warming cycle is complete when the water has evaporated and the indicator light turns off. The unit will automatically shut off.
- Remove: Carefully lift the bottle basket using its handle to remove the warmed bottle or food jar. Always check the temperature of the contents before feeding by shaking the bottle and testing a few drops on the inside of your wrist.

B. Sterilizing Bottles & Pacifiers
The warmer can also sterilize bottles and pacifiers in minutes using steam.
- Add Water: Using the measuring cup, add the recommended amount of water for sterilizing into the heating chamber.
- Load Items: Place clean bottles, nipples, rings, or pacifiers into the bottle basket. Ensure items are arranged to allow steam to circulate freely. The warmer accommodates various bottle sizes and shapes.
- Cover: Place the lid securely on top of the warmer unit.
- Start Sterilizing: Press the one-touch button. The indicator light will illuminate.
- Cycle Completion: The sterilizing cycle is complete when the water has evaporated and the indicator light turns off. The unit will automatically shut off.
- Remove: Carefully lift the bottle basket using its handle to remove the sterilized items. Use tongs or allow items to cool before handling.
Maintenance and Cleaning
Regular cleaning and maintenance will ensure the efficient operation and longevity of your Nuby One-Touch Warmer & Sterilizer.
A. Daily Cleaning
- Always unplug the unit and allow it to cool completely before cleaning.
- Wipe the exterior of the main unit with a damp cloth. Do not immerse the main unit in water.
- After each use, wipe the inside of the heating chamber with a damp cloth to remove any water residue.
- Wash the bottle basket, lid, and measuring cup in warm, soapy water. Rinse thoroughly and air dry.

B. Descaling (Mineral Deposit Removal)
Over time, mineral deposits from water may accumulate on the heating element, affecting performance. Descale the unit regularly, especially if you notice cloudy water or slower heating times.
- Ensure the unit is unplugged and cool.
- Mix 2 oz (60ml) of white vinegar with 4 oz (120ml) of cold water.
- Pour the solution into the heating chamber.
- Allow the solution to stand in the unit for approximately 30 minutes. Do not turn on the unit during this time.
- Pour out the solution. Rinse the heating chamber thoroughly with clean water several times to remove any vinegar residue.
- Wipe dry with a clean cloth.
Troubleshooting
| Problem | Possible Cause | Solution |
|---|---|---|
| Unit does not turn on. | Not plugged in; power outage; unit overheated. | Ensure unit is properly plugged into a working outlet. Check household circuit breaker. If unit recently ran a cycle, allow 10-15 minutes for it to cool down before attempting to use again. |
| Warming/Sterilizing takes too long. | Insufficient water; mineral deposits; items too cold. | Ensure correct water amount is used per instructions. Descale the unit as per maintenance section. For frozen items, allow extra time or thaw slightly before warming. |
| Water becomes cloudy or discolored. | Mineral deposits from water. | This is normal with hard water. Descale the unit regularly using the vinegar solution as described in the maintenance section. |
| Unit does not have an 'off' switch / continues to heat. | This is a design feature. | The unit operates on a one-touch cycle that completes when the water has evaporated. To stop a cycle prematurely, unplug the unit from the wall outlet. Always ensure sufficient water is added for the desired warming/sterilizing time. |
| Contents are too hot after warming. | Too much water added; cycle ran too long. | Ensure you are using the precise amount of water specified in the warming chart for the volume and starting temperature of the liquid. Remove items immediately once the cycle completes. |
Specifications
- Model Number: 1564
- Product Dimensions: Approximately 5 x 5 x 8.5 inches
- Item Weight: Approximately 0.018 ounces (unit only)
- Power Source: Electric (no batteries required)
- Function: 2-in-1 Bottle Warmer & Sterilizer
- Compatibility: Fits all sizes, shapes, and brands of bottles
Warranty and Support
Nuby products are manufactured to high-quality standards. Specific warranty details, including coverage period and terms, are typically provided with your product purchase documentation or can be found on the official Nuby website. Please retain your proof of purchase for warranty claims.
For customer support, technical assistance, or to inquire about replacement parts, please refer to the contact information provided on the product packaging or visit the official Nuby website. When contacting support, please have your product model number (1564) and purchase date available.
Ask a question about this manual
Ask about setup, troubleshooting, compatibility, parts, safety, or missing instructions. Manuals+ will review the question and use this page’s manual context to help answer it.