1. Introduction
This manual provides detailed instructions for the setup, operation, and maintenance of your Excelvan AOK-5019TC Wireless Weather Station. Please read this manual thoroughly before using the device to ensure proper function and longevity.
Package Contents
- 1 x Excelvan AOK-5019TC Weather Station Main Unit
- 1 x Wireless Remote Sensor (433MHz)
- 1 x User Manual (this document)

Image 1.1: Contents of the Excelvan AOK-5019TC package, showing the main weather station unit, the wireless remote sensor, and the instruction manual.
2. Key Features
- Large LED Display: Easy-to-read display for all weather data.
- Radio-Controlled Clock (DCF77): Automatic time synchronization for precise timekeeping, including automatic Summer/Winter time adjustment.
- Time Display: 12/24 hour format with adjustable 24 time zones (+/-12).
- Calendar: Displays Day, Month, and Weekday (up to 2099). Weekday display in 7 languages: German, English, Italian, French, Dutch, Spanish, and Danish.
- Dual Alarm with Snooze: Two independent alarms with a 5-minute snooze function.
- Weather Forecast: 5 weather forecast icons (sunny, partially sunny, cloudy, rainy, stormy) with customizable symbols.
- Barometric Pressure History: Displays 12-hour history of atmospheric pressure in hPa/inHg. Altitude setting for accurate pressure calculation.
- Indoor/Outdoor Temperature & Humidity: Displays current, maximum, and minimum values with trend indicators.
- Temperature Range: Indoor: 0℃ to +50℃ (32℉ to 122℉); Outdoor: -20℃ to +60℃ (-4℉ to 140℉). Switchable between ℃ and ℉.
- Temperature Alert: Programmable alerts for temperature thresholds.
- Moon Phase: Displays current moon phase.
- Sunrise/Sunset & Moonrise/Moonset: Provides times for 150 pre-programmed cities.
- Low Battery Indicator: Alerts when batteries need replacement.
- Blue LED Backlight: For improved visibility in low light conditions.
- Multiple Sensors: Supports up to 3 outdoor sensors (one included).
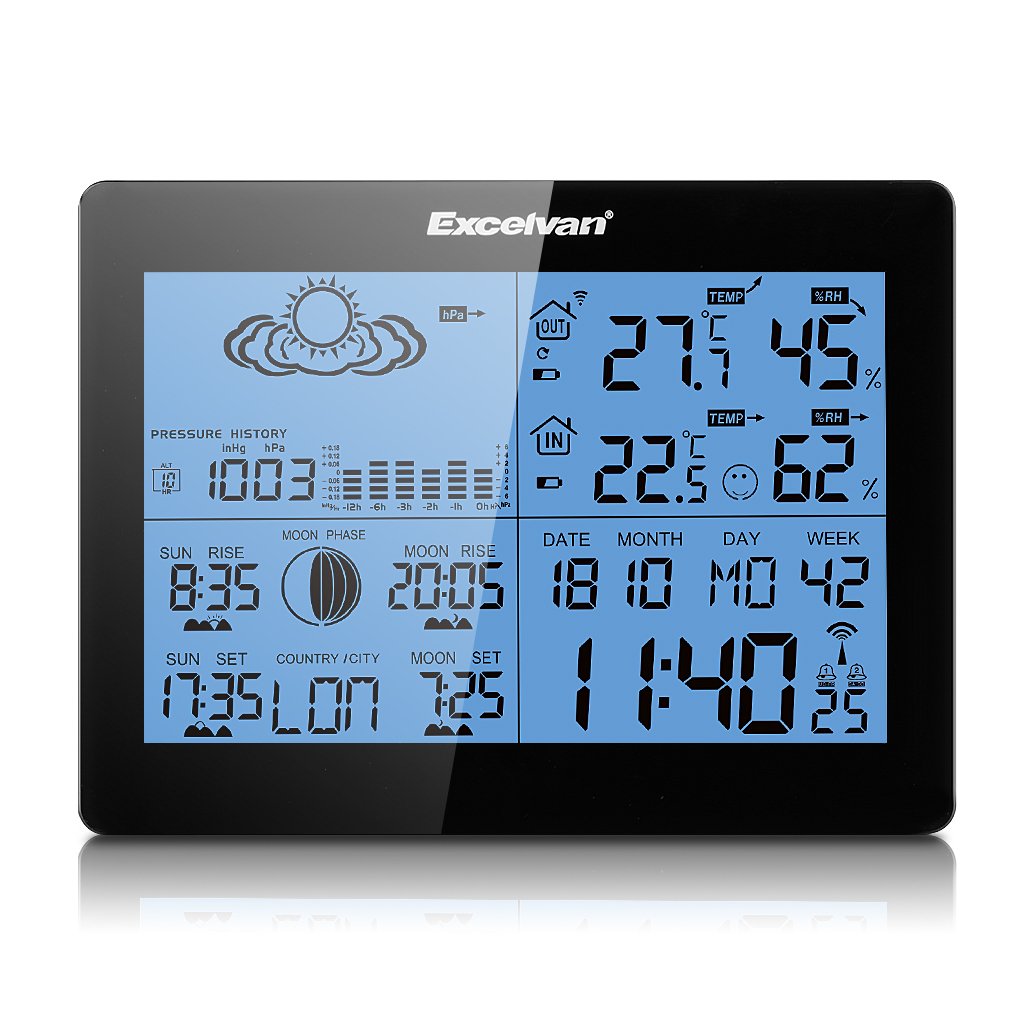
Image 2.1: The Excelvan AOK-5019TC Weather Station main unit displaying various weather parameters and time, alongside its wireless remote sensor.
3. Setup
3.1 Battery Installation
- Main Unit: Open the battery compartment cover on the back of the main unit. Insert 2 x AA 1.5V batteries (not included), ensuring correct polarity (+/-). Close the cover.
- Remote Sensor: Open the battery compartment cover on the back of the remote sensor. Insert 2 x AAA 1.5V batteries (not included), ensuring correct polarity (+/-). Close the cover.

Image 3.1: Rear view of the weather station main unit with the battery compartment open, showing where to insert 2 x AA batteries.
3.2 Sensor Placement
Place the wireless remote sensor outdoors in a shaded, dry location, protected from direct sunlight and rain. Ensure it is within 50 meters (164 feet) of the main unit for optimal signal reception. Avoid placing it near large metal objects or electrical appliances that may interfere with the signal.
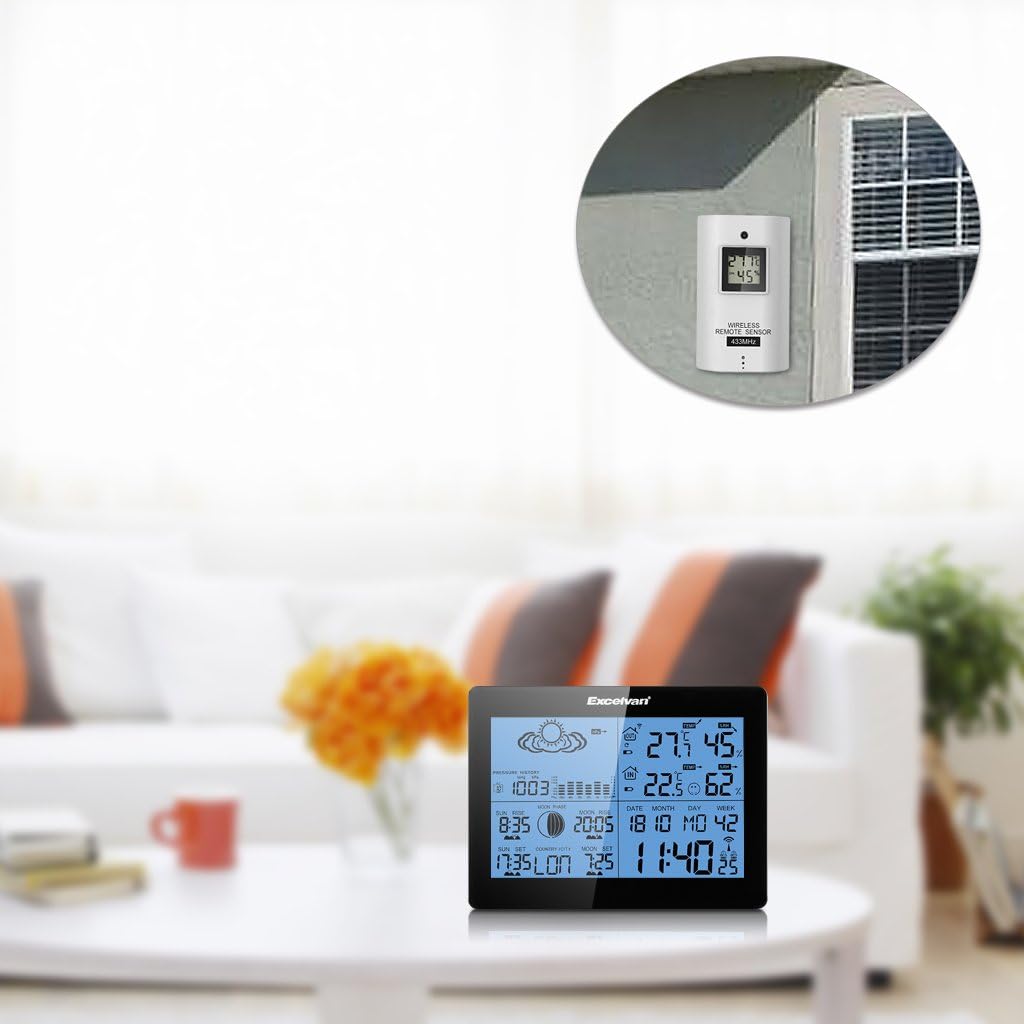
Image 3.2: The weather station main unit displayed indoors, with the remote sensor shown mounted on an exterior wall, illustrating typical placement.
3.3 Initial Synchronization
After inserting batteries, the main unit will automatically search for the remote sensor signal and the DCF77 radio signal for time synchronization. This process may take several minutes. Ensure both units are close to each other during initial setup. Once connected, the outdoor temperature and humidity will appear on the main unit, and the time will be set automatically.

Image 3.3: The wireless remote sensor, which transmits outdoor temperature and humidity data to the main weather station unit.
4. Operating Instructions
4.1 Button Functions
The main unit features six control buttons on the back and one on the top:
- MODE: Press to cycle through display modes (e.g., time, alarm). Press and hold to enter setting mode.
- +: In setting mode, increases values. In normal mode, switches between ℃/℉ or 12/24 hour format.
- -: In setting mode, decreases values. In normal mode, views min/max temperature/humidity.
- HISTORY: Displays the 12-hour barometric pressure history.
- CHANNEL: Switches between outdoor sensor channels (if multiple sensors are used).
- SNOOZE/LIGHT: On the top of the unit. Press to activate backlight. When alarm sounds, press to activate snooze function.

Image 4.1: The back of the weather station, highlighting the MODE, +, -, HISTORY, and CHANNEL buttons.

Image 4.2: A close-up of the weather station's top, showing the SNOOZE/LIGHT button.
4.2 Time and Date Settings
The weather station automatically synchronizes time via the DCF77 radio signal. If manual adjustment is needed:
- Press and hold the MODE button until the time display flashes.
- Use the + or - buttons to adjust the hour, then press MODE to confirm and move to minutes.
- Repeat for minutes, year, month, day, and language for the weekday display.
- Press MODE to exit setting mode.
4.3 Alarm Settings
- Press the MODE button repeatedly until "AL1" or "AL2" is displayed.
- Press and hold the MODE button until the alarm hour flashes.
- Use the + or - buttons to set the desired alarm hour, then press MODE.
- Repeat for minutes.
- Press MODE to activate/deactivate the alarm and exit setting mode.
4.4 Weather Forecast Interpretation
The weather station provides a forecast based on barometric pressure changes. The icons represent:
- Sunny
- Partially Sunny
- Cloudy
- Rainy
- Stormy
Note that weather forecasts are predictions and may not always be 100% accurate, especially for localized conditions.

Image 4.3: A detailed view of the weather station's display, showing weather forecast icons, indoor/outdoor temperature and humidity, time, date, and moon phase.
5. Maintenance
5.1 Battery Replacement
When the low battery indicator appears on the display, replace the batteries in the main unit or remote sensor as soon as possible. Always replace all batteries in a unit at the same time with new ones of the same type. Do not mix old and new batteries.
5.2 Cleaning
Wipe the weather station and sensor with a soft, damp cloth. Do not use abrasive cleaners or solvents, as these may damage the display or casing. Ensure no moisture enters the battery compartments or other openings.
5.3 Environmental Considerations
For optimal performance and longevity, avoid exposing the main unit to extreme temperatures, direct sunlight, or high humidity. The remote sensor is designed for outdoor use but should be protected from direct rain and snow to prevent water ingress and damage.
6. Troubleshooting
| Problem | Possible Cause | Solution |
|---|---|---|
| No outdoor temperature/humidity reading | Sensor out of range, low sensor battery, interference. | Move sensor closer to main unit. Replace sensor batteries. Avoid placing near electronic devices. Press CHANNEL button to re-sync. |
| Incorrect time display / Time not synchronizing | Weak DCF77 signal, interference, incorrect time zone setting. | Move main unit to a location with better signal reception (e.g., near a window). Ensure correct time zone is set manually. Allow up to 24 hours for initial synchronization. |
| Inaccurate weather forecast | Forecasts are based on barometric pressure trends, which can be localized and not always precise. Altitude setting may be incorrect. | Understand that forecasts are indicative. Ensure the altitude setting is correct for your location to improve barometric pressure accuracy. |
| Display is dim or blank | Low main unit battery. | Replace main unit batteries. |
| Buttons unresponsive | Temporary software glitch. | Remove and reinsert batteries to reset the unit. |
7. Specifications
- Brand: EXCELVAN
- Model: AOK-5019TC
- Power Source (Main Unit): 2 x AA 1.5V batteries (not included)
- Power Source (Sensor): 2 x AAA 1.5V batteries (not included)
- Indoor Temperature Range: 0℃ to +50℃ (32℉ to 122℉)
- Outdoor Temperature Range: -20℃ to +60℃ (-4℉ to 140℉)
- Humidity Range: 20% to 95% RH
- Wireless Frequency: 433MHz
- Wireless Range: Up to 50 meters (164 feet) in open air
- Display Type: LCD, LED backlight
- Weight: 291 Grams (main unit)
- Color: Black
- GTIN: 723120327726
- ASIN: B017YWQ8FC
8. Warranty and Support
For warranty information or technical support, please refer to the documentation provided at the time of purchase or contact your retailer. Keep your purchase receipt as proof of purchase.