Introduction
Welcome to your new Weslock 2810S Single Cylinder Handleset. This manual provides detailed instructions for installation, operation, maintenance, and troubleshooting to ensure proper function and longevity of your door hardware. Please read all instructions carefully before proceeding.
Safety Information
- Read all instructions carefully before installation.
- Wear appropriate safety gear, such as eye protection, during installation.
- Keep small parts away from children.
- Ensure the door is securely supported during installation to prevent injury or damage.
Package Contents
Verify that all components are present before beginning installation. If any parts are missing or damaged, contact Weslock customer support.
- Exterior Handleset Assembly
- Interior Knob Assembly (Salem Knob)
- Latch Mechanism (Adjustable 2-3/8" or 2-3/4")
- Strike Plate
- Mounting Screws
- Keys
- Installation Template (if included)
Tools Required
- Phillips Head Screwdriver
- Tape Measure
- Pencil
- Drill (with appropriate bits for door preparation, if needed)
- Chisel (for strike plate mortise, if needed)
- Safety Glasses
Setup and Installation
Follow these steps carefully to install your Weslock 2810S handleset. Refer to the images for visual guidance.
- Prepare the Door:
Ensure your door is prepared with a 2-1/8 inch top cross hole and a 2-1/8 inch bottom cross hole, along with a 1-inch edge hole. The handleset adjusts to door thickness from 1-3/8 inches to 2 inches.

Image: Diagram illustrating the required bore holes and backset for door preparation, including the top and bottom cross holes and the edge bore.
- Install the Latch Mechanism:
Adjust the latch to either 2-3/8 inches or 2-3/4 inches backset as required. Insert the latch into the edge bore hole and secure it with screws. Ensure the radius faceplate is flush with the door edge.

Image: A close-up view of the latch mechanism being inserted into the door's edge bore hole, showing the adjustable backset feature.
- Install the Exterior Handleset:
Position the exterior handleset assembly, ensuring the spindle passes through the latch mechanism and aligns with the lower cross hole.
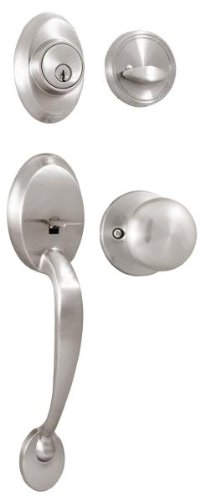
Image: The exterior handleset assembly, featuring the satin nickel finish, being aligned and placed onto the door, with the spindle ready to engage the latch.
- Install the Interior Knob:
Attach the interior Salem knob assembly to the exterior handleset using the provided mounting screws. Ensure the thumb turn aligns correctly with the locking mechanism.

Image: The interior Salem knob being attached to the door, showing the mounting screws being tightened to secure it to the exterior handleset.
- Install the Strike Plate:
Mark and chisel out a mortise for the strike plate on the door frame, aligning it with the latch bolt. Secure the strike plate with screws.

Image: A strike plate being installed on the door frame, showing the alignment with the latch bolt and the screws securing it in place.
- Test Operation:
Close the door and test the latching and locking mechanisms from both the interior and exterior using the key and thumb turn. Ensure smooth operation and proper engagement of the deadbolt.
Operating Instructions
The Weslock 2810S handleset provides secure entry and exit with a single cylinder deadbolt.
Locking from Exterior
Insert the key into the exterior cylinder and turn to engage the deadbolt. Remove the key.
Unlocking from Exterior
Insert the key into the exterior cylinder and turn to retract the deadbolt.
Locking from Interior
Turn the thumb turn on the interior knob to engage the deadbolt.
Unlocking from Interior
Turn the thumb turn on the interior knob to retract the deadbolt.
Maintenance
- Cleaning: Clean the handleset with a soft, damp cloth. Avoid abrasive cleaners, harsh chemicals, or solvents, which can damage the finish.
- Lubrication: Periodically apply a small amount of graphite lubricant to the keyway and latch mechanism to ensure smooth operation. Do not use oil-based lubricants, as they can attract dirt and debris.
- Inspection: Regularly check all screws and components for tightness. Tighten as necessary to maintain security and proper function.
Troubleshooting
| Problem | Possible Cause | Solution |
|---|---|---|
| Key does not turn smoothly or gets stuck. | Dirt or debris in keyway; lack of lubrication. | Apply graphite lubricant to the keyway. Clean the key. |
| Latch bolt does not fully extend or retract. | Misalignment of latch or strike plate; loose screws; debris. | Check alignment of latch and strike plate. Tighten all mounting screws. Clear any obstructions. |
| Handleset feels loose on the door. | Mounting screws are loose. | Tighten all visible mounting screws on both interior and exterior assemblies. |
| Deadbolt does not engage the strike plate. | Strike plate misalignment; door sag. | Adjust the strike plate position on the door frame. Check door hinges for sag. |
Specifications
- Model: 2810S
- Type: Handleset - Keyed Entry, Single Cylinder
- Series: Hillcrest
- Material: Other Metals
- Finish: Satin Nickel
- Interior Knob: Salem Knob
- Lock Standards: Exceeds ANSI A 156.2 Grade III Lock Standards
- Backset: Adjustable 2-3/8 inches or 2-3/4 inches
- Door Thickness: Adjustable 1-3/8 inches to 2 inches
- Cross Hole Diameter: 2-1/8 inches (top and bottom)
- Edge Hole Diameter: 1 inch
- Throw Bolt: 1 inch with two hardened steel rollers to prevent sawing
- Keyway: Weslock
- Item Weight: Approximately 17.2 Pounds
Warranty Information
This Weslock 2810S handleset is backed by the following warranties:
- Limited Lifetime Mechanical Warranty: Covers the mechanical components of the handleset for the lifetime of the original purchaser.
- Limited 10 Year Finish Warranty: Covers the finish of the handleset for a period of 10 years from the date of purchase.
For detailed terms and conditions, please refer to the official Weslock warranty documentation or contact customer support.
Customer Support
If you encounter any issues not covered in this manual or require further assistance, please contact Weslock customer support.
Visit the official Weslock website for contact information and additional resources: Weslock Store