1. Introduction
This manual provides essential information for the safe and efficient installation, operation, and maintenance of your Prolux CV12000 Central Vacuum Unit System. Please read all instructions carefully before using the appliance to ensure proper function and to prevent injury or damage.
The Prolux CV12000 is a powerful central vacuum system designed for residential use, featuring a robust motor, HEPA Shield allergy reduction, and a 150 CFM suction capacity. It is intended to provide thorough cleaning by exhausting dust and debris away from living spaces.

Image 1.1: Front view of the Prolux CV12000 Central Vacuum Unit System. The unit is red with black accents, featuring a cylindrical design with a dirt canister at the bottom and an exhaust port on the side.
2. Safety Information
Always follow basic safety precautions when using electrical appliances to reduce the risk of fire, electric shock, or injury.
- Electrical Safety: Ensure the unit is connected to a properly grounded outlet. Do not use with a damaged cord or plug. Disconnect power before servicing.
- General Use: Do not pick up flammable or combustible liquids, hot ashes, or sharp objects. Do not operate without the dirt canister and filters properly installed.
- Installation: Installation should be performed by a qualified individual in accordance with local electrical and building codes.
- Maintenance: Only perform maintenance as described in this manual. Refer all other servicing to qualified personnel.
3. Setup and Installation
Proper installation is crucial for the optimal performance of your central vacuum system. The unit is designed for wall mounting and requires connection to a dedicated vacuum piping system and electrical supply.
3.1 Mounting the Unit
- Select a suitable location, typically a garage, utility room, or basement, where the unit can be securely mounted to a wall stud or appropriate support. Ensure adequate space for maintenance and access to the dirt canister.
- Use the provided mounting bracket to mark drilling locations. Securely fasten the bracket to the wall.
- Carefully lift and hang the central vacuum unit onto the mounted bracket.
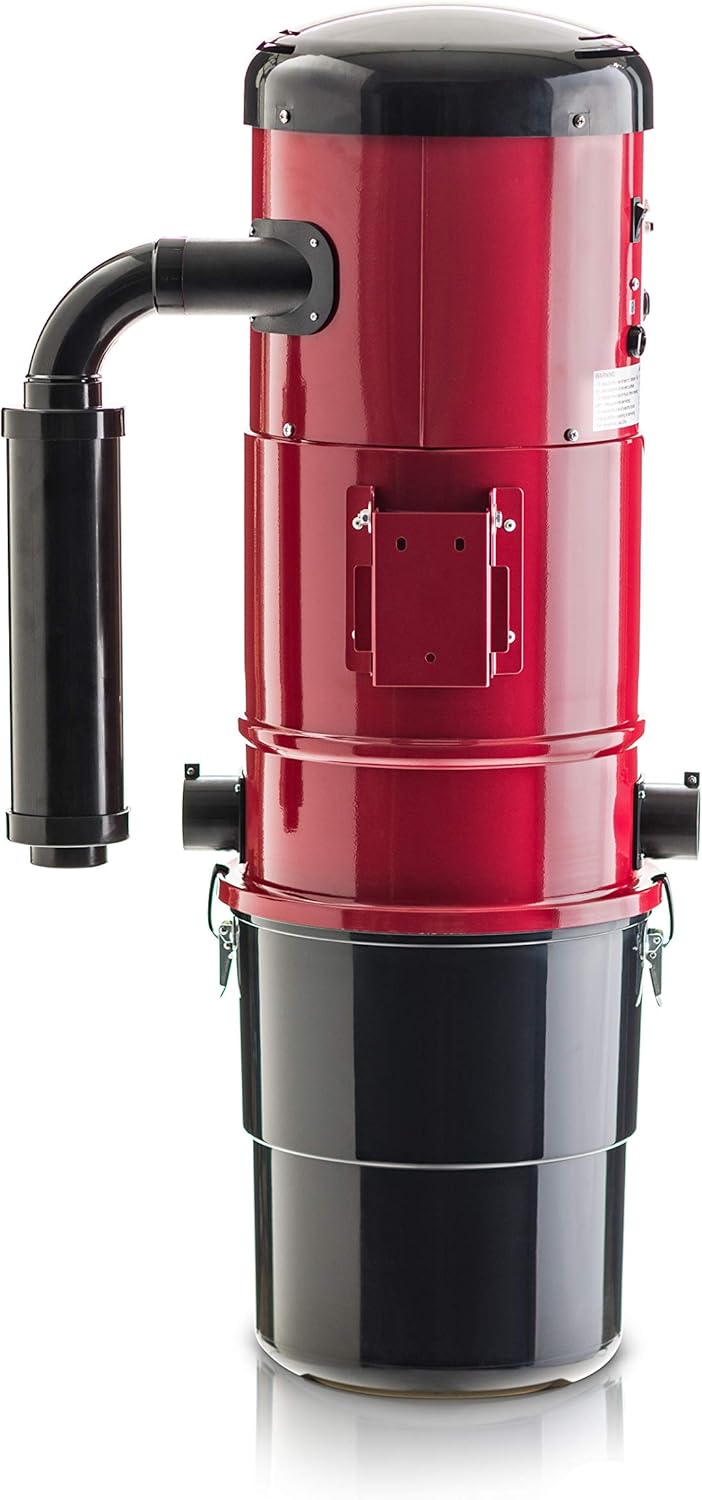
Image 3.1: Rear view of the Prolux CV12000 Central Vacuum Unit, highlighting the mounting brackets and various connection ports for piping and electrical input.
3.2 Connecting the Piping System
- Connect the main vacuum inlet pipe from your home's existing central vacuum system to one of the suction ports on the unit. The CV12000 typically has multiple suction ports; cap any unused ports.
- Connect the exhaust pipe to the exhaust port on the unit. It is recommended to vent the exhaust to the outside to ensure all fine dust particles are removed from your indoor air. The unit includes a muffler for noise reduction.
- Ensure all pipe connections are sealed properly to prevent air leaks, which can reduce suction power. Use appropriate PVC cement for vacuum piping (typically 2-inch diameter).

Image 3.2: Illustrative diagram of a typical central vacuum installation within a multi-story home, showing the main unit in the garage connected via piping to wall inlets throughout the house.
3.3 Electrical Connection
- Plug the unit's power cord into a standard 120V, 60Hz grounded electrical outlet.
- Ensure the circuit can handle the unit's power requirements (1500W).
4. Operating Instructions
The Prolux CV12000 is designed for user-friendly operation. Follow these steps to effectively clean your home.
4.1 Connecting the Hose and Attachments
- Insert the central vacuum hose cuff firmly into any wall inlet valve until it clicks into place. This action typically activates the central vacuum unit.
- Attach the desired cleaning tool (e.g., electric power nozzle, floor brush, crevice tool) to the end of the hose wand.
4.2 Powering On/Off
- The unit will typically turn on automatically when the hose is inserted into a wall inlet.
- Some hoses may feature a power switch (Off, I, II) on the handle. Position 'I' or 'II' will activate the central unit. Refer to your hose manual for specific functions.
- To turn off the unit, remove the hose from the wall inlet or switch the hose handle to the 'Off' position.

Image 4.1: Close-up of the central vacuum unit's control panel, showing indicator lights for 'To Service', 'Clean Filter', and 'Power', providing operational status at a glance.
4.3 Using the Electric Power Nozzle
If your system includes an electric power nozzle, ensure it is properly connected to the electrified hose wand. The power nozzle is ideal for deep cleaning carpets.
- Carpet Height Adjustment: The power nozzle typically has a height adjustment mechanism. Select the appropriate height setting for your carpet type. Too low a setting can make the nozzle difficult to push and may cause the brushes to pull the head across the carpet. Adjust to a higher setting if this occurs.
- Operation: Guide the power nozzle over the carpeted areas in a steady, overlapping motion.
5. Maintenance
Regular maintenance ensures the longevity and optimal performance of your Prolux CV12000 Central Vacuum System.
5.1 Emptying the Dirt Canister
The dirt canister should be emptied regularly, depending on usage, to maintain strong suction and prevent overfilling.
- Ensure the central vacuum unit is turned off and unplugged from the electrical outlet.
- Release the latches securing the dirt canister to the main unit.
- Carefully lower and remove the dirt canister.
- Empty the contents into a trash receptacle.
- Reattach the dirt canister, ensuring the latches are securely fastened.
5.2 Cleaning/Replacing Filters
The Prolux CV12000 features HEPA Shield filtration. Filters should be inspected periodically and cleaned or replaced as needed.
- Refer to the 'Clean Filter' indicator light on the unit (if illuminated) as a reminder for filter maintenance.
- Consult your specific filter type's instructions for cleaning (e.g., tapping out dust, rinsing, or replacement).
- Always ensure filters are completely dry before reinstallation to prevent damage to the unit.
6. Troubleshooting
If you encounter issues with your Prolux CV12000, refer to the following troubleshooting guide. For problems not listed here, contact customer support.
| Problem | Possible Cause | Solution |
|---|---|---|
| Unit does not turn on. | No power, tripped circuit breaker, faulty wall inlet. | Check power cord connection. Reset the circuit breaker on the unit or in your home's electrical panel. Ensure hose is properly inserted into a functional wall inlet. |
| Low or no suction. | Clogged hose/piping, full dirt canister, dirty filter, air leak. | Check hose and piping for obstructions. Empty dirt canister. Clean or replace filters. Inspect all pipe connections for leaks. |
| Motor head not spinning (if applicable). | No power to head, belt broken, obstruction in brush roll. | Ensure hose is fully engaged and receiving power. Check for obstructions in the brush roll. Inspect and replace belt if broken. |
| Unit runs continuously. | Faulty wall inlet switch, short in wiring. | Remove hose from all inlets. If unit continues to run, unplug and contact customer support. |

Image 6.1: Side panel of a central vacuum unit, displaying the main power switch and a 'PRESS TO RESET' circuit breaker button, which can be used to restore power after an overload.
7. Specifications
Key technical specifications for the Prolux CV12000 Central Vacuum Unit System:
- Brand: Prolux
- Model: CV12000
- Power Source: Corded Electric
- Voltage: 120 Volts
- Manufacturer: ProLux
- Item Weight: 55 pounds
- Noise Level: 58 Decibels
- Special Feature: Bagless, Lightweight (referring to attachments)
- Included Components: Nozzle (Electric Hose Power Nozzle Kit)
- Recommended Uses For Product: Carpet
- Surface Recommendation: Carpet
- Form Factor: Stick (referring to attachments)
- Color: Red
- Number of Power Levels: 1
8. Warranty and Support
Prolux stands behind its products. The CV12000 Central Vacuum System includes a 10-year warranty on the motor. For specific warranty details, including coverage for parts and labor, please refer to your warranty card or contact Prolux customer service.
For product help, technical support, or warranty claims, please contact Prolux customer service. Our vacuum experts are available to assist you with setup, operation, and troubleshooting.
- Warranty Coverage: 10-year motor warranty.
- Customer Support: Contact Prolux for assistance.