1. Product Overview
The Superior Electric S77-54 Aftermarket Depth Adjustment Lever Assembly is a replacement part designed for specific Skil worm drive saws. This assembly replaces the OEM part number 2610317088.
This kit typically includes the adjustment lever, a locking nut, and an E-clip. Two such kits are commonly used on compatible saw models: one for locking the cutting angle at the front of the saw, and another for locking the depth of cut at the back of the saw.
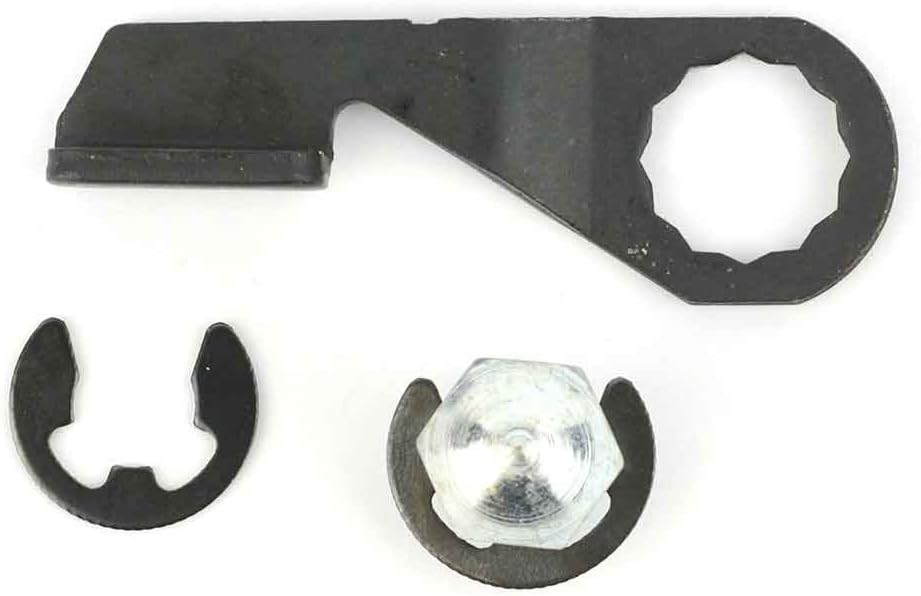
Image 1: Components of the S77-54 Depth Adjustment Lever Assembly, including the lever, E-clip, and locking nut.
1.1 Compatibility
This part is compatible with the following Skil saw models:
- HD77 Type 17 Worm Drive Saw (Skilsaw 77)
- HD77M (F012HM7702) 7 1/4" Magnesium Worm Drive Skilsaw
- HD77M-72 (F012HM7772) 7 1/4" Magnesium Worm Drive Skilsaw
- SHD77 (F012SD7700) 7 1/4" Worm Drive Skilsaw
- SHD77 (F012SD7705) 7 1/4" Worm Drive Skilsaw
- SHD77M (F012SD7702) 7 1/4" Magnesium Worm Drive Skilsaw
- SHD77M (F012SD7707) 7 1/4" Magnesium Worm Drive Skilsaw
- 5865 Power Saw
2. Installation (Setup)
Installation of the depth adjustment lever assembly requires careful attention to detail. It is recommended to consult your saw's original service manual for specific disassembly and reassembly instructions.
2.1 Safety Precautions
- Always disconnect the saw from the power source before attempting any installation or maintenance.
- Wear appropriate personal protective equipment (PPE), such as gloves and eye protection.
- Ensure the work area is clean, well-lit, and free of obstructions.
2.2 General Installation Steps
- Disassembly: Carefully remove the old or broken depth adjustment lever assembly from your saw. This may involve removing retaining clips, screws, or nuts. Note the orientation and position of all components.
- Component Identification: Identify the new lever, locking nut, and E-clip from the S77-54 kit.
- Assembly: Position the new depth adjustment lever onto the saw's mechanism. Secure it using the provided E-clip and locking nut. Ensure the lever moves freely but can be tightened to hold its position.
- Testing: After installation, manually test the lever's function to ensure it properly locks and unlocks the desired angle or depth setting.

Image 2: Close-up view of the S77-54 assembly, highlighting the locking nut and E-clip for installation reference.
Note: Some users have reported that the included locking nut may not be compatible with all original Skil saw threads. If this occurs, it may be necessary to reuse the original locking nut if it is still functional, or source a compatible replacement.
3. Operating the Depth Adjustment Lever
The depth adjustment lever is crucial for setting precise cutting depths and angles on your saw. Its operation is straightforward:
- To Adjust: Loosen the depth adjustment lever by rotating it counter-clockwise. This will allow the saw's base plate to move freely, enabling you to set the desired cutting depth or angle.
- To Lock: Once the desired depth or angle is achieved, tighten the depth adjustment lever by rotating it clockwise. Ensure it is securely fastened to prevent any movement during operation, which could affect cut accuracy and safety.
Always ensure the lever is fully tightened before operating the saw to maintain stability and accuracy.
4. Maintenance
Regular maintenance helps ensure the longevity and proper function of your depth adjustment lever assembly.
- Cleaning: Periodically clean the lever and its surrounding area to remove sawdust, debris, and grime. A dry cloth or soft brush is usually sufficient. Avoid using harsh chemicals that could damage the material.
- Lubrication: Apply a small amount of light machine oil or silicone spray to the pivot points and threads of the locking mechanism to ensure smooth operation. Wipe off any excess lubricant.
- Inspection: Regularly inspect the lever, nut, and E-clip for signs of wear, damage, or looseness. Replace any worn or damaged components immediately to prevent operational issues.
5. Troubleshooting
If you encounter issues with your depth adjustment lever assembly, consider the following troubleshooting steps:
| Problem | Possible Cause | Solution |
|---|---|---|
| Lever does not lock securely. | Loose or stripped locking nut; worn lever mechanism. | Ensure the locking nut is fully tightened. If it spins freely or does not grip, the nut or the lever's threads may be stripped and require replacement. |
| Lever is stiff or difficult to move. | Accumulation of dirt/debris; lack of lubrication. | Clean the lever and its pivot points thoroughly. Apply a small amount of lubricant to the moving parts. |
| New locking nut does not fit. | Incompatible thread pitch with original saw component. | Reuse the original locking nut if it is in good condition. If not, source a locking nut with the correct thread pitch for your specific saw model. |
| Lever feels loose after installation. | Improper installation of E-clip or nut; incorrect part size. | Verify that the E-clip is correctly seated and the locking nut is fully tightened. Confirm the part is indeed compatible with your specific saw model. |
6. Specifications
| Attribute | Detail |
|---|---|
| Brand | Superior Electric |
| Model Number | S77-54 |
| Replaces OEM # | 2610317088 |
| Item Weight | 1.44 ounces (approx. 0.04 Kilograms) |
| Package Dimensions | 3.82 x 3.19 x 2.68 inches |
| Material | Plastic or Rubber (Handle), Metal (Lever, Nut, E-clip) |
| Special Feature | Depth Adjustment |
| Color | Black |
7. Warranty Information
This Superior Electric S77-54 Aftermarket Depth Adjustment Lever Assembly comes with a limited warranty. For specific details regarding warranty coverage, terms, and conditions, please refer to the warranty documentation included with your purchase or contact Superior Electric directly.
8. Support
For further assistance, technical support, or inquiries regarding the Superior Electric S77-54 Aftermarket Depth Adjustment Lever Assembly, please contact the manufacturer or your authorized dealer. When contacting support, please have your product model number (S77-54) and any relevant purchase information ready.