
1. Introduction
The Youshiko YC9350 Wireless Weather Station provides accurate indoor and outdoor temperature and humidity readings, a radio-controlled clock, and a weather forecast display. This manual will guide you through the setup, operation, and maintenance of your device to ensure optimal performance.
2. Package Contents
Please verify that all items are present in your package:
- 1 x YC9350 Main Weather Station Unit
- 1 x YC9311 Wireless Outdoor Sensor (Splash-proof)
- 1 x Instruction Manual
3. Product Overview
Familiarize yourself with the main unit and wireless sensor components.

Figure 3.1: Front view of the YC9350 Main Unit display.

Figure 3.2: YC9350 Main Unit with blue backlight and YC9311 Wireless Sensor.
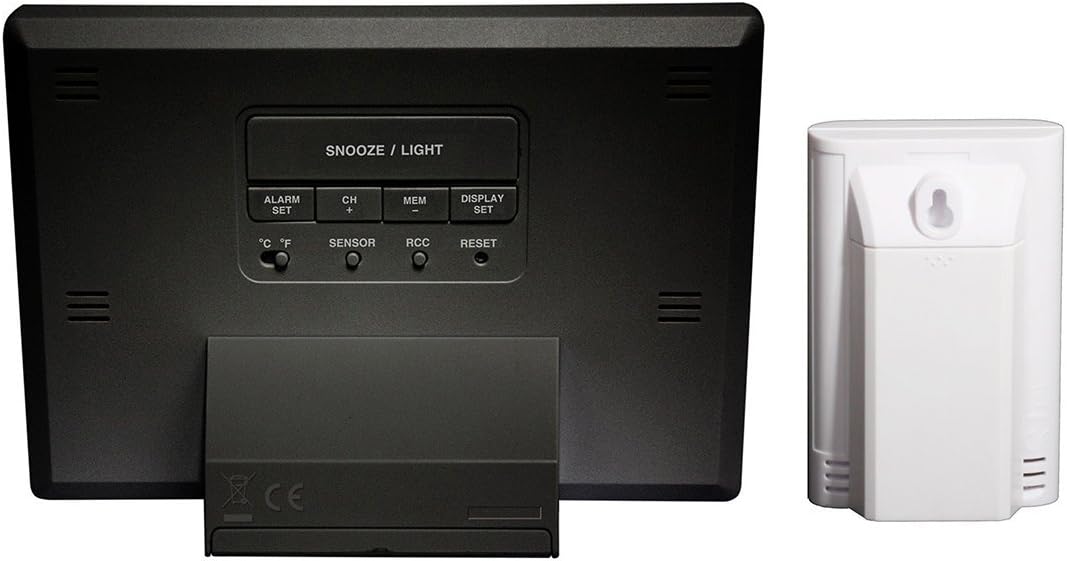
Figure 3.3: Rear view of the Main Unit and Wireless Sensor, showing buttons and battery compartments.
3.1 Main Unit (YC9350)
- Display: Shows time, indoor/outdoor temperature, indoor/outdoor humidity, and weather forecast icons.
- Buttons (Rear): ALARM/SET, CH/+, MEM, DISPLAY/SET, °C/°F, SENSOR, RCC, RESET.
- SNOOZE/LIGHT Button (Top): Activates backlight and snooze function.
- Battery Compartment: Located on the rear.
3.2 Wireless Outdoor Sensor (YC9311)
- Display: Shows current channel, temperature, and humidity.
- Mounting Hole: For wall mounting.
- Battery Compartment: Located on the rear.
- RESET Button: For re-synchronization.
4. Setup
4.1 Battery Installation
- Main Unit: Open the battery compartment on the rear. Insert 2 x AA batteries (not included), observing the correct polarity (+/-). Close the compartment.
- Wireless Sensor: Open the battery compartment on the rear. Insert 2 x AA batteries (not included), observing the correct polarity (+/-). Close the compartment.
Note: It is recommended to insert batteries into the main unit first, then the sensor.
4.2 Initial Synchronization
After battery installation, the main unit will automatically attempt to connect with the wireless sensor. This process may take a few minutes. Ensure the sensor is within range (up to 50 meters / 160 feet in open air) of the main unit.
- If the connection is not established, press the RESET button on both the main unit and the sensor (main unit first, then sensor).
- The main unit can support up to 3 wireless sensors. Press the SENSOR button to cycle through channels if you have multiple sensors.
4.3 Wireless Sensor Placement
For accurate outdoor readings, place the wireless sensor in a sheltered location, away from direct sunlight and heavy rain. While the sensor is splash-proof, it is not fully waterproof. Consider mounting it on a north-facing wall or under an overhang. The sensor can be wall-mounted using the integrated hole or placed on a flat surface.

Figure 4.1: Front view of the YC9311 Wireless Sensor.

Figure 4.2: Rear view of the YC9311 Wireless Sensor with mounting option.
4.4 Radio Controlled Clock (RCC) Setup
The YC9350 features a Radio Controlled Clock (RCC) that automatically synchronizes with the MSF signal from Cumbria, UK, ensuring precise timekeeping. The clock will automatically adjust for British Summer Time (BST) changes.
- After initial power-up, the unit will automatically search for the MSF signal. A signal tower icon will flash on the display.
- Once the signal is received, the time will set automatically, and the signal tower icon will become solid. This process may take several minutes or hours depending on location and interference.
- If the signal is not received, try placing the unit near a window or in a location with less interference.
- To manually initiate an RCC search, press and hold the RCC button on the rear of the main unit.

Figure 4.3: Information on Radio Control Systems (MSF for UK).
5. Operation
5.1 Display Information
The main unit's display is divided into several sections:
- Time: Displays the current time (12/24 hour format).
- Indoor Temperature & Humidity: Readings from the main unit.
- Outdoor Temperature & Humidity: Readings from the wireless sensor.
- Weather Forecast: Animated icons indicating predicted weather trends (sunny, partly cloudy, cloudy, rainy, snowy).
- Ice Alert: An icon will appear when outdoor temperature approaches freezing.
- RCC Signal Indicator: Shows the status of the radio-controlled clock signal.
- Low Battery Indicator: Appears when batteries need replacement for either the main unit or sensor.
5.2 Temperature Unit Selection (°C/°F)
Press the °C/°F button on the rear of the main unit to switch between Celsius and Fahrenheit temperature display.
5.3 Viewing Minimum/Maximum Readings
Press the MEM button repeatedly to cycle through current, maximum (MAX), and minimum (MIN) recorded indoor and outdoor temperature and humidity values. The readings reset automatically every 24 hours or can be manually cleared by holding the MEM button.
5.4 Setting the Alarm
- Press the ALARM/SET button once to display the alarm time.
- Press and hold the ALARM/SET button until the hour digit flashes. Use the CH/+ button to adjust the hour.
- Press ALARM/SET again, and the minute digit will flash. Use the CH/+ button to adjust the minutes.
- Press ALARM/SET to confirm.
- To activate/deactivate the alarm, press the ALARM/SET button once to display the alarm time, then press CH/+ to toggle the alarm on/off (an alarm icon will appear/disappear).
5.5 Snooze Function and Backlight
- When the alarm sounds, press the SNOOZE/LIGHT button on top of the unit to activate the snooze function. The alarm will sound again after approximately 5 minutes.
- Press any other button to stop the alarm for 24 hours.
- Press the SNOOZE/LIGHT button at any time to activate the blue backlight for a few seconds.
5.6 Weather Forecast
The weather station predicts weather trends for the next 12-24 hours based on atmospheric pressure changes. The accuracy is approximately 70-75%. The forecast icons include:
- Sunny
- Partly Cloudy
- Cloudy
- Rainy
- Snowy (indicated by a snowflake icon when temperature is low)
6. Maintenance
6.1 Battery Replacement
When the low battery indicator appears on the display, replace the batteries in the respective unit (main unit or sensor) with new AA batteries. Always replace all batteries in a unit at the same time.
6.2 Cleaning
Clean the unit and sensor with a soft, damp cloth. Do not use abrasive cleaners or solvents, as these may damage the display or casing.
6.3 Sensor Care
Ensure the wireless sensor remains in a sheltered location to protect it from extreme weather conditions, especially heavy rain, to prolong its lifespan and maintain accuracy.
7. Troubleshooting
| Problem | Possible Cause | Solution |
|---|---|---|
| No outdoor temperature/humidity reading | Sensor out of range, low sensor battery, interference, sensor not synchronized. | Move sensor closer to main unit. Replace sensor batteries. Press RESET on both units (main first, then sensor). Avoid placing near electronic devices. |
| Incorrect time display | RCC signal not received, manual time setting error. | Ensure unit is in a location with good MSF signal reception. Manually initiate RCC search by holding the RCC button. Check time zone setting if applicable. |
| Display is dim or blank | Low main unit battery. | Replace main unit batteries. |
| Weather forecast seems inaccurate | Weather forecast is a prediction based on pressure changes and has inherent limitations. | This is normal. The forecast provides a general trend, not a precise prediction. |
8. Specifications
- Model: YC9350
- Brand: Youshiko
- Main Unit Dimensions (H x L x W): 100 x 140 x 47 mm
- Wireless Sensor Dimensions (H x L x W): 100 x 65 x 35 mm
- Indoor Temperature Range: -9.9°C to +50°C (14.2°F to 122°F)
- Outdoor Temperature Range: -40°C to +70°C (-40°F to 158°F)
- Temperature Accuracy: ±1°C
- Humidity Range: 20% to 90% RH
- Connectivity: Wireless (433MHz)
- Wireless Range: Up to 50 meters (160 feet) in open air
- Power Source (Main Unit): 2 x AA batteries (not included)
- Power Source (Sensor): 2 x AA batteries (not included)
- Special Features: Radio Controlled Clock (MSF - UK Version), Alarm with Snooze, LED Backlight, Ice Alert, Min/Max Temperature/Humidity Display, Multi-sensor capability (up to 3).
- Colour: Black
9. Warranty and Support
For warranty information and technical support, please refer to the contact details provided with your purchase documentation or visit the official Youshiko website. Keep your proof of purchase for any warranty claims.