1. Introduction
This instruction manual provides detailed guidance for the safe and effective use of the EWK 24 Pcs Timing Chain Riveting/Separating Tool Kit. This kit is designed for the removal and installation of timing chains on specific Mercedes-Benz and Chrysler/Jeep engines. Please read this manual thoroughly before operation to ensure proper usage and prevent damage to the tool or vehicle.
2. Safety Information
Always observe general workshop safety procedures when using this tool kit. Failure to do so may result in personal injury or damage to the vehicle.
- Wear appropriate personal protective equipment, including safety glasses and gloves.
- Ensure the vehicle is stable and properly supported before beginning any work.
- Disconnect the vehicle's battery to prevent accidental starting or electrical hazards.
- Keep the work area clean and well-lit.
- Do not use damaged or modified tools.
- Consult the vehicle's service manual for specific timing chain procedures and torque specifications.
- Keep children and unauthorized personnel away from the work area.
3. Package Contents
The EWK 24 Pcs Timing Chain Riveting/Separating Tool Kit includes the following components:

Image: Overview of the EWK Timing Chain Tool Kit components.
- A. 3+4mm Chain Separator Tool: Used for breaking the timing chain.
- B. 3+4mm Chain Riveter Tool: Used for riveting the new timing chain.
- C. 4mm Separation and Pilot Bolt: Aids in chain separation and guiding.
- D. 4 x Link Removal Pin: Pins for removing chain links.
- E. Temporary Assembly Link: Used to temporarily connect chain ends.
- F. Securing Bolt: For securing components during operation.
- G. Temporary Threading Link: Assists in threading the new chain.
- H. Outer Plates: Used with temporary links.
- I. 3+4mm Assembly Thrust Piece: Component for chain assembly.
- J. 4mm Riveting Thrust Piece: For riveting 4mm chains.
- K. 3mm Riveting Thrust Piece: For riveting 3mm chains.
- L. 4mm Riveting Simplex Guide Rail: Guide for 4mm simplex chains.
- M. 3+4mm Assembly Guide Rail: Guide for 3mm and 4mm chain assembly.
- N. 3mm Riveting Duplex Guide Rail: Guide for 3mm duplex chains.
- O. 4mm Riveting Duplex Guide Rail: Guide for 4mm duplex chains.
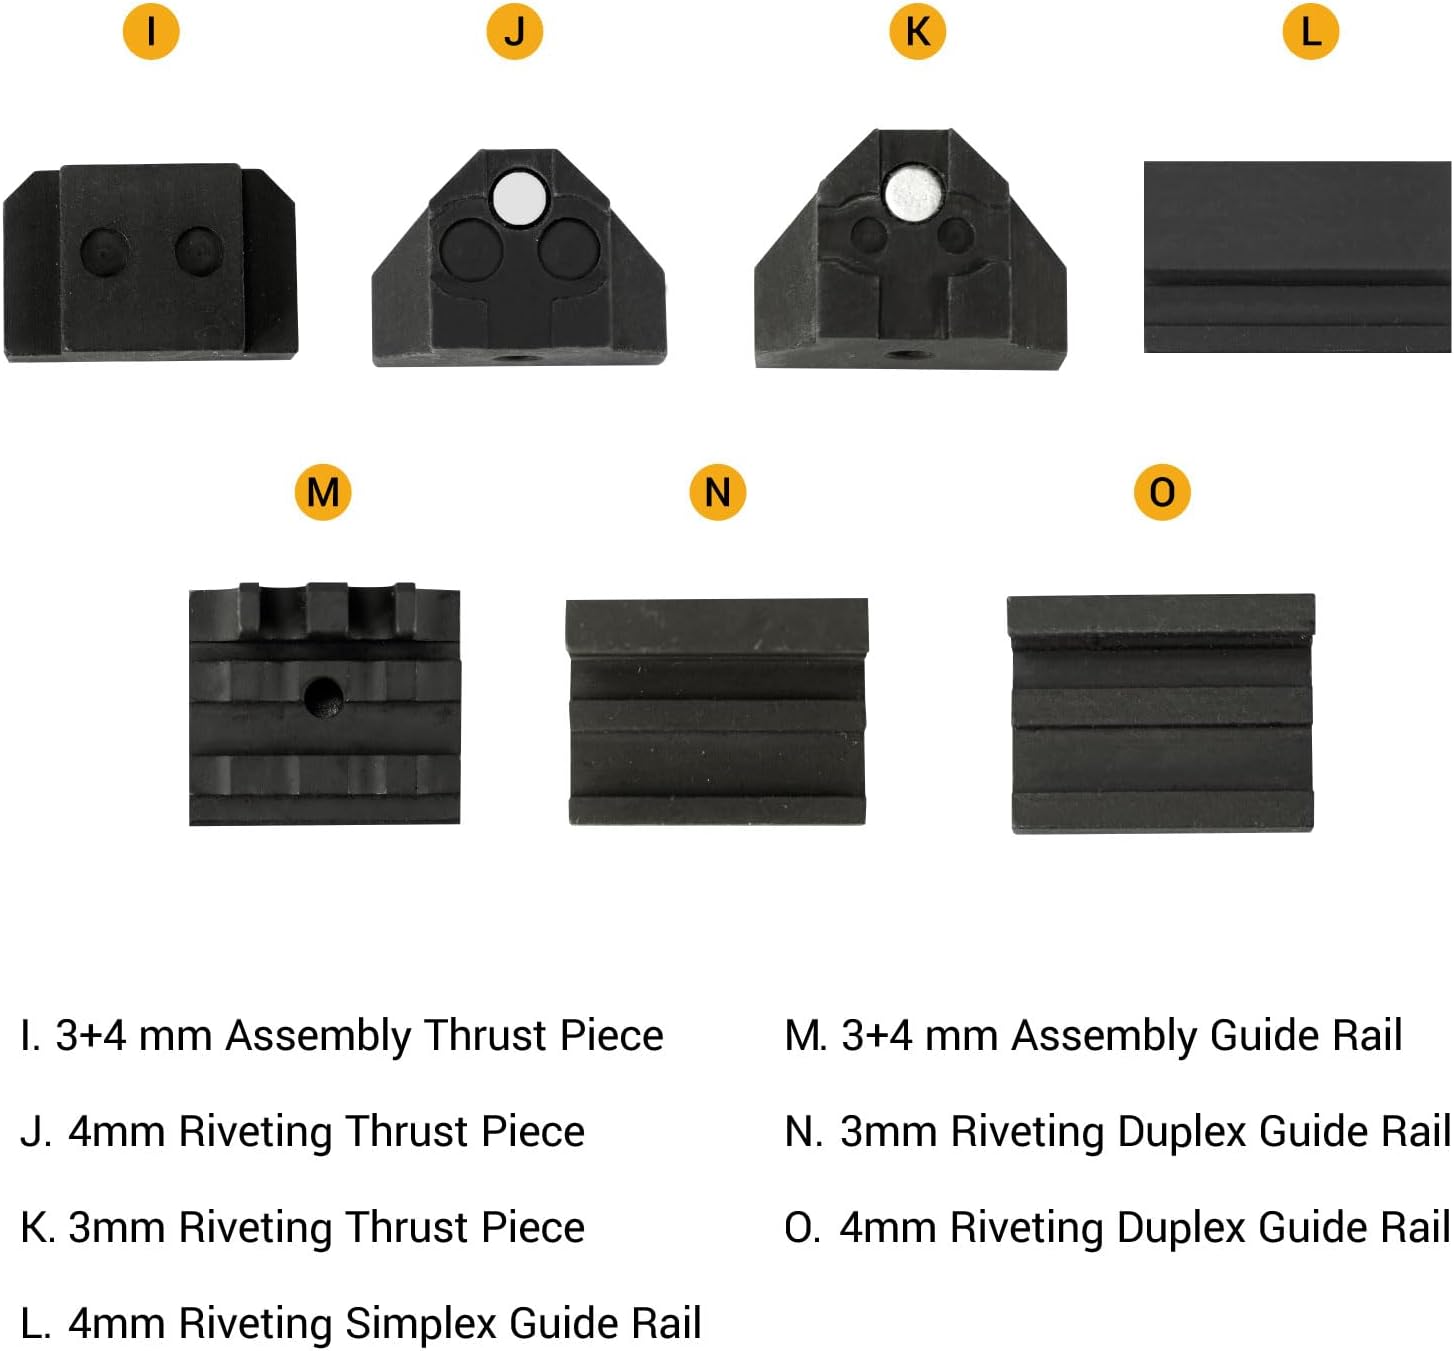
Image: Detailed view of thrust pieces and guide rails included in the kit.
4. Vehicle Compatibility
This tool kit is compatible with a range of Mercedes-Benz and Chrysler/Jeep engines. It is suitable for simplex, duplex, and double-roller chains on petrol and diesel engines.
Mercedes-Benz Engines:
- M615, M616, M617, M102, M103, M116, M271, M272, M273, M276
- 1.7D, 2.1D, 2.2D, 2.7D, 3.0D, 3.2D, 3.9D, and 4.0D CDi models.
Chrysler / Jeep Engines:
- 2.2D, 2.7D, and 3.0D CRD engines.

Image: Part 1 of the compatibility chart for Mercedes-Benz engines.

Image: Part 2 of the compatibility chart, including Mercedes-Benz and Chrysler/Jeep engines.
5. Setup and Preparation
Before using the tool, ensure all components are clean and free from damage. Select the appropriate thrust pieces and guide rails based on the timing chain type (simplex or duplex) and pin size (3mm or 4mm) of your vehicle's engine.
- Identify the type and size of the timing chain on your vehicle. Refer to your vehicle's service manual for this information.
- Select the corresponding chain separator and riveter tools, along with the correct thrust pieces and guide rails.
- Assemble the chain separator or riveter tool by inserting the appropriate components as needed for the specific task.
6. Operating Instructions
6.1. Timing Chain Separation (Breaking)
This procedure outlines how to safely separate an existing timing chain using the EWK tool kit.
- Position the chain separator tool (A) over the chain link to be broken. Ensure the pin of the tool aligns precisely with the pin of the chain link.
- Slowly turn the threaded bolt of the separator tool clockwise using a suitable wrench. This will push the chain pin out of the link.
- Continue turning until the chain pin is fully pushed out and the chain separates.
- Carefully remove the separator tool and the separated chain.
Video: Demonstration of timing chain removal using a similar tool. This video illustrates the general process of separating a timing chain.

Image: The chain separator tool in use, pushing out a chain pin.
6.2. Timing Chain Riveting (Installation)
This procedure outlines how to rivet a new timing chain or connect chain ends using the EWK tool kit.
- Connect the new timing chain to the old chain using a temporary assembly link (E) if feeding the new chain through.
- Once the new chain is in position, remove the temporary link.
- Insert the new master link (not included, typically comes with the new chain) into the chain ends.
- Place the appropriate riveting thrust piece (J or K) and guide rail (L, N, or O) into the chain riveter tool (B).
- Position the riveter tool over the master link, ensuring the thrust piece aligns with the chain pins.
- Slowly turn the threaded bolt of the riveter tool clockwise. This will press the master link's pins and rivet them into place.
- Ensure the pins are properly flared and secured. Check for proper articulation of the newly riveted link.
Video: Demonstration of timing chain riveting using a similar tool. This video shows the process of installing and riveting a timing chain.

Image: The chain riveter tool in use, securing a new chain link.
7. Maintenance
Proper maintenance ensures the longevity and reliable performance of your EWK Timing Chain Tool Kit.
- After each use, clean all tool components thoroughly to remove oil, grease, and debris.
- Apply a light coat of rust-preventative oil to all metal parts before storage.
- Store the tool kit in its original case in a dry, clean environment to prevent corrosion and damage.
- Inspect pins and threaded components for wear or damage before each use. Replace worn parts as necessary.
8. Troubleshooting
If you encounter issues while using the tool kit, consider the following common solutions:
- Tool not engaging chain properly: Ensure the correct thrust piece and guide rail are selected for your chain type and size. Verify the tool is correctly aligned with the chain link.
- Difficulty in pushing out chain pin: Ensure the pin of the separator tool is perfectly aligned with the chain pin. Apply steady, even pressure. If excessive force is required, re-check alignment or consider if the pin is seized.
- Riveted pin not secure: Ensure the correct riveting thrust piece is used. Apply sufficient pressure to properly flare the pin. Verify the chain link is fully seated before riveting.
- Tool damage: Discontinue use immediately if any part of the tool appears damaged. Do not attempt to repair damaged components; contact EWK customer support for assistance.
9. Specifications
| Feature | Specification |
|---|---|
| Model Number | EB0189 |
| Item Weight | 6.89 pounds |
| Product Dimensions | 11.57 x 7.6 x 2.36 inches |
| Material | Hardened Steel |
| Chain Compatibility | Simplex, Duplex, Double-roller (3mm & 4mm pins) |
10. Warranty and Support
This EWK product is backed by an extraordinary 12+6 months warranty. For warranty claims, technical support, or inquiries regarding replacement parts, please contact EWK customer service through their official channels or the retailer where the product was purchased.