1. Introduction
This manual provides essential information for the safe and efficient operation of your Goplus 2642 GPH Pond Filter. Please read these instructions thoroughly before installation and use, and retain them for future reference.
1.1 Intended Use
The Goplus 2642 GPH Pond Filter is designed for filtering and maintaining water quality in outdoor ponds, including koi ponds and ornamental ponds, up to 2642 gallons. It employs a multi-stage filtration system to remove debris and promote biological balance.
1.2 Package Contents
- Goplus Pond Filter Unit
- Filter Foams (Coarse and Fine)
- Bio Balls
- Hose Adapters
- Instruction Manual
2. Safety Instructions
WARNING: Failure to follow these safety instructions may result in electric shock, fire, or serious injury.
- Always disconnect the power supply before performing any maintenance, cleaning, or installation procedures.
- Ensure the electrical outlet is a Ground Fault Circuit Interrupter (GFCI) protected outlet.
- Do not operate the filter if the power cord or plug is damaged.
- Keep all electrical connections dry and away from water.
- This appliance is not intended for use by persons (including children) with reduced physical, sensory or mental capabilities, or lack of experience and knowledge, unless they have been given supervision or instruction concerning use of the appliance by a person responsible for their safety.
- Do not use the filter for purposes other than its intended use.
- Ensure the filter is placed on a stable, level surface.
- Protect the unit from extreme temperatures outside its operating range (-4°F to 104°F).
3. Product Components
Familiarize yourself with the various parts of your Goplus Pond Filter for proper installation and maintenance.

Figure 3.1: Main view of the Goplus Pond Filter.

Figure 3.2: Labeled diagram showing the filter's handle, function switch, turbidimeter, water inlet, water outlet, sewage outlet, coarse pore filter sponge, fine pore filter sponge, and bio balls.
- Handle: For easy transport and securing the lid.
- Function Switch: Controls the filter's operational modes (e.g., filtration, cleaning).
- Turbidimeter: Visual indicator for filter cleanliness.
- Water Inlet: Connects to the pond pump.
- Water Outlet (Drainage Outlet): Returns filtered water to the pond.
- Sewage Outlet: Used for discharging dirty water during cleaning cycles.
- Coarse Pore Filter Sponge: Mechanical filtration for larger debris.
- Fine Pore Filter Sponge: Mechanical filtration for smaller particles.
- Bio Balls: Provide surface area for beneficial bacteria, facilitating biological filtration.
4. Setup
Proper setup is crucial for the filter's performance and longevity.
4.1 Placement
The filter can be placed on the shore or partially buried underground. Ensure it is on a stable, level surface and easily accessible for maintenance. Position it close enough to the pond for hose connections but away from direct sunlight if possible to prevent excessive heat buildup.

Figure 4.1: Example of filter placement next to a pond.
4.2 Hose Connections
Connect appropriate hoses to the filter's inlet and outlet ports. Use hose clamps to secure all connections to prevent leaks.

Figure 4.2: Diagram illustrating the water inlet, drainage outlet, and sewage outlet connections.
- Water Inlet: Connect the hose from your pond pump to the water inlet.
- Drainage Outlet: Connect a hose from this outlet back to your pond to return filtered water.
- Sewage Outlet: Connect a hose from this outlet to a suitable drainage area (e.g., garden bed, sewer system) for discharging dirty water during cleaning.

Figure 4.3: Schematic diagram of the pond filter system, showing the pump in the pond, water flowing to the filter, and filtered water returning to the pond.
4.3 Electrical Connection
Plug the filter's power cord into a GFCI-protected electrical outlet. Ensure the power cord is routed safely to avoid damage or tripping hazards.
5. Operating Instructions
5.1 Initial Start-up
- Ensure all hose connections are secure and the filter is properly placed.
- Turn on your pond pump. Allow water to fill the filter unit.
- Plug in the filter's power cord. The filter will begin its filtration process.
- Check for any leaks immediately after start-up.
5.2 Normal Operation
The filter operates continuously to maintain water clarity. Monitor the turbidimeter (if present) for an indication of filter cleanliness. A red indicator typically suggests the filter requires cleaning.
5.3 Function Switch
The function switch on the top of the unit allows you to select different modes, such as normal filtration or backwash/cleaning mode. Refer to the markings on the switch for specific positions and their functions.
6. Maintenance
Regular maintenance ensures optimal performance and extends the life of your filter.
6.1 Regular Cleaning (Quick-Flush)
The filter features a quick-flush valve for easy cleaning. When the turbidimeter indicates cleaning is needed, or water flow significantly reduces:
- Ensure the sewage outlet hose is directed to a suitable drainage area.
- Rotate the function switch to the 'Clean' or 'Backwash' position.
- Activate the cleaning mechanism (e.g., pump the handle or press a button, depending on the model) to flush out accumulated debris.
- Continue flushing until the water discharged from the sewage outlet runs clear.
- Return the function switch to the 'Filter' or 'Normal Operation' position.
6.2 Filter Media Cleaning/Replacement
Periodically, the filter sponges and bio balls may require more thorough cleaning or replacement.
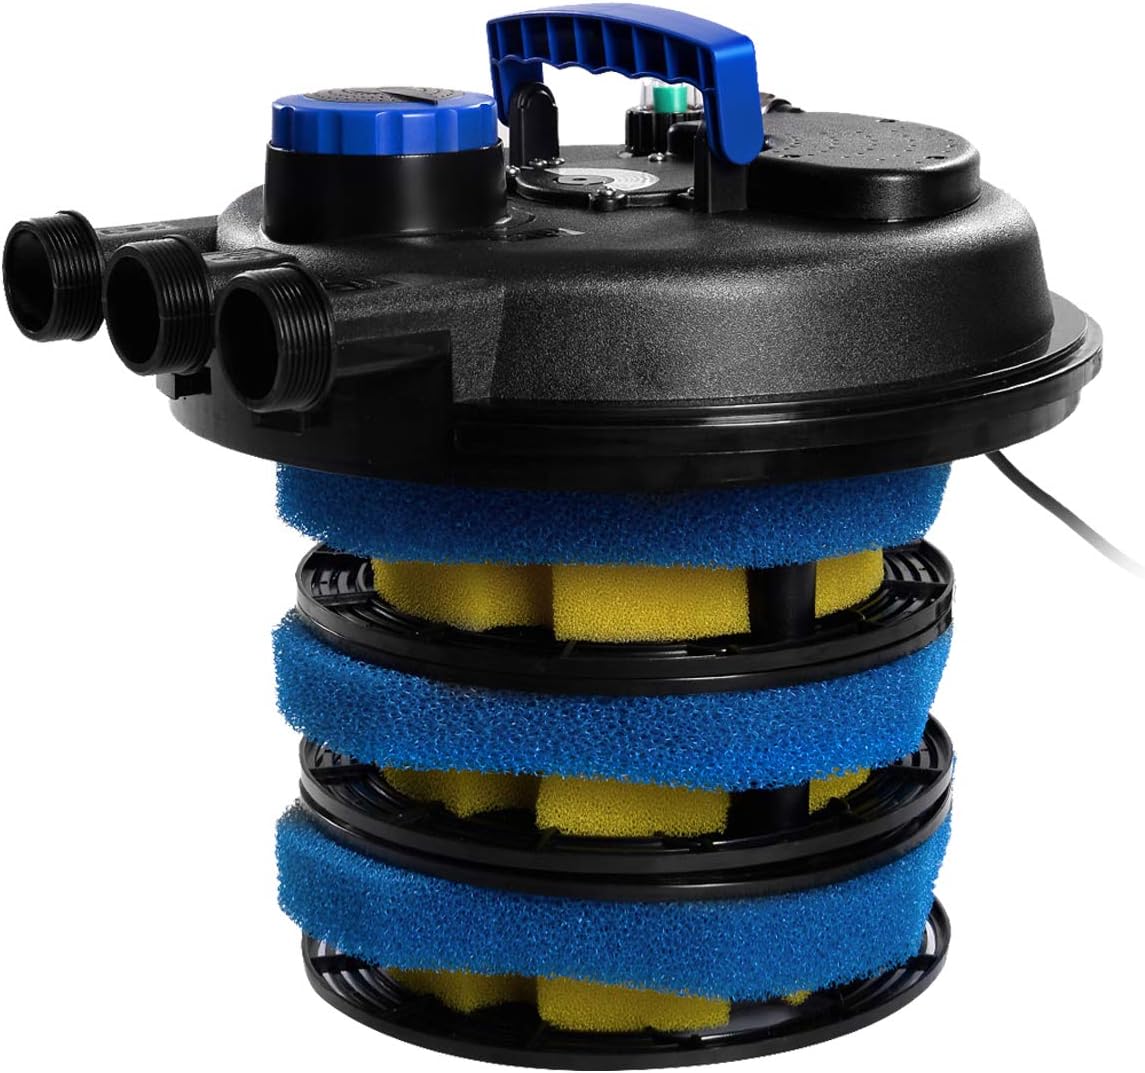
Figure 6.1: Internal view showing the layered filter sponges and bio balls.
- Disconnect Power: Always unplug the filter and pump before opening the unit.
- Open Unit: Release the clamps or latches securing the lid and carefully remove it.
- Remove Media: Carefully lift out the filter sponges and bio balls.
- Clean Media: Rinse the sponges thoroughly with pond water (not tap water, to preserve beneficial bacteria) until clean. Bio balls can also be gently rinsed.
- Inspect: Check sponges for wear and tear. Replace if heavily damaged or clogged beyond cleaning.
- Reassemble: Place the clean media back into the filter in the correct order (coarse sponge first, then fine sponge, then bio balls).
- Secure Lid: Replace the lid and secure all clamps/latches.
- Restart: Reconnect power and restart the system as per initial start-up instructions.
6.3 UV Lamp Maintenance (If Applicable)
If your model includes a UV lamp, it will require periodic inspection and replacement. UV lamps typically need to be replaced every 8-12 months of continuous operation, as their effectiveness diminishes over time. Refer to the specific instructions for UV lamp replacement provided with your unit or contact customer support.
7. Troubleshooting
This section addresses common issues you might encounter with your pond filter.
| Problem | Possible Cause | Solution |
|---|---|---|
| Water not clearing / Poor filtration | Clogged filter media Insufficient pump flow UV lamp ineffective (if applicable) Pond size exceeds filter capacity | Perform quick-flush or manual cleaning of filter media. Check pump for blockages or proper operation. Replace UV lamp. Ensure filter is appropriately sized for your pond. |
| Water leaks from unit | Loose hose connections Damaged O-rings or seals Cracked housing | Tighten all hose clamps. Inspect and replace O-rings/seals if damaged. Contact customer support for housing damage. |
| Filter not powering on | No power to outlet GFCI tripped Damaged power cord/plug | Check power supply to the outlet. Reset GFCI outlet. Inspect power cord for damage; do not use if damaged. Contact customer support. |
| Turbidimeter always green (clean) but water is dirty | Sensor malfunction Extremely low flow rate | Manually check filter media for clogging. If clean, contact customer support. Ensure pump is providing adequate flow. |
8. Specifications
| Feature | Specification |
|---|---|
| Model | Pressure filter |
| Brand | Goplus |
| Maximum Pond Capacity (Ornamental) | 2642 Gallons |
| Maximum Pond Capacity (Koi) | 1321 Gallons |
| Filtration Stages | 4-stage (Vortex, Dual Foam, Bio-balls) |
| Housing Material | ABS |
| Waterproof Rating | IP44 |
| Operating Temperature Range | -4°F to 104°F |
| Product Dimensions | 22 x 17 x 17 inches |
| Item Weight | 17.74 pounds |
| Liquid Volume | 10000 Liters |
9. Warranty and Support
Goplus products are manufactured to high-quality standards. For specific warranty information, please refer to the documentation included with your purchase or visit the official Goplus website. If you encounter any issues or require technical assistance, please contact Goplus customer support. Have your model number and purchase date available when contacting support.
Contact Information: Refer to your purchase receipt or the Goplus official website for the most current customer service contact details.