
1. Introduction
This manual provides detailed instructions for the installation, operation, and maintenance of your UNI-T ZHUDELE ZDL-27M2 7-inch LCD Video Door Phone System. Please read this manual thoroughly before installation and use to ensure proper functionality and safety.
2. Product Features
- Outdoor Unit: IP56 rated waterproof design with an integrated rain shade to protect against direct sunlight. Features a durable construction and a high-definition CCD camera with night vision capabilities.
- Indoor Unit: Equipped with a 7-inch TFT-LCD screen for clear video display.
- Communication: Enables two-way, hands-free communication between indoor and outdoor units.
- Monitoring Function: Allows monitoring of the outdoor environment.
- Adjustable Settings: Brightness, chroma, and ring volume are adjustable.
- Ring Tones: Offers eight selectable melody rings.
- Installation: Designed for DIY installation.
3. Components Overview
Familiarize yourself with the main components of your video door phone system.

Figure 3.1: Overview of the UNI-T ZHUDELE ZDL-27M2 Video Door Phone System, showing one outdoor unit and two indoor monitor units.
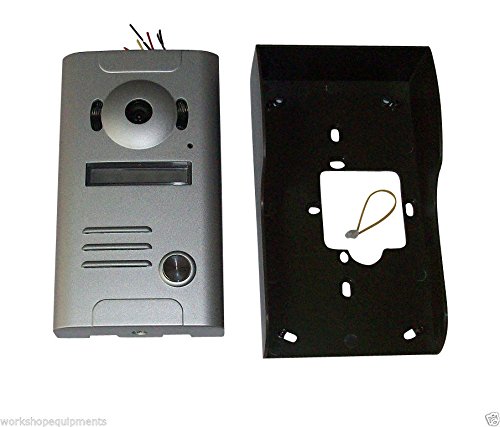
Figure 3.2: Front view of the ZHUDELE ZDL-M outdoor unit, featuring the camera, speaker, microphone, and call button.
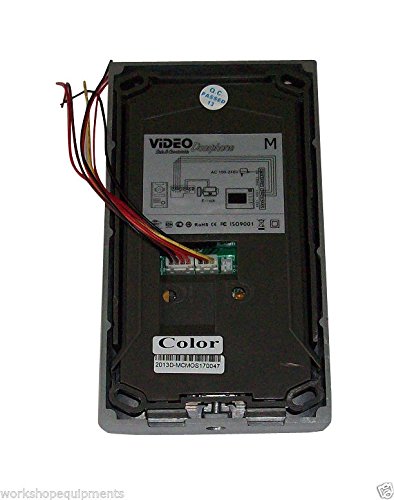
Figure 3.3: Rear view of the ZHUDELE ZDL-M outdoor unit, displaying the wiring connections and internal components.

Figure 3.4: Front view of the ZHUDELE ZDL-27 indoor monitor, showing the 7-inch LCD screen and control buttons.

Figure 3.5: Rear view of the ZHUDELE ZDL-27 indoor monitor, illustrating the mounting bracket and wiring terminals.

Figure 3.6: Side view of the ZHUDELE ZDL-27 indoor monitor, highlighting the brightness, chroma, and ring volume adjustment controls.
4. Setup and Installation
4.1 Wiring Requirements
Proper wiring is crucial for optimal performance. Use RVV6 cables with the following specifications based on distance:
- Up to 30 meters: RVV6 x 0.5 mm² cable
- Up to 50 meters: RVV6 x 0.75 mm² cable
- Up to 100 meters: RVV6 x 1.0 mm² cable
Ensure all connections are secure and follow the wiring diagrams provided on the rear of both indoor and outdoor units.
4.2 Outdoor Unit Installation
Mount the outdoor unit in a location that provides a clear view of the entrance. The integrated rain shade should be positioned to protect the camera from direct sunlight and rain. Ensure the unit is securely fastened to a stable surface.
4.3 Indoor Unit Installation
Install the indoor unit at a convenient height within your home. Connect the power adapter and all necessary wiring as per the diagram. The unit is designed for wall mounting.
5. Operation
5.1 Basic Communication
When a visitor presses the call button on the outdoor unit, the indoor unit will ring. You can then initiate hands-free two-way communication by pressing the talk button on the indoor unit.
5.2 Monitoring Function
- Single Outdoor Camera Kit: Press the 'Monitor' button once on the indoor unit to view the outdoor camera feed. Press again to exit monitoring.
- Two Outdoor Camera Kit:
- Press the 'Monitor' button once to view Entrance A.
- Press the 'Monitor' button again briefly to close the current view.
- Press and hold the 'Monitor' button until the indicator light turns green to switch to Entrance B.
5.3 Adjusting Settings
Use the dedicated controls on the side of the indoor unit to adjust:
- Brightness: Controls the display brightness of the screen.
- Chroma: Adjusts the color saturation of the display.
- Ring: Controls the volume of the incoming call ring.
You can also select from eight different melody rings for incoming calls.
6. Maintenance
To ensure the longevity and optimal performance of your video door phone system, follow these general maintenance guidelines:
- Cleaning: Regularly wipe the indoor and outdoor units with a soft, dry cloth. For stubborn dirt, a slightly damp cloth can be used, but avoid harsh chemicals or abrasive cleaners.
- Outdoor Unit: Periodically check the outdoor camera lens for dirt, dust, or spiderwebs that may obstruct the view. Clean gently if necessary.
- Connections: Ensure all wiring connections remain secure. Avoid pulling on cables.
- Environmental Protection: While the outdoor unit is waterproof, extreme weather conditions can still affect performance. Ensure the rain shade is properly positioned.
7. Troubleshooting
If you encounter issues with your video door phone system, consider the following common troubleshooting steps:
- No Power: Check if the power adapter is securely plugged into both the indoor unit and a working power outlet. Verify the power indicator light on the indoor unit.
- No Video/Poor Video Quality: Ensure all video cables are correctly connected and not damaged. Check for obstructions on the outdoor camera lens. Adjust brightness and chroma settings on the indoor unit.
- No Audio/Poor Audio Quality: Verify that audio cables are properly connected. Check for obstructions around the microphone and speaker on both units. Adjust ring volume.
- Outdoor Unit Not Responding: Confirm that the outdoor unit is receiving power and its connection to the indoor unit is intact.
- Interference: Keep the system away from strong electromagnetic interference sources.
If problems persist after attempting these steps, contact customer support for further assistance.
8. Specifications
| Night Vision Illumination Distance | Greater than 2 meters |
| Gain Control | Automatic |
| Working Temperature | -10°C to 50°C |
| Illumination | 0.1 Lux |
| Camera Angle | 92° Wide-Angle |
| Adapter Input Voltage | AC100-240V 50Hz-60Hz |
| Adapter Output Voltage/Current | AC15V 1500mA |
| Talk Time Delay | 120 seconds +/- 10% |
| Monitor Time Delay | 40 seconds +/- 10% |
| Power Dissipation | Stand-by <0.5W, Working <10W |
| Relative Humidity | 10% - 90% RH |
| ZDL-27 Indoor Station Dimensions (L x W x H) | 173mm x 98mm x 38mm |
| ZDL-M Outdoor Station Dimensions (L x W x H) | 165mm x 100mm x 3.4mm |
9. Warranty and Support
For information regarding warranty coverage and technical support, please refer to the documentation provided at the time of purchase or contact your retailer. Keep your purchase receipt as proof of purchase for any warranty claims.