Evertech EVDVR08AHD1082
Evertech 8 Channel H.265 Security DVR Instruction Manual
Model: EVDVR08AHD1082
Introduction
This manual provides comprehensive instructions for the installation, operation, and maintenance of your Evertech 8 Channel H.265 Security DVR. Please read this manual thoroughly before using the product to ensure proper setup and functionality. This Digital Video Recorder is designed for home and office surveillance applications, supporting various camera types and offering remote access capabilities.

Image: The Evertech 8 Channel H.265 Security DVR unit, featuring a 2TB hard drive and a smartphone displaying the remote viewing application.
Package Contents
Verify that all items listed below are included in your package. If any items are missing or damaged, please contact Evertech support.
- Evertech 8 Channel H.265 Security DVR with 2TB Hard Drive Installed
- CD for PC Software and Video Instructions
- Power Supply Adapter
- USB Mouse

Image: A visual representation of the items included in the product package, such as the DVR unit, 2TB hard drive, software CD, power adapter, and USB mouse.
Camera Compatibility
The Evertech 8 Channel H.265 Security DVR is designed to be compatible with a range of security camera technologies. Please ensure your cameras meet the specified compatibility requirements for optimal performance and image quality.
- Compatible Camera Types: 1080P, 960P, 720P, TVI, AHD, CVI, and Traditional Analog Cameras. Supports resolutions up to 2.4 Megapixels.
- Not Compatible Camera Types: SDI, 3MP, 4MP, and 5MP Security Cameras.

Image: A compatibility chart illustrating which camera technologies (AHD, TVI, CVI, Analog up to 2.4MP) are supported and which (SDI, 3MP, 4MP, 5MP) are not supported by the DVR.
Setup Guide
1. Physical Connections
Follow these steps to connect your DVR to cameras, display, network, and power sources. Ensure all connections are secure before powering on the device.

Image: A detailed diagram of the DVR's rear panel, showing connection points for security cameras, audio input/output, HDMI, VGA, LAN, USB devices, and the power adapter.
- Camera Connection: Connect your security cameras to the BNC video input ports (VIDEO IN) on the rear panel of the DVR. The DVR supports up to 8 cameras.
- Audio Input/Output: If using microphones, connect them to the audio input (MIC) port. Connect speakers to the audio output (AUDIO OUT) ports if audio monitoring is desired.
- Display Connection: Connect a monitor to the HDMI or VGA output port for local viewing.
- Network Connection: Connect an Ethernet cable from your router to the LAN port on the DVR for network access and remote viewing.
- USB Devices: Connect the included USB mouse to one of the USB ports. Additional USB devices, such as a USB flash drive for video backup, can be connected to the other USB port.
- Power Connection: Connect the power adapter to the DC 12V input on the DVR, then plug the adapter into a standard power outlet.
2. Initial Configuration
Upon first power-on, the system will initiate a setup wizard. Follow the on-screen prompts to configure essential settings such as language, date and time, network parameters, and user accounts. It is recommended to set a strong password for the administrator account.
Operating Instructions
Recording Modes
The DVR supports flexible recording options to suit various surveillance needs:
- Continuous Recording: The DVR records constantly, overwriting the oldest footage when the hard drive is full.
- Manual Recording: Recording is initiated and stopped manually by the user.
- Motion Detection Recording: Recording begins automatically only when motion is detected by the connected cameras. This mode helps conserve storage space.
- Schedule Recording: Set specific times and days for the DVR to record, allowing for customized surveillance periods.
Motion Detection and Alerts
The DVR features customizable motion detection. You can define specific areas within the camera's view for motion detection and adjust sensitivity levels. When motion is detected, the system can be configured to send instant email alerts to your registered mobile device, providing timely notifications of suspicious activity.
Remote Access
The DVR allows for remote viewing of live video feeds and playback of recorded footage via a mobile application or PC software. This feature enables monitoring from virtually anywhere with an internet connection.

Image: Various devices, including tablets, smartphones, and laptops, demonstrating the capability to view live or recorded video remotely.
- Mobile App Installation: Download the official Evertech mobile application from your device's app store. Details and QR codes for the app can be found in the included CD or online resources.
- Device Pairing: Use the QR code scanning feature within the mobile app to quickly add your DVR device. Alternatively, manual input of device details may be required.
- PC Software: Install the provided PC software from the included CD for remote access and management from a computer.
- Viewing: Once configured, you can view live camera feeds, search for specific events, and playback recorded footage directly from your remote device.
Video Playback and Backup
The pre-installed 2TB hard drive is configured for continuous recording, providing ample storage for surveillance footage. The DVR offers multichannel playback, allowing you to review footage from multiple cameras simultaneously. For data retention, video files can be easily transferred and backed up to external storage media via the USB port.
Maintenance
Regular maintenance ensures the longevity and optimal performance of your Evertech DVR system.
- Hard Drive Management: The 2TB hard drive is pre-installed and configured. Periodically check the hard drive status through the DVR's system settings to monitor its health and ensure continuous recording.
- Firmware Updates: Check the official Evertech website periodically for available firmware updates. Keeping your DVR's firmware updated can improve performance, add new features, and enhance security.
- Cleaning: Keep the DVR unit clean and free from dust. Dust accumulation can lead to overheating and affect performance. Use a soft, dry cloth for cleaning the exterior. Do not use liquid cleaners directly on the unit.
- Environmental Conditions: Ensure the DVR is placed in a well-ventilated area, away from direct sunlight, heat sources, and excessive moisture.
Troubleshooting
This section addresses common issues you might encounter with your DVR system. If the problem persists after attempting these solutions, please contact technical support.
| Problem | Possible Cause | Solution |
|---|---|---|
| No video display on monitor. | Incorrect cable connection, monitor input not selected, DVR not powered on. | Check HDMI/VGA cable connections. Ensure the monitor is powered on and set to the correct input source. Verify the DVR is powered on and its power indicator light is active. |
| Cameras not showing video. | Incompatible camera type, loose BNC connection, camera power issue, faulty camera. | Verify camera compatibility (AHD, TVI, CVI, Analog up to 2.4MP). Check all BNC cable connections at both the camera and DVR ends. Ensure cameras are receiving power. Test with a known working camera if possible. |
| Remote access not working. | Network connection issue, incorrect app settings, router firewall blocking, incorrect port forwarding. | Ensure the DVR is connected to the internet via the LAN port. Verify network settings on the DVR and mobile app. Check your router's firewall settings and ensure necessary ports are forwarded if required for direct access. |
| DVR reboots frequently. | Unstable power supply, overheating, internal hardware fault, corrupted firmware. | Ensure the DVR is connected to a stable power source. Check for proper ventilation to prevent overheating. If the issue persists, contact technical support. |
| No recording or hard drive error. | Hard drive not initialized, hard drive failure, incorrect recording schedule. | Check the hard drive status in the DVR's system settings. Ensure the hard drive is initialized and formatted. Verify recording schedules are correctly configured. If the hard drive is faulty, it may need replacement. |
Specifications
Detailed technical specifications for the Evertech 8 Channel H.265 Security DVR.
- Model Number: EVDVR08AHD1082
- Channels: 8
- Hard Disk Size: 2 TB (Installed)
- Memory Storage Capacity: 2000 GB
- Connectivity Technology: USB, Ethernet
- Video Compression: H.265
- Compatible Camera Types: 1080P, 960P, 720P, TVI, AHD, CVI, Analog (up to 2.4MP)
- Recording Modes: Continuous, Manual, Motion, Schedule
- Product Dimensions: 10.25 x 8.75 x 1.87 inches
- Item Weight: 5 pounds
- Manufacturer: EVERTECH
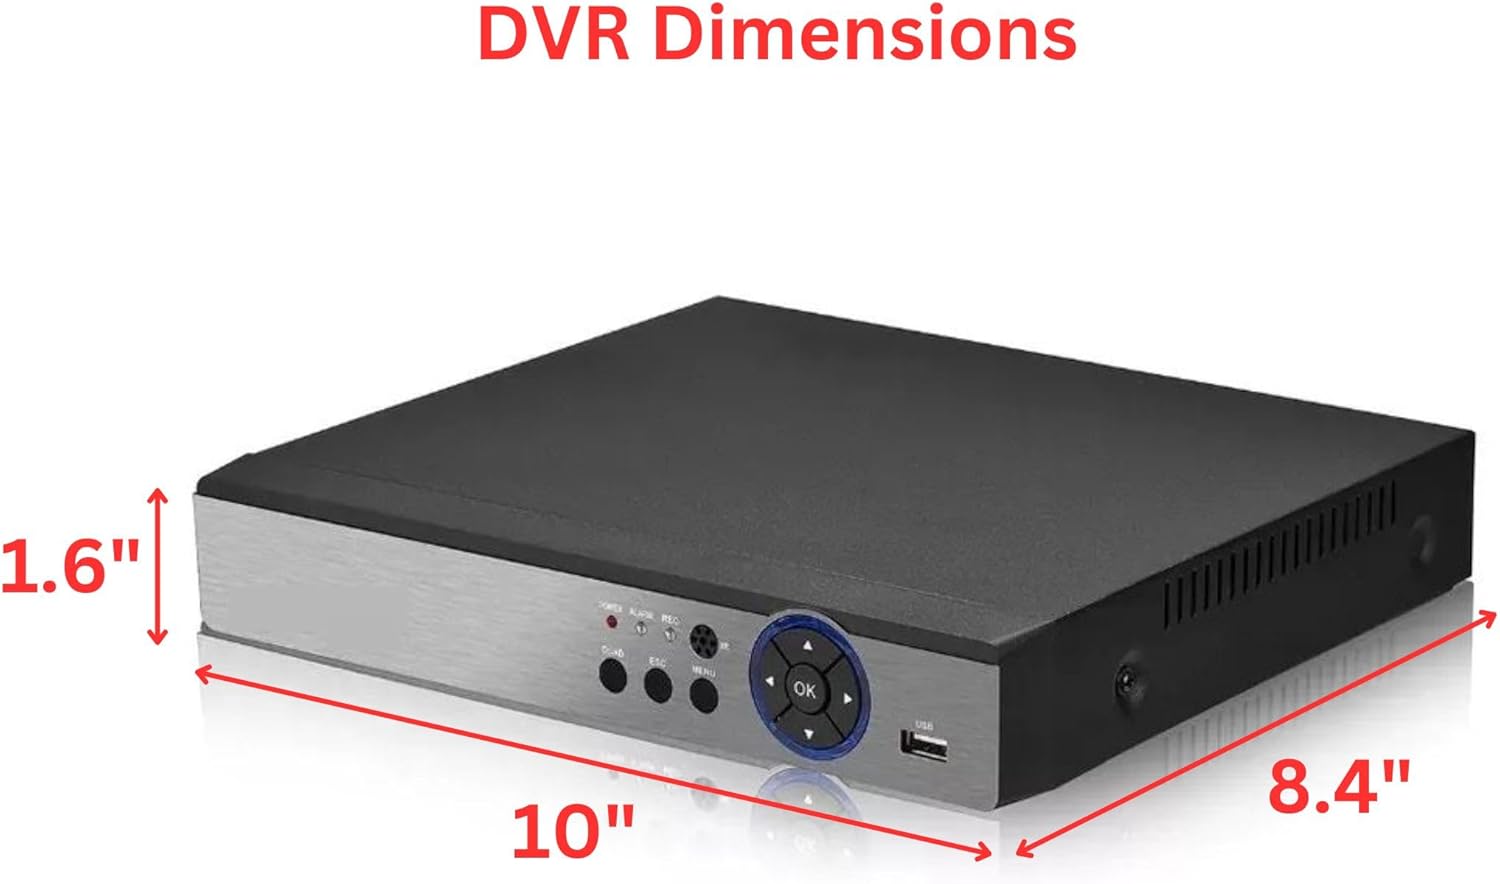
Image: A visual representation of the DVR unit with its physical dimensions labeled: 10 inches (width), 8.4 inches (depth), and 1.6 inches (height).
Warranty and Support
All Evertech products are covered by a one-year limited warranty from the date of purchase. This warranty covers defects in materials and workmanship under normal use.
Free technical support is available to assist you with any questions, installation guidance, or troubleshooting you may require. For technical assistance, please refer to the contact information provided with your product packaging or visit the official Evertech website for support resources and contact details.
Ask a question about this manual
Ask about setup, troubleshooting, compatibility, parts, safety, or missing instructions. Manuals+ will review the question and use this page’s manual context to help answer it.