1. Introduction
This manual provides comprehensive instructions for the installation, operation, and maintenance of your Hifonics TRX-4004DSP 4-Channel Amplifier with an integrated 8-Channel DSP Sound Processor. To ensure optimal performance and safety, please read this manual thoroughly before using the product and retain it for future reference.
2. Safety Instructions
Always observe the following safety precautions to prevent injury or damage to the device:
- Disconnect the vehicle's battery before any installation or wiring.
- Ensure all wiring is correctly routed and secured to prevent pinching or damage.
- Use appropriate gauge wiring for power and ground connections to avoid overheating.
- Do not expose the amplifier to moisture or extreme temperatures.
- Consult a professional car audio installer if you are unsure about any installation steps.
- Never operate the amplifier with damaged cables or if it has been exposed to water.
3. Package Contents
Verify that all items are present in the package:
- Hifonics TRX-4004DSP Amplifier
- Wired Remote Control with LCD Display
- USB Cable for PC Connection
- Mounting Hardware
- User Manual (this document)
4. Product Overview
4.1 Key Features
- 4-Channel Class A/B Amplifier
- Integrated 8-Channel DSP Sound Processor (32-bit / 192 kHz)
- Power Output: 4 x 100W RMS @ 4 Ohm, 4 x 150W RMS @ 2 Ohm, 2 x 300W RMS Bridged @ 4 Ohm
- Comprehensive DSP Software for Windows PC control:
- 6 x 31-band Equalizer (20-20,000 Hz)
- 2 x 11-band Equalizer (20-200 Hz)
- 6-48 dB/octave Crossovers (HP/BP/LP)
- Time Correction (0-15 ms / 0-510 cm)
- Phase Rotation (0°/180°)
- Multiple Inputs: 6 RCA Line, 1 RCA AUX, Optical (stereo PCM 2.0)
- 4 RCA Line Outputs for additional amplifiers
- Wired Remote Control with LCD Display for volume, bass, and 10 preset selection
- Illuminated logo badge and cooling fins
4.2 Amplifier Components
The Hifonics TRX-4004DSP amplifier features a robust design with high-quality internal components for superior sound reproduction.
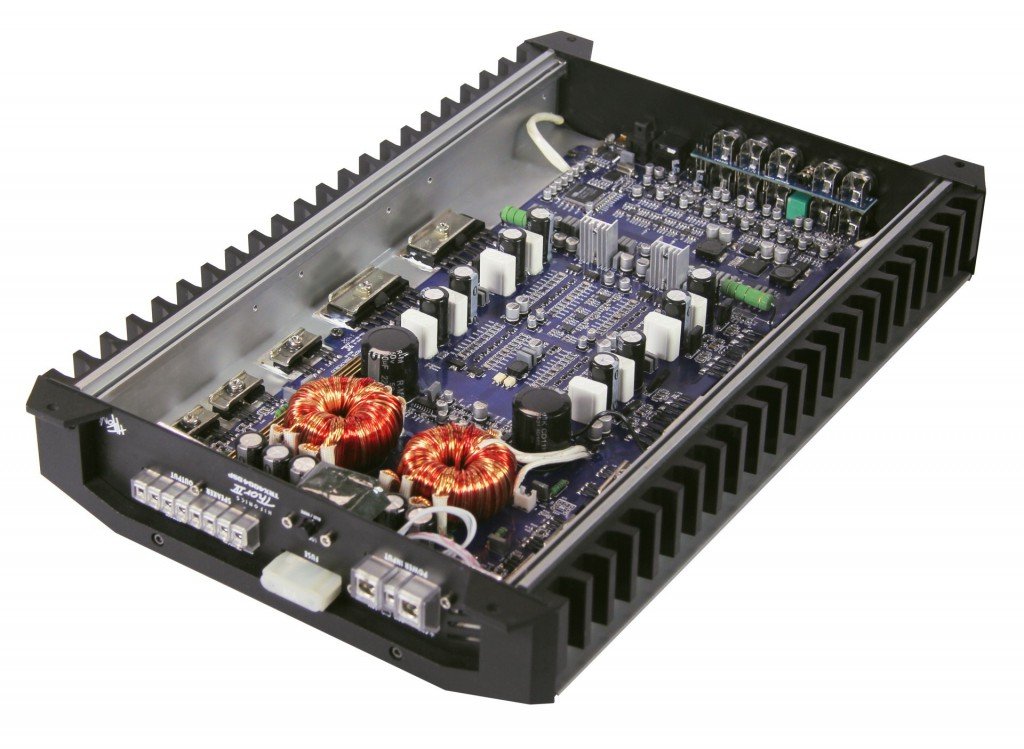
Figure 1: Internal view of the Hifonics TRX-4004DSP amplifier. This image displays the internal layout of the amplifier, revealing the high-quality circuit board, toroidal transformers, and other electronic components designed for optimal audio performance and heat dissipation.
4.3 Rear Panel Connections
The rear panel provides all necessary connections for power, audio input, and audio output.

Figure 2: Rear panel connections of the Hifonics TRX-4004DSP amplifier. The rear panel features various input and output connections including USB for PC link, Optical Input, Remote control port, WiFi Box port, SUB IN, LINE IN (RL, RR, FL, FR), AUX IN, and LINE OUT (E, F, G, H) RCA outputs. Power and protection indicators are also visible.
- USB (PC LINK): Connects to a Windows PC for DSP software control.
- OPTICAL INPUT: Digital audio input (stereo PCM 2.0).
- REMOTE: Port for the wired remote control.
- WIFI BOX: (Optional) Connection for a Wi-Fi module.
- SUB IN (L/R): RCA inputs for subwoofer signal.
- LINE IN (RL/RR/FL/FR): RCA inputs for main audio channels.
- AUX IN (L/R): Auxiliary RCA inputs.
- LINE OUT (E/F/G/H): RCA outputs to connect additional amplifiers.
- PROTECT/POWER LEDs: Indicators for amplifier status.
4.4 Wired Remote Control
The included wired remote control allows for convenient adjustments without accessing the amplifier directly.

Figure 3: Front view of the Hifonics Thor remote control. This image shows the clear LCD display, rotary control knob, and input selection buttons. LED indicators for MAIN, AUX, and OPTICAL inputs are also visible, providing quick status feedback.
- Rotary Knob: Controls overall system volume. Press and hold for approximately 3 seconds to adjust SUB OUT bass level.
- MODE Button: Cycles through various modes or settings.
- OK Button: Confirms selections.
- INPUT SEL. Button: Selects audio input source (MAIN, AUX, OPTICAL).
- Up/Down Arrows: Used for navigating menus or selecting presets.
- LCD Display: Shows current settings, volume level, or selected preset.
5. Setup and Installation
5.1 Mounting the Amplifier
Choose a secure, dry, and well-ventilated location in your vehicle for mounting the amplifier. Ensure it is away from direct sunlight and heat sources. Use the provided mounting hardware to firmly secure the amplifier to a solid surface.
5.2 Wiring Connections
Proper wiring is crucial for performance and safety. Refer to Figure 2 for connection points.
- Power (B+): Connect to the positive terminal of the vehicle's battery via a fuse holder (not included, ensure appropriate fuse rating).
- Ground (GND): Connect to a clean, unpainted metal surface of the vehicle chassis. Ensure a solid, low-resistance connection.
- Remote (REM): Connect to the remote turn-on output of your head unit. This turns the amplifier on/off with your car's audio system.
- Audio Inputs:
- RCA Line Inputs: Connect your head unit's RCA outputs to the corresponding LINE IN (RL/RR/FL/FR), SUB IN, or AUX IN ports.
- Optical Input: For digital audio sources (stereo PCM 2.0).
- Speaker Outputs: Connect your speakers to the amplifier's speaker terminals. Observe correct polarity (+/-). For bridged mode, follow specific instructions in the full manual (not provided here, but implied).
- Line Outputs (RCA): Use these to connect additional amplifiers if expanding your audio system.
- Remote Control: Connect the wired remote control to the "REMOTE" port.
- USB (PC LINK): Connect to a Windows PC for initial DSP setup and tuning.
6. Operating the Amplifier and DSP
6.1 Basic Operation with Remote Control
Once installed and powered on, the amplifier can be controlled via the wired remote (Figure 3).
- Volume Control: Rotate the knob to adjust the overall system volume.
- Bass Level Adjustment: Press and hold the rotary knob for approximately 3 seconds. Then, rotate the knob to adjust the bass level for the SUB OUT (G/H) channels.
- Input Selection: Use the "INPUT SEL." button to cycle through available audio inputs (MAIN, AUX, OPTICAL).
- Preset Selection: Use the Up/Down arrows to select one of the 10 stored sound presets.
6.2 Advanced DSP Tuning (Windows Software)
The full potential of the TRX-4004DSP is realized through its dedicated Windows DSP software. Connect the amplifier to your PC via the USB (PC LINK) port.
- Software Installation: Install the Hifonics DSP software on your Windows PC (software typically provided on a CD or available for download from the manufacturer's website).
- Equalization: Adjust the 31-band EQ for full-range channels and 11-band EQ for bass channels to fine-tune the frequency response.
- Crossovers: Set high-pass, band-pass, and low-pass filters for each channel with slopes from 6 to 48 dB/octave to optimize speaker performance and prevent distortion.
- Time Correction: Adjust the delay for each speaker to ensure all sound waves arrive at the listening position simultaneously, creating a precise soundstage.
- Phase Rotation: Adjust the phase (0° or 180°) for individual channels to correct phase issues.
- Saving Presets: Configure and save up to 10 custom sound settings, which can then be recalled using the wired remote control.
7. Maintenance
To ensure the longevity and optimal performance of your amplifier:
- Cleaning: Use a soft, dry cloth to wipe the exterior of the amplifier. Do not use harsh chemicals or abrasive cleaners.
- Connections: Periodically check all wiring connections to ensure they are secure and free from corrosion.
- Ventilation: Ensure the amplifier's cooling fins are free from obstructions to allow for proper heat dissipation.
8. Troubleshooting
If you encounter issues, refer to the following common problems and solutions:
- No Power:
- Check the vehicle's battery connection and fuse.
- Verify the ground connection is secure.
- Ensure the remote turn-on wire is connected and receiving 12V when the head unit is on.
- No Sound:
- Check all RCA input and speaker output connections.
- Verify the input source selection on the remote control or DSP software.
- Ensure the volume is turned up on both the amplifier remote and the head unit.
- Check DSP settings for muted channels or incorrect crossover configurations.
- Distorted Sound:
- Reduce the gain settings on the amplifier or head unit.
- Check speaker impedance to ensure it matches the amplifier's capabilities.
- Inspect speaker wires for shorts or damage.
- Review DSP EQ settings for excessive boosts.
- Amplifier Overheating (Protection LED On):
- Ensure adequate ventilation around the amplifier.
- Check speaker impedance; too low impedance can cause overheating.
- Reduce volume or gain settings.
If problems persist, contact Hifonics customer support or a qualified service technician.
9. Specifications
| Feature | Specification |
|---|---|
| Brand | Hifonics |
| Model Number | TRX-4004DSP |
| Channels | 4 |
| Output Power (RMS @ 4 Ohm) | 4 x 100 W |
| Output Power (RMS @ 2 Ohm) | 4 x 150 W |
| Output Power (Bridged RMS @ 4 Ohm) | 2 x 300 W |
| DSP Processor | 8-Channel, 32-bit / 192 kHz |
| Inputs | 6 RCA Line, 1 RCA AUX, Optical (stereo PCM 2.0) |
| Outputs | 4 RCA Line Outputs |
| Equalizer | 6 x 31-band (20-20kHz), 2 x 11-band (20-200Hz) |
| Crossovers | 6-48 dB/octave (HP/BP/LP) |
| Time Correction | 0-15 ms / 0-510 cm |
| Phase Rotation | 0°/180° |
| Presets | 10 |
| Control | Wired Remote Control, Windows DSP Software |
| Dimensions (L x W x H) | 395/435 x 255 x 62 mm (approx.) |
| Voltage | 9 Volt (Operating voltage typically 12V for car audio) |
| Mounting Type | Surface Mount |
| UPC | 806586221613 |
10. Warranty Information
Hifonics products are manufactured to high-quality standards. This product comes with a limited warranty against defects in materials and workmanship. The specific terms and duration of the warranty may vary by region and retailer. Please retain your proof of purchase for warranty claims. For detailed warranty information, refer to the warranty card included with your product or visit the official Hifonics website.
11. Support
For technical assistance, troubleshooting beyond this manual, or service inquiries, please contact your authorized Hifonics dealer or visit the official Hifonics support website. Ensure you have your product model number (TRX-4004DSP) and proof of purchase available when seeking support.


