GODOX FT-16 Kit 2
GODOX FT-16 Wireless Power Control Flash Trigger User Manual
Model: FT-16 Kit 2
Brand: GODOX
1. Introduction
The Godox FT-16 wireless power-control flash trigger system is designed to provide versatile and reliable remote control for compatible studio flashes and camera flashes. It offers sensitive reactions and stable signal transmission, enabling remote flash group and power control for professional and agile shooting solutions.
2. Package Contents
Please check the package contents upon opening to ensure all items are present and in good condition:
- 1 x FT-16 Transmitter
- 3 x FT-16 Receiver

Image 2.1: Contents of the Godox FT-16 Kit, showing one transmitter and three receivers.
3. Product Overview
3.1 FT-16 Transmitter (FT-16T)
The transmitter unit mounts onto your camera's hot shoe and allows for remote control of flash units. It features an LCD display for settings, a power adjustment dial, channel DIP switches, and control buttons.

Image 3.1: Detailed view of the FT-16 Transmitter, highlighting its LCD screen, power dial, channel switches, and control buttons.
3.2 FT-16 Receiver (FT-16R)
The receiver unit connects to compatible flash units. It is compact and powered directly by the flash, eliminating the need for internal batteries. It includes channel DIP switches and a power adjustment dial.

Image 3.2: Detailed view of the FT-16 Receiver, showing its channel switches and power adjustment dial.

Image 3.3: The USB connector on the FT-16 Receiver, used for connecting to compatible flash units.
4. Setup
4.1 Transmitter Installation
- Slide the FT-16 Transmitter onto your camera's hot shoe.
- Secure the transmitter by tightening the locking ring or lever, if present, on the hot shoe mount.

Image 4.1: The FT-16 Transmitter correctly mounted on a camera's hot shoe.
4.2 Receiver Installation
- Locate the wireless control port (often a USB port) on your compatible flash unit (e.g., Godox Witstro AD180/AD360).
- Insert the USB connector of the FT-16 Receiver into the flash unit's wireless control port. The receiver draws power directly from the flash unit.
4.3 Setting Channels
Both the transmitter and each receiver have a set of DIP switches for channel selection. To ensure proper communication, the channel settings on the transmitter must match those on all receivers you intend to control.
- Set the 4 DIP switches on both the transmitter and each receiver to the desired channel combination. There are 16 available channels.
- Ensure the switches are firmly set to either the ON or OFF position.
5. Operating Instructions
5.1 Powering On/Off
- Transmitter: The transmitter typically powers on when mounted on a camera hot shoe and the camera is turned on, or via a dedicated power button if available.
- Receiver: The receiver powers on automatically when connected to a compatible flash unit that is powered on.
5.2 Setting Flash Groups and Power
The FT-16 system allows for remote control of up to 16 groups of flashes. The power adjustment dial on both the transmitter and receiver is used to set the flash output.
- Group Selection: Use the group selection dial on the transmitter to choose the desired flash group (A-F, 0-9).
- Power Adjustment: Rotate the POWER dial on the transmitter to adjust the flash output. The LCD display will show the power level, which can be displayed in two modes: 5.0~10.0 (representing 1/32 to 1/1) or 1/1~1/128 (full to minimum power).
- Ensure the power dial on the receiver is set to a position that allows remote control (often indicated by a specific setting or by being in a 'remote' mode).
5.3 Remote Control Functions
The transmitter provides additional remote control capabilities:
- LAMP Button: Controls the modeling lamp on compatible flash units.
- BUZZ Button: Toggles the audible beep (buzzer) on compatible flash units.
- SET Button: Used to confirm settings or enter/exit menus on the transmitter.
- TEST Button: Triggers a test flash. Press this button to confirm that the transmitter and receiver are communicating correctly and the flash fires.
5.4 Multi-Flash Control
With multiple receivers, you can control several flash units simultaneously or in groups. Ensure each receiver is connected to a flash and set to the same channel as the transmitter. You can then assign different groups to each flash for individual power control.
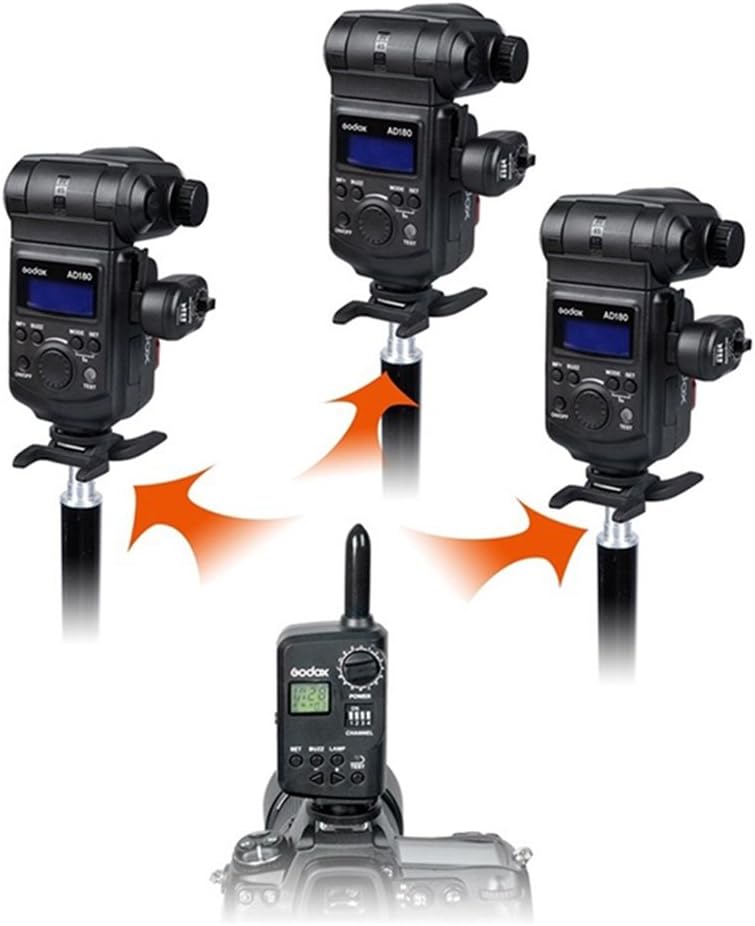
Image 5.1: Illustration of the FT-16 system controlling multiple flash units wirelessly.
6. Specifications
| Feature | Description |
|---|---|
| Model | FT-16 Kit 2 |
| Frequency | 433MHz |
| Channels | 16 (via DIP switches) |
| Groups | 16 (A-F, 0-9) |
| Control Range | Approx. 50 meters (open area) |
| Max Sync Speed | 1/250 seconds |
| Power Display Modes | 5.0~10.0 or 1/1~1/128 |
| Transmitter Display | Large area LCD |
| Receiver Power | Powered by flash unit (no battery required) |
| Remote Functions | Flash power, modeling lamp, focus lamp, buzzer switch |
| Supported Flashes | Godox Witstro AD180/AD360, Witkey series, D upgrade, GT series, GS series Gemini |
| Supported Cameras | Pentax, Olympus (as per product data, generally universal hot shoe) |
7. Troubleshooting
7.1 Flash Not Firing
- Check Channel Settings: Ensure the DIP switches on the transmitter and all receivers are set to the exact same channel.
- Check Connections: Verify that the receiver is securely plugged into the flash unit's wireless control port and the transmitter is firmly seated in the camera's hot shoe.
- Power Status: Ensure both the camera and the flash unit are powered on. The receiver draws power from the flash.
- Flash Compatibility: Confirm that your flash unit is compatible with the FT-16 receiver.
- Distance/Obstacles: Reduce the distance between the transmitter and receiver, and remove any large obstacles that might block the signal.
7.2 Inconsistent Firing or Range Issues
- Interference: Other wireless devices operating on similar frequencies (433MHz) can cause interference. Try changing to a different channel.
- Environment: Dense environments (e.g., concrete walls, large metal objects) can significantly reduce wireless range.
- Low Camera Battery: While the transmitter doesn't use its own battery, a low camera battery might affect its performance.
8. Maintenance
- Cleaning: Use a soft, dry cloth to clean the exterior of the transmitter and receivers. Do not use liquid cleaners or solvents.
- Storage: Store the units in a cool, dry place away from direct sunlight, excessive heat, and moisture.
- Handling: Avoid dropping or subjecting the units to strong impacts, as this can damage internal components.
9. Warranty and Support
For detailed warranty information, product registration, and technical support, please refer to the official GODOX website or contact your local GODOX distributor. Keep your purchase receipt as proof of purchase for warranty claims.
Related Documents - FT-16 Kit 2
 |
Godox FT433 TTL Wireless Flash Trigger Instruction Manual Explore the Godox FT433 TTL Wireless Flash Trigger with this comprehensive instruction manual. Learn about its features, compatibility with Canon, Sony, and Nikon cameras, and its support for Godox AD200ProII, AD600ProII, and AD600BMII flashes, for professional wireless flash photography. |
 |
Godox FT433 TTL Wireless Flash Trigger Instruction Manual Comprehensive instruction manual for the Godox FT433 TTL Wireless Flash Trigger and FR433 Receiver system, detailing features, operation, and technical specifications for advanced photography lighting control. |
 |
神牛 X3 S TTL 无线闪光灯引闪器说明书 了解神牛 X3 S TTL 无线闪光灯引闪器的功能、设置、操作指南及安全提示,适用于索尼相机。 |
 |
Godox XPROII C TTL Wireless Flash Trigger User Manual This comprehensive user manual provides detailed instructions for the Godox XPROII C TTL Wireless Flash Trigger. It covers setup, operation, features, settings, specifications, troubleshooting, and maintenance for photographers using Canon cameras and Godox flashes. |
 |
Godox X2T-N Wireless Flash Trigger for Nikon Cameras Comprehensive user guide for the Godox X2T-N wireless flash trigger, detailing its features, setup, compatibility with Nikon cameras, and advanced lighting control capabilities. |
 |
Ed Verosky's Guide to the Godox TT685: Overview, Features, and Operation A comprehensive guide to the Godox TT685 camera flash, covering its overview, features, operation modes, wireless capabilities, and compatible triggers. Learn how to use the Godox TT685 for professional photography. |
Ask a question about this manual
Ask about setup, troubleshooting, compatibility, parts, safety, or missing instructions. Manuals+ will review the question and use this page’s manual context to help answer it.