Introduction
Thank you for purchasing the K&F Concept KF-150 I-TTL Macro Ring Light Flash. This advanced flash unit is designed for macro photography, providing precise and even illumination for close-up subjects. Featuring an LCD display, wireless slave function, and compatibility with Nikon DSLR cameras, the KF-150 offers versatile lighting control. Please read this manual thoroughly before use to ensure proper operation and to maximize the performance of your new flash.

Figure 1: K&F Concept KF-150 Macro Ring Light Flash and Control Unit.
Safety Information
- Do not disassemble or modify the flash unit. This can cause electric shock or damage the product.
- Keep the flash unit away from water and moisture. Exposure to water can cause electric shock or malfunction.
- Do not operate the flash in environments with flammable gases or liquids.
- Avoid direct eye exposure to the flash light, especially at close range, as it can cause temporary vision impairment.
- Use only recommended batteries (AA batteries). Incorrect battery types or improper insertion can lead to leakage, heat, or explosion.
- Turn off the flash unit and disconnect it from the camera before cleaning or when not in use for extended periods.
Package Contents
Please verify that all items listed below are included in your package:
- 1 x K&F Concept KF-150 Macro Ring Light Flash Unit
- 1 x Control Unit
- 1 x User Manual (this document)
- 6 x Adapter Rings (52mm, 55mm, 58mm, 62mm, 67mm, 77mm)
- 1 x Carrying Case

Figure 2: All components included in the K&F Concept KF-150 package.
Parts Identification
Ring Light Unit
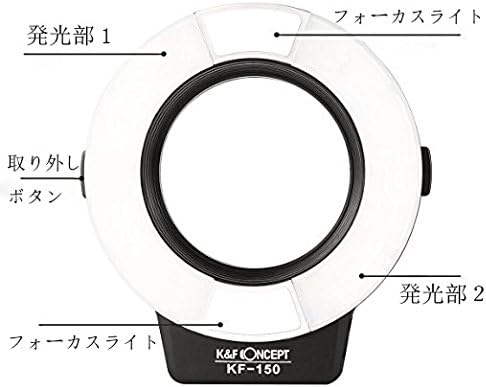
Figure 3: Ring Light Unit Components.
- Focus Light: Provides continuous light for focusing.
- Flash Unit 1: Left flash tube segment.
- Flash Unit 2: Right flash tube segment.
- Detach Button: Releases the ring light from the adapter ring.
Control Unit

Figure 4: Control Unit Front Panel.
- LCD Display: Shows current settings and modes.
- Test / Charge Indicator: Lights up when flash is ready, blinks during charging.
- Test Flash Button: Triggers a test flash.
- Charge Lamp: Indicates charging status.
- Lock Pin: Secures the unit to the camera hot shoe.
- FB Mode Setting / Rear Curtain Sync Setting: Button for flash bracketing and sync settings.
- ON/OFF: Power button.
- Adjustment Buttons: Navigate menus and change values.

Figure 5: Control Unit Side View.
- PC Sync Port: For connecting to cameras with a PC sync terminal.
- Mini Stand: Detachable stand for off-camera use.
Setup
1. Installing Batteries
The KF-150 requires 4 AA batteries (not included). Open the battery compartment on the control unit and insert the batteries according to the polarity indicators. Close the compartment securely.
2. Attaching to Camera
- Select the appropriate adapter ring for your lens filter thread size (52mm, 55mm, 58mm, 62mm, 67mm, or 77mm).
- Screw the chosen adapter ring onto the front filter thread of your camera lens.
- Align the ring light unit with the adapter ring and gently push until it clicks into place. Ensure it is securely attached.
- Slide the control unit onto your camera's hot shoe. Tighten the lock wheel to secure it.
- Connect the coiled cable from the ring light unit to the control unit.
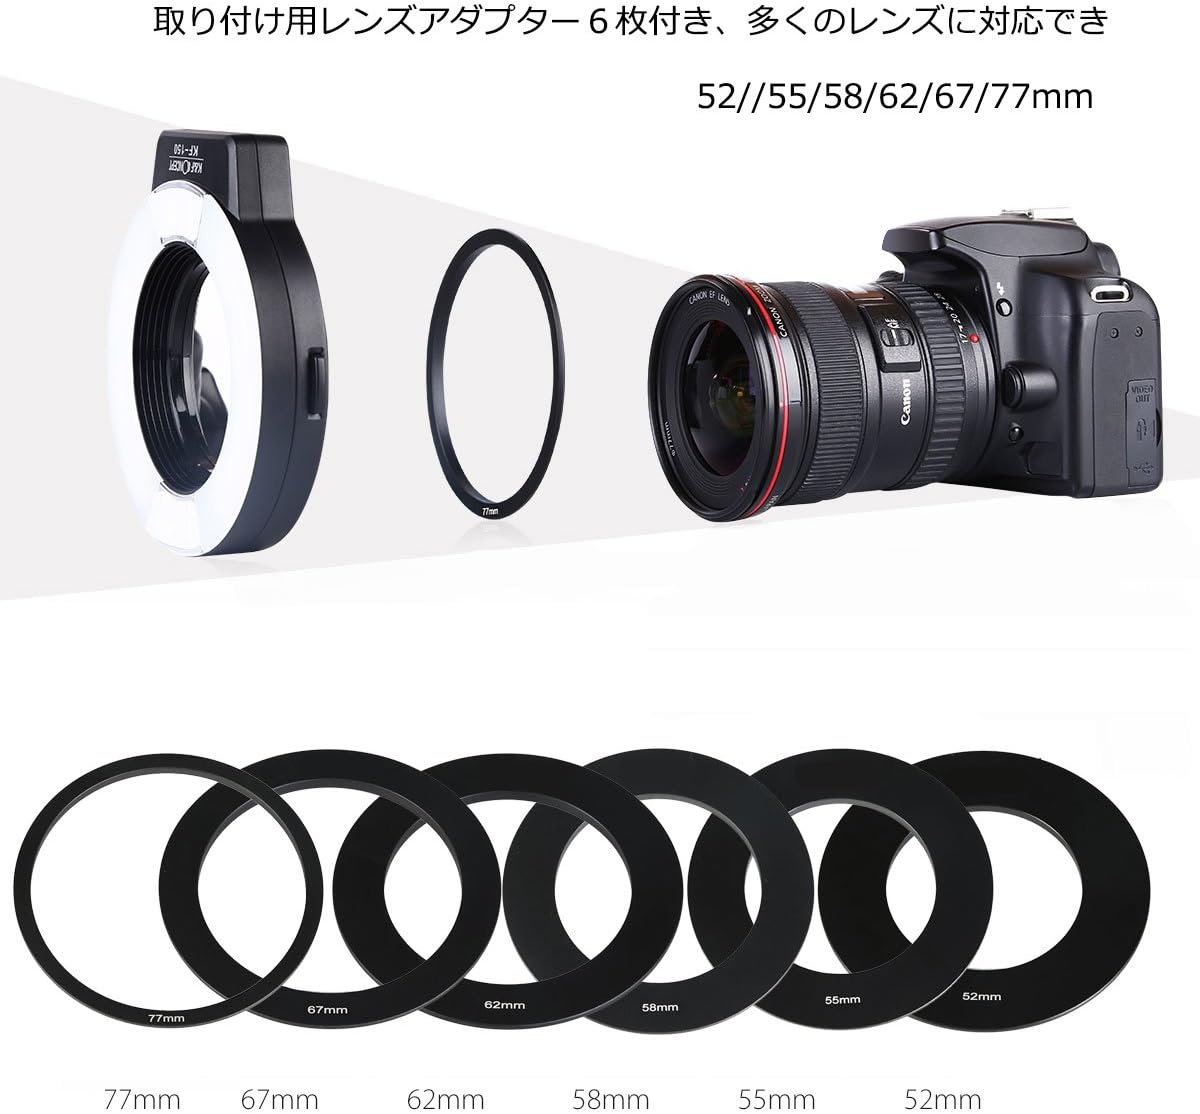
Figure 6: Adapter rings and mounting the ring light to a lens.

Figure 7: KF-150 mounted on a camera, ready for use.
Operating Instructions
Power On/Off
Press the ON/OFF button to power on the flash unit. The LCD display will illuminate. Press and hold the button to power off.
Mode Selection
Press the MODE button to cycle through the available flash modes:
- TTL Mode: (Through-The-Lens) Automatic flash output based on camera's metering.
- Manual Mode (M): Manually set flash power output.
- Multi Mode: Stroboscopic flash for multiple exposures in a single frame.
- AB Flash Ratio Mode: Adjust the power ratio between the left (A) and right (B) flash tubes.

Figure 8: LCD Display and Control Buttons.
Adjusting Flash Output and Ratio
Use the Adjustment Buttons (directional pad) to change settings displayed on the LCD. In Manual mode, adjust the power level. In AB Flash Ratio mode, you can independently control the output of the left (A) and right (B) flash tubes to create specific lighting effects.

Figure 9: Flash Output Options (Both, Left Only, Right Only).
The focus light and individual flash tubes can be adjusted based on your lighting needs.
Focus Light
Press the LAMP button to turn the continuous focus light on or off. This light assists with focusing in low-light conditions.
Wireless Slave Function
The KF-150 can function as a wireless slave unit. Refer to the detailed instructions in the full user manual for setting up wireless triggering with compatible master flash units.
Maintenance
- Cleaning: Use a soft, dry cloth to clean the flash unit. For stubborn dirt, slightly dampen the cloth with water. Do not use organic solvents like alcohol or thinner.
- Storage: When not in use for extended periods, remove the batteries to prevent leakage. Store the unit in a cool, dry place, preferably in its original carrying case.
- Handling: Avoid dropping or subjecting the flash unit to strong impacts.
Troubleshooting
| Problem | Possible Cause | Solution |
|---|---|---|
| Flash does not fire. | Batteries are low or incorrectly inserted. Unit is not powered on. Flash is not securely mounted on hot shoe. | Replace batteries. Ensure correct polarity. Power on the unit. Re-mount flash securely. |
| Flash is too bright/dark. | Incorrect flash power setting (Manual mode). Exposure compensation needed (TTL mode). | Adjust flash power. Adjust camera's exposure compensation or flash exposure compensation. |
| Ring light does not attach to lens. | Incorrect adapter ring size. Adapter ring not screwed on properly. | Verify lens filter thread size and use corresponding adapter ring. Ensure adapter ring is fully screwed onto lens. |
| LCD display is blank. | Unit is off or batteries are dead. | Power on the unit. Replace batteries. |
Specifications
| Feature | Detail |
|---|---|
| Model Number | KF22.008 |
| Guide Number | GN14 (ISO 100) |
| Flash Modes | TTL, Manual, Multi, AB Flash Ratio |
| Flash Sync Speed | Up to 1/200s |
| Recycle Time | Approx. 2.9 seconds (with fresh AA batteries) |
| Power Source | 4 x AA batteries (Alkaline or Ni-MH) |
| Compatible Mountings | Nikon DSLR Cameras |
| Included Adapter Rings | 52mm, 55mm, 58mm, 62mm, 67mm, 77mm |
| Item Weight | 1.76 pounds (approx. 0.8 kg) |
| Manufacturer | Shenzhen Zhuoer Photograph |
Warranty and Support
K&F Concept products are manufactured to high quality standards. For warranty information and support, please refer to the warranty card included with your product or visit the official K&F Concept website. If you encounter any issues not covered in this manual, please contact K&F Concept customer service for assistance.
K&F Concept Official Website: www.kentfaith.com