
Introduction
This manual provides essential information for the proper installation, operation, and maintenance of your XLC A-Head Antishock ST-M21 Stem. Designed to enhance riding comfort, this stem features an innovative antishock mechanism to absorb vibrations and reduce fatigue in your arms, shoulders, wrists, and neck. Please read these instructions carefully before installation and use to ensure safety and optimal performance.
Safety Information
- Always wear appropriate safety gear, including a helmet, when cycling.
- Ensure all bolts are tightened to the specified torque values. Overtightening or undertightening can lead to component failure or injury.
- Regularly inspect your bicycle components, including the stem, for any signs of wear, damage, or loose connections.
- If you are unsure about any installation or maintenance procedure, consult a qualified bicycle mechanic.
- Do not modify the stem or its components. Unauthorized modifications can compromise safety and void the warranty.
Setup and Installation
Proper installation is crucial for the safety and performance of your XLC A-Head Antishock ST-M21 Stem. Ensure you have the necessary tools, including hex keys and a torque wrench.
Tools Required:
- Hex keys (typically 4mm, 5mm, 6mm)
- Torque wrench
- Grease (for bolts and steerer tube)
Installation Steps:
- Prepare the Steerer Tube: Ensure the bicycle's steerer tube is clean and free of burrs. Apply a thin layer of grease to the steerer tube where the stem will clamp.
- Position the Stem: Slide the XLC A-Head Antishock ST-M21 Stem onto the steerer tube. Ensure the stem is oriented correctly (usually with the XLC logo facing forward).
- Install Top Cap and Preload: Install the top cap and bolt onto the steerer tube. Tighten the top cap bolt until there is no play in the headset, but the fork can still turn freely. Do not overtighten.
- Align the Stem: Align the stem with the front wheel.
- Tighten Steerer Clamp Bolts: Tighten the two steerer clamp bolts on the side of the stem evenly, alternating between them, to a maximum torque of 6 Nm.
- Attach Handlebar: Open the faceplate of the stem. Position your handlebar in the stem clamp, ensuring it is centered and at your desired angle.
- Tighten Handlebar Clamp Bolts: Reinstall the faceplate and tighten the four handlebar clamp bolts evenly, alternating diagonally, to a maximum torque of 8 Nm.
- Final Check: Verify that the handlebar is secure and does not rotate, and that the stem is firmly clamped to the steerer tube and aligned with the front wheel. Check for any play in the headset.
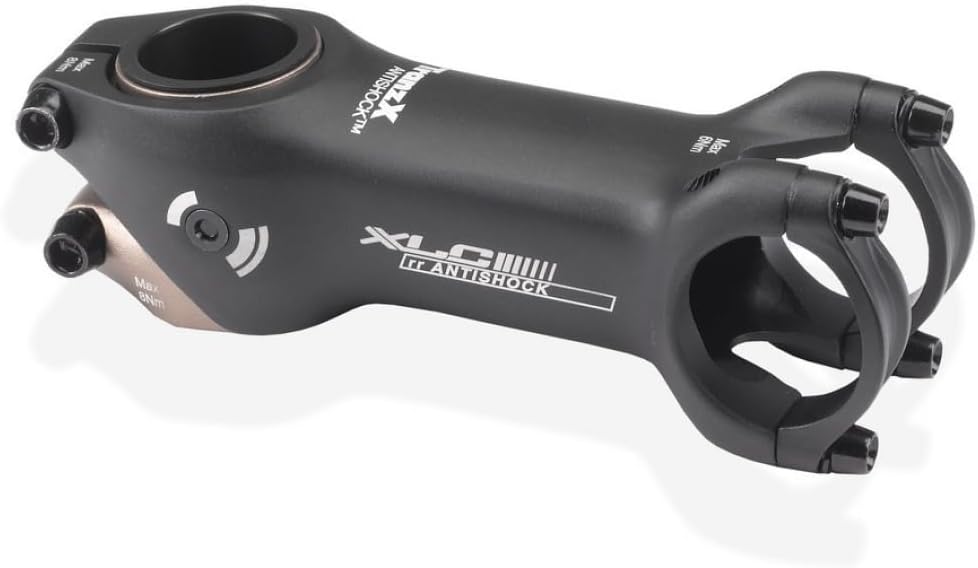
Image: The XLC A-Head Antishock ST-M21 Stem, showing its design and bolt locations. Note the torque specifications printed on the stem for handlebar (Max 8Nm) and steerer (Max 6Nm) clamp bolts.
Operating the Antishock Feature
The XLC A-Head Antishock ST-M21 Stem is designed with an internal elastomer-based damping system. This system works to absorb minor road vibrations and impacts, providing a smoother ride and reducing the transmission of jarring forces to your upper body.
- Vibration Damping: The stem's design allows for a horizontal damping angle of up to 2°, which helps to mitigate high-frequency vibrations from rough surfaces.
- Fatigue Reduction: By absorbing these vibrations, the stem helps to prevent fatigue and discomfort in your arms, shoulders, wrists, and neck during longer rides.
- Non-Adjustable Damping: The antishock mechanism is factory-tuned and does not offer user-adjustable damping levels or interchangeable elastomers. Its performance is optimized for general riding conditions.
Maintenance
Regular maintenance ensures the longevity and safe operation of your stem.
- Bolt Torque Check: Periodically check all stem bolts (steerer clamp and handlebar clamp) with a torque wrench to ensure they remain tightened to their specified values (6 Nm for steerer, 8 Nm for handlebar).
- Cleaning: Clean the stem with a damp cloth and mild soap. Avoid using harsh chemicals or abrasive cleaners, which can damage the finish or materials.
- Inspection: Regularly inspect the stem for any cracks, bends, or other signs of damage. Pay close attention to the clamping areas. If any damage is found, replace the stem immediately.
- Internal Mechanism: The internal antishock mechanism is sealed and requires no user maintenance. Do not attempt to disassemble the stem beyond removing the faceplate for handlebar installation.
Troubleshooting
| Problem | Possible Cause | Solution |
|---|---|---|
| Handlebar slips or rotates | Handlebar clamp bolts are loose. | Tighten handlebar clamp bolts to 8 Nm using a torque wrench. Ensure even tightening. |
| Stem rotates on steerer tube | Steerer clamp bolts are loose. | Tighten steerer clamp bolts to 6 Nm using a torque wrench. Ensure even tightening. |
| Creaking noise from stem area | Loose bolts, dry interfaces, or damaged components. | Check and re-torque all stem bolts. Disassemble, clean, and re-grease steerer tube and handlebar clamping surfaces if necessary. Inspect for damage. |
| Perceived lack of shock absorption | The antishock feature is designed for subtle vibration damping, not large impacts. | Ensure proper tire pressure and riding technique. The stem's damping is intended to reduce high-frequency road chatter and minor impacts, not to provide suspension for rough terrain. |
Specifications
| Feature | Detail |
|---|---|
| Brand | XLC |
| Model Name | A-Head Antishock ST-M21 |
| Handlebar Clamp Diameter | 31.8 mm |
| Steerer Clamp Diameter | 28.6 mm (1 1/8 inch) |
| Reach | 100 mm |
| Angle | Up to 6° |
| External Material | Thermoplastic Elastomer (TPE) |
| Internal Material | Ethylene Vinyl Acetate Copolymer (EVA) |
| Dimensions (L x W x H) | 10 x 3.1 x 3.1 cm |
| Special Feature | Antishock vibration damping |
| Recommended Use | Cycling |
Warranty
The XLC A-Head Antishock ST-M21 Stem comes with a 2-year manufacturer's warranty. This warranty covers defects in materials and workmanship under normal use. It does not cover damage resulting from improper installation, misuse, neglect, accidents, or unauthorized modifications. Please retain your proof of purchase for warranty claims.
Support
For further assistance, technical support, or warranty inquiries, please contact your authorized XLC dealer or visit the official XLC website. When contacting support, please have your product model (ST-M21) and proof of purchase available.