Introduction
This manual provides detailed instructions for the installation, operation, and maintenance of the Blue-White F-1000 Digital Flow Meter. Please read this manual thoroughly before attempting to install or operate the device to ensure proper function and safety. The F-1000 is designed for accurate measurement of fluid flow in 2-inch PVC pipes, with a range of 30-300 gallons per minute (GPM).
Safety Information
- Always disconnect power or turn off fluid flow before performing any installation or maintenance.
- Ensure all connections are secure to prevent leaks.
- Wear appropriate personal protective equipment (PPE) during installation.
- Do not exceed the specified operating pressure or temperature limits of the device.
- Refer to local codes and regulations for proper installation practices.
Package Contents
Verify that all components are present and undamaged upon unpacking. If any items are missing or damaged, contact your supplier immediately.

Image: All components of the Blue-White F-1000 Digital Flow Meter kit. This includes the digital display head, the pipe saddle, two stainless steel hose clamps, a threaded nut, a sensor plug, and several O-rings.
- F-1000 Digital Flow Meter Head
- 2" PVC Pipe Saddle
- Stainless Steel Clamps (x2)
- Mounting Hardware (threaded nut, sensor plug, O-rings)
- User Manual (this document)
Setup and Installation
Proper installation is crucial for accurate readings and reliable operation. Follow these steps carefully.
1. Select Installation Location
Choose a straight section of 2-inch PVC pipe. Ensure there is sufficient straight pipe run before and after the installation point to minimize turbulence and ensure accurate flow measurement. A minimum of 10 pipe diameters upstream and 5 pipe diameters downstream is recommended.
2. Prepare the Pipe
- Turn off the flow in the pipe and drain the system.
- Clean the exterior of the pipe where the saddle will be installed.
- Mark the center point for drilling.
3. Drill the Hole

Image: The F-1000 flow meter head mounted on a pipe saddle, secured to a 2-inch PVC pipe with two metal clamps. The digital display shows "F-1000-RB" and "BLUE-WHITE INDUSTRIES" with "GPM" below the numerical reading.
- Using a drill bit appropriate for the sensor size (refer to specifications for exact diameter), carefully drill a hole through the pipe wall at the marked center point.
- Remove any burrs or debris from the drilled hole.
4. Install the Pipe Saddle

Image: Side view of the F-1000 flow meter, showing the label on the meter head. The label indicates "Model: F-1000-RB", "Pipe: 2" SCH40", "Range: 30-300 GPM", and "Cal. Date: 1-14-19". It also states "CHANGE TWO AAA BATTERIES EVERY YEAR" and "Made in USA".
- Place the pipe saddle over the drilled hole, ensuring the O-ring is properly seated around the opening.
- Secure the saddle to the pipe using the two stainless steel clamps. Tighten the clamps evenly to create a watertight seal, but do not overtighten.
5. Install the Flow Meter Head

Image: Front view of the F-1000 digital display. The screen shows "R" on the left, indicating "Rate", and "0.0" on the right, indicating the current flow rate in GPM. The text "Flow Rate Meter" and "F-1000-RB" are visible above the display.
- Insert the flow meter head into the saddle opening. Ensure the sensor is fully engaged with the flow stream.
- Secure the meter head with the threaded nut, hand-tightening until snug. Do not use tools to overtighten.
6. Power On and Test
- Once installation is complete, slowly restore flow to the pipe. Check for any leaks.
- The digital display should activate and begin showing flow readings.
Operating Instructions
The F-1000 Digital Flow Meter is designed for straightforward operation.
Display Functions
- The primary display shows the instantaneous flow rate in Gallons Per Minute (GPM).
- Some models may feature additional display modes, such as totalized flow. Refer to the specific model's detailed instructions for advanced features.
Battery Replacement
The unit is powered by two AAA batteries. The display will indicate a low battery warning when replacement is needed. To replace batteries:
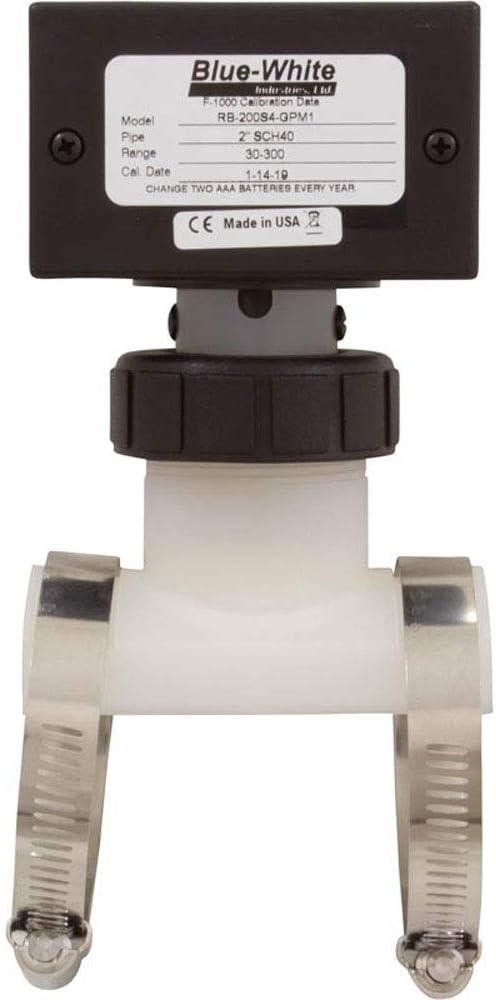
Image: Rear view of the F-1000 flow meter head, showing the product label. The label details the model (F-1000-RB), pipe size (2" SCH40), range (30-300 GPM), and calibration date (1-14-19). It also instructs to "CHANGE TWO AAA BATTERIES EVERY YEAR" and notes "Made in USA".
- Carefully remove the four screws securing the top cover of the meter head.
- Lift the cover to access the battery compartment.
- Replace the old AAA batteries with new ones, observing correct polarity.
- Securely reattach the cover, ensuring the gasket is properly seated to maintain water resistance.
Maintenance
The F-1000 Digital Flow Meter requires minimal maintenance to ensure long-term accuracy and performance.
- Annual Battery Replacement: As indicated on the product label, replace the two AAA batteries annually to prevent unexpected power loss.
- Sensor Inspection: Periodically inspect the sensor for any debris or buildup that might impede its rotation. If cleaning is necessary, turn off flow, remove the meter head, and gently clean the impeller with a soft brush.
- Leak Checks: Regularly check the installation points for any signs of leaks. Tighten clamps or connections if necessary.
Troubleshooting
| Problem | Possible Cause | Solution |
|---|---|---|
| No display or blank screen | Dead or low batteries | Replace AAA batteries. |
| Inaccurate flow readings |
|
|
| Leaks at installation point |
|
|
| Flow reading stuck at zero |
|
|
Specifications
| Feature | Detail |
|---|---|
| Model | F-1000-RB |
| Pipe Size | 2" PVC (SCH40) |
| Flow Range | 30-300 GPM (Gallons Per Minute) |
| Display | Digital, Instantaneous Flow Rate |
| Power Source | 2 x AAA Batteries |
| Product Dimensions | 6.85 x 7.85 x 2.65 inches |
| Item Weight | 4.2 ounces |
| Manufacturer | Blue-White Industries Ltd. |
| ASIN | B01508RCQ6 |
Warranty and Support
Blue White Industries products are manufactured to high standards. For specific warranty information, please refer to the warranty card included with your product or visit the official Blue White Industries website. For technical support, replacement parts, or further assistance, please contact Blue White Industries customer service directly.
Manufacturer: Blue-White Industries Ltd.
Website: www.blue-white.com