Introduction
This manual provides essential information for the safe and proper installation, operation, and maintenance of the Robertshaw WR 646A-X Furnace Gas Valve. This valve is designed for use in natural gas (NAT) and liquid propane (LP) furnace systems. Please read all instructions carefully before proceeding with installation or operation.
WARNING: Improper installation, adjustment, alteration, service, or maintenance can cause property damage, personal injury, or loss of life. Consult a qualified installer, service agency, or gas supplier before installing or servicing this product.
Safety Information
- Always turn off the main gas supply and electrical power to the furnace before attempting any installation, service, or maintenance.
- Verify that the gas valve is compatible with the type of gas being used (Natural Gas or LP Gas).
- Ensure all gas connections are properly sealed and leak-tested after installation. Use a non-corrosive leak detection solution.
- Do not use open flames to check for gas leaks.
- Follow all local codes and regulations for gas appliance installation.
- Only qualified personnel should install or service this gas valve.
Product Overview
The Robertshaw WR 646A-X is a combination gas control valve designed for furnace applications. It integrates a manual shut-off, automatic main gas control, and a pressure regulator into a single unit.
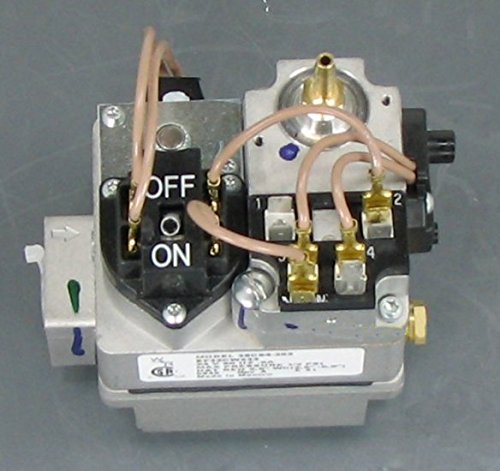
Figure 1: Robertshaw WR 646A-X Furnace Gas Valve. This image displays the top view of the gas valve, showing the manual ON/OFF switch, wiring terminals (labeled 1, 2, 3, 4), and the gas outlet connection. The beige wires connect various internal components and terminals. A label with model information is visible on the side.
Key components include:
- Manual ON/OFF Switch: Controls the gas flow manually. (Visible on the left side of the image, labeled "OFF" and "ON")
- Wiring Terminals: Connections for electrical control signals. (Labeled 1, 2, 3, 4 in the image)
- Gas Inlet/Outlet: Connections for gas piping. (Inlet typically on the side, outlet on top/front, with a brass fitting visible for outlet in the image)
- Pressure Regulator: Maintains a consistent gas pressure to the burner.
Installation
- Preparation: Ensure the main gas supply and electrical power to the furnace are OFF.
- Remove Old Valve: Carefully disconnect gas piping and electrical wiring from the existing gas valve.
- Mount New Valve: Install the new Robertshaw WR 646A-X valve in the same orientation as the old valve, ensuring secure mounting.
- Connect Gas Piping: Apply appropriate pipe sealant to threaded connections. Connect the gas inlet and outlet pipes to the valve. Ensure all connections are tight.
- Connect Electrical Wiring: Refer to the furnace manufacturer's wiring diagram. Connect the electrical wires to the corresponding terminals on the gas valve (e.g., terminals 1, 2, 3, 4 as shown in Figure 1).
- Leak Test: Turn on the main gas supply. Use a non-corrosive leak detection solution to check all gas connections for leaks. Bubbles indicate a leak. Tighten connections as necessary and re-test.
- Restore Power: Once all connections are secure and leak-free, restore electrical power to the furnace.
Note: This is a general guide. Always refer to the specific installation instructions provided by the furnace manufacturer and local codes.
Operating Instructions
- Initial Startup: After installation or extended shutdown, it may take several ignition attempts for air to purge from the gas lines.
- Manual ON/OFF: The manual switch on the valve (see Figure 1) allows for manual control of gas flow.
- Set to "ON" for normal operation.
- Set to "OFF" to completely shut off gas flow to the burner.
- Normal Operation: With the manual switch in the "ON" position, the furnace control board will send signals to the gas valve to open and close as required for heating cycles.
- Pilot Light (if applicable): If your furnace uses a standing pilot, follow the furnace manufacturer's instructions for lighting the pilot. This gas valve typically works with intermittent pilot or direct spark ignition systems.
Maintenance
The Robertshaw WR 646A-X gas valve is designed for reliable operation and generally requires minimal maintenance. However, periodic checks are recommended as part of overall furnace maintenance.
- Annual Inspection: Have a qualified HVAC technician inspect the gas valve and furnace annually.
- Leak Checks: Periodically check gas connections for leaks using a non-corrosive leak detection solution.
- Cleanliness: Ensure the area around the gas valve is free from dust, debris, and obstructions.
- Do Not Lubricate: Do not attempt to lubricate any part of the gas valve. Internal components are factory-lubricated and sealed.
Troubleshooting
Before troubleshooting, ensure the main gas supply is ON and electrical power is supplied to the furnace.
| Problem | Possible Cause | Solution |
|---|---|---|
| No gas flow to burner |
|
|
| Gas odor detected | Gas leak | IMMEDIATELY turn off gas supply, ventilate area, and contact gas company/qualified technician. Do not operate electrical switches. |
| Burner cycles on/off rapidly | Incorrect gas pressure or other furnace issue | Contact a qualified technician for diagnosis and adjustment. |
For any issues beyond basic checks, contact a qualified HVAC service technician.
Specifications
- Model Number: 646A-X
- Brand: WR for Robertshaw
- Gas Type: Natural Gas (NAT) / Liquid Propane (LP)
- Product Dimensions: 6 x 6 x 6 inches
- Item Weight: 2.5 Pounds
- Inlet Connection Type: Threaded
- Number of Ports: 2
- Manufacturer: Robertshaw
Warranty Information
This product is covered by the manufacturer's standard warranty. For specific warranty terms and conditions, please refer to the documentation provided with your purchase or contact Robertshaw customer support. Keep your proof of purchase for warranty claims.
Support
For technical assistance, replacement parts, or service inquiries, please contact your authorized Robertshaw dealer or a qualified HVAC service professional. You may also visit the official Robertshaw website for additional resources.