Parkside PDSS 310 A1
PARKSIDE PDSS 310 A1 Pneumatic Impact Wrench User Manual
Model: PDSS 310 A1 | Brand: Parkside
1. Introduction and Overview
This manual provides essential information for the safe and efficient operation, maintenance, and troubleshooting of your PARKSIDE PDSS 310 A1 Pneumatic Impact Wrench. Please read this manual thoroughly before initial use and keep it for future reference.

Image 1.1: The PARKSIDE PDSS 310 A1 Pneumatic Impact Wrench. This image shows the main tool, a green and black impact wrench with a square drive for sockets and a trigger handle.
The PARKSIDE PDSS 310 A1 is a robust and powerful pneumatic impact wrench designed for various fastening and loosening tasks. It features a 4-stage adjustable impact power and a durable hammer mechanism, making it suitable for demanding applications. The tool operates on compressed air, requiring a compressor with a minimum tank volume of 50 liters.
2. Safety Instructions
Always observe general safety regulations when working with power tools. Failure to do so may result in serious injury or property damage.
- Personal Protective Equipment: Always wear safety glasses, hearing protection, and gloves when operating the impact wrench.
- Work Area: Keep your work area clean and well-lit. Cluttered or dark areas invite accidents.
- Air Supply: Ensure the compressed air supply is clean and dry. Use an inline oiler as specified in the maintenance section. Do not exceed the maximum working pressure of 6.3 bar.
- Tool Condition: Before each use, inspect the tool for any damage. Do not use a damaged tool.
- Secure Workpiece: Always secure the workpiece to prevent movement during operation.
- Proper Use: Use the tool only for its intended purpose. Do not modify the tool.
- Disconnect Air: Always disconnect the air supply before changing accessories, performing maintenance, or when the tool is not in use.
3. Package Contents
Carefully unpack all items and check for completeness and any signs of damage. If any parts are missing or damaged, contact your retailer.
- 1 x PARKSIDE PDSS 310 A1 Pneumatic Impact Wrench
- 10 x Socket Attachments (various sizes)
- 1 x Extension Attachment
- 1 x Nipple (approx. 6.35 mm / 1/4 inch)
- 1 x Inline Oiler
- 1 x Pneumatic Oil bottle
- 1 x Hex Key (for maintenance/adjustment, if applicable)
- 1 x User Manual (this document)
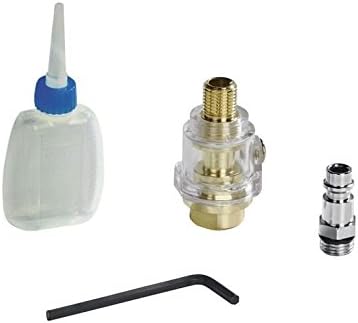
Image 3.1: Included accessories. This image displays a bottle of pneumatic oil, an inline oiler, and a quick-connect nipple, which are essential for the tool's operation and maintenance.

Image 3.2: Socket attachments and extension. This image shows a set of black impact sockets of various sizes and a black extension bar, designed for use with the impact wrench.
4. Setup
- Prepare Air Compressor: Ensure your air compressor is capable of providing a maximum working pressure of 6.3 bar and has a tank volume of at least 50 liters. Drain any condensation from the compressor tank.
- Connect Inline Oiler: If not already integrated into your air line, connect the supplied inline oiler to the air inlet of the impact wrench. Fill the oiler with the provided pneumatic oil. This is crucial for the longevity of the tool.
- Attach Air Hose: Connect your air hose to the nipple (approx. 1/4 inch) on the impact wrench. Ensure all connections are secure to prevent air leaks.
- Initial Lubrication: Before first use, add a few drops of pneumatic oil directly into the air inlet of the tool if an inline oiler is not used or as an additional measure.
- Select Socket: Choose the appropriate socket attachment for your task and firmly attach it to the square drive of the impact wrench. Use the extension attachment if needed.
5. Operating Instructions
5.1. Adjusting Impact Power
The PARKSIDE PDSS 310 A1 features a 4-stage adjustable impact power setting. This allows you to control the torque output for different applications. Locate the power adjustment dial, usually near the air inlet or trigger, and rotate it to select the desired power level. Start with a lower setting and increase if more torque is required.
5.2. Forward/Reverse Rotation
The tool has a switch for selecting forward (tightening) or reverse (loosening) rotation. This switch is typically located near the trigger for easy access. Ensure the tool is not operating when changing the direction of rotation.
5.3. General Operation
- Ensure the workpiece is stable and secure.
- Select the correct socket and attach it firmly.
- Set the desired impact power and rotation direction.
- Place the socket squarely onto the fastener.
- Press the trigger to operate the tool. Apply steady pressure.
- Release the trigger to stop the tool.
- For loosening stubborn fasteners, the maximum loosening torque is 310 Nm.
6. Maintenance
Regular maintenance ensures the longevity and optimal performance of your impact wrench.
- Lubrication: It is essential to lubricate the tool daily or before each use. Add 5-10 drops of pneumatic tool oil into the air inlet. If using an inline oiler, ensure it is filled and functioning correctly.
- Cleaning: Keep the tool clean and free from dirt and debris. Wipe down the housing with a damp cloth. Do not use harsh chemicals or solvents.
- Air Filter/Regulator: Regularly check and clean the air filter on your compressor and any inline filters/regulators to ensure a clean air supply to the tool.
- Storage: Store the impact wrench in a dry, clean place, away from direct sunlight and extreme temperatures. Disconnect it from the air supply before storage.
- Inspection: Periodically inspect the tool for worn or damaged parts, especially the square drive and air fittings. Replace any damaged components immediately.
7. Troubleshooting
| Problem | Possible Cause | Solution |
|---|---|---|
| Tool not operating or low power |
|
|
| Excessive air consumption |
|
|
| Tool gets hot |
|
|
8. Specifications
| Feature | Specification |
|---|---|
| Model | PDSS 310 A1 |
| Brand | Parkside |
| Loosening Torque (max.) | 310 Nm |
| No-load Speed | Approx. 7000 rpm |
| Working Pressure (max.) | 6.3 bar |
| Recommended Compressor Tank Volume | From 50 liters |
| Impact Power Adjustment | 4-stage |
| Rotation | Right/Left (Forward/Reverse) |
| Housing Material | Die-cast Aluminum |
| Item Weight | Approx. 4.28 kg |
9. Warranty and Support
For warranty claims, technical support, or spare parts, please contact your retailer or the manufacturer's customer service. Keep your proof of purchase for warranty purposes.
Please refer to the official Parkside website or your purchase documentation for specific warranty terms and contact information.
Ask a question about this manual
Ask about setup, troubleshooting, compatibility, parts, safety, or missing instructions. Manuals+ will review the question and use this page’s manual context to help answer it.