
1. Product Overview
The Cinolink USB 2.0 to IDE/SATA Hard Drive Reader (Model HA006) is a versatile adapter designed to connect 2.5-inch and 3.5-inch IDE/SATA hard drives, SSDs, and 5.25-inch optical drives (CD/DVD-ROM, CD/DVD-RW, Blu-ray DVD) to your computer via a USB 2.0 port. This device facilitates data transfer, backup, and recovery from various storage devices, supporting capacities up to 3 TB.
Key Features:
- Simultaneous operation of IDE and SATA drives.
- Compatible with 2.5" and 3.5" SATA/IDE hard drives and SSDs.
- Supports 5.25" optical drives with SATA or IDE interface.
- LED indicator for power status.
- Integrated ON/OFF switch for easy control.
- USB 2.0 interface with data transfer rates up to 480 Mbps.
- Plug-and-play functionality with Windows PC and Mac.
2. What's in the Box
Upon unpacking, please ensure all the following components are present:
- USB to IDE+SATA Adapter
- External AC Power Adapter (UL/FCC Certified 12V, 2A) with ON/OFF Switch
- USB 2.0 Cable (A-Male to B-Male, 3 Feet / 0.9 Meters)
- 4-pin Power Cable (Molex)

Figure 2.1: All components included with the Cinolink Hard Drive Reader.
3. Setup Instructions
Follow these steps to connect your hard drive or optical drive to your computer using the Cinolink adapter.
3.1. Connection Diagram

Figure 3.1: General connection diagram for various drive types.
3.2. Connecting a SATA Drive (2.5" or 3.5")
- Ensure the adapter's power switch is in the "OFF" position.
- Connect the SATA data and power connector from the adapter to your SATA hard drive or SSD. The adapter has a combined SATA data and power port.
- For 3.5" SATA drives, connect the external AC power adapter to the Cinolink adapter, then plug the AC adapter into a power outlet.
- For 2.5" SATA drives, external power is typically not required as they draw sufficient power from the USB connection. However, if the drive is not detected or unstable, connect the external AC power adapter.
- Connect the USB 2.0 cable from the Cinolink adapter to an available USB port on your computer.
- Flip the power switch on the AC adapter to "ON". The "PWR Active" LED on the Cinolink adapter should illuminate.

Figure 3.2: Connecting 3.5" SATA drives to the adapter and computer.
3.3. Connecting an IDE Drive (2.5" or 3.5")
- Ensure the adapter's power switch is in the "OFF" position.
- Connect the appropriate IDE connector from the Cinolink adapter to your IDE hard drive or optical drive.
- For 3.5" IDE drives, use the larger 40-pin IDE connector.
- For 2.5" IDE drives, use the smaller 44-pin IDE connector.
- Connect the 4-pin power cable (Molex) from the Cinolink adapter to the power input on your IDE drive.
- Connect the external AC power adapter to the Cinolink adapter, then plug the AC adapter into a power outlet. External power is always required for IDE drives.
- Connect the USB 2.0 cable from the Cinolink adapter to an available USB port on your computer.
- Flip the power switch on the AC adapter to "ON". The "PWR Active" LED on the Cinolink adapter should illuminate.

Figure 3.3: Connecting a 2.5" IDE drive to the adapter and computer.
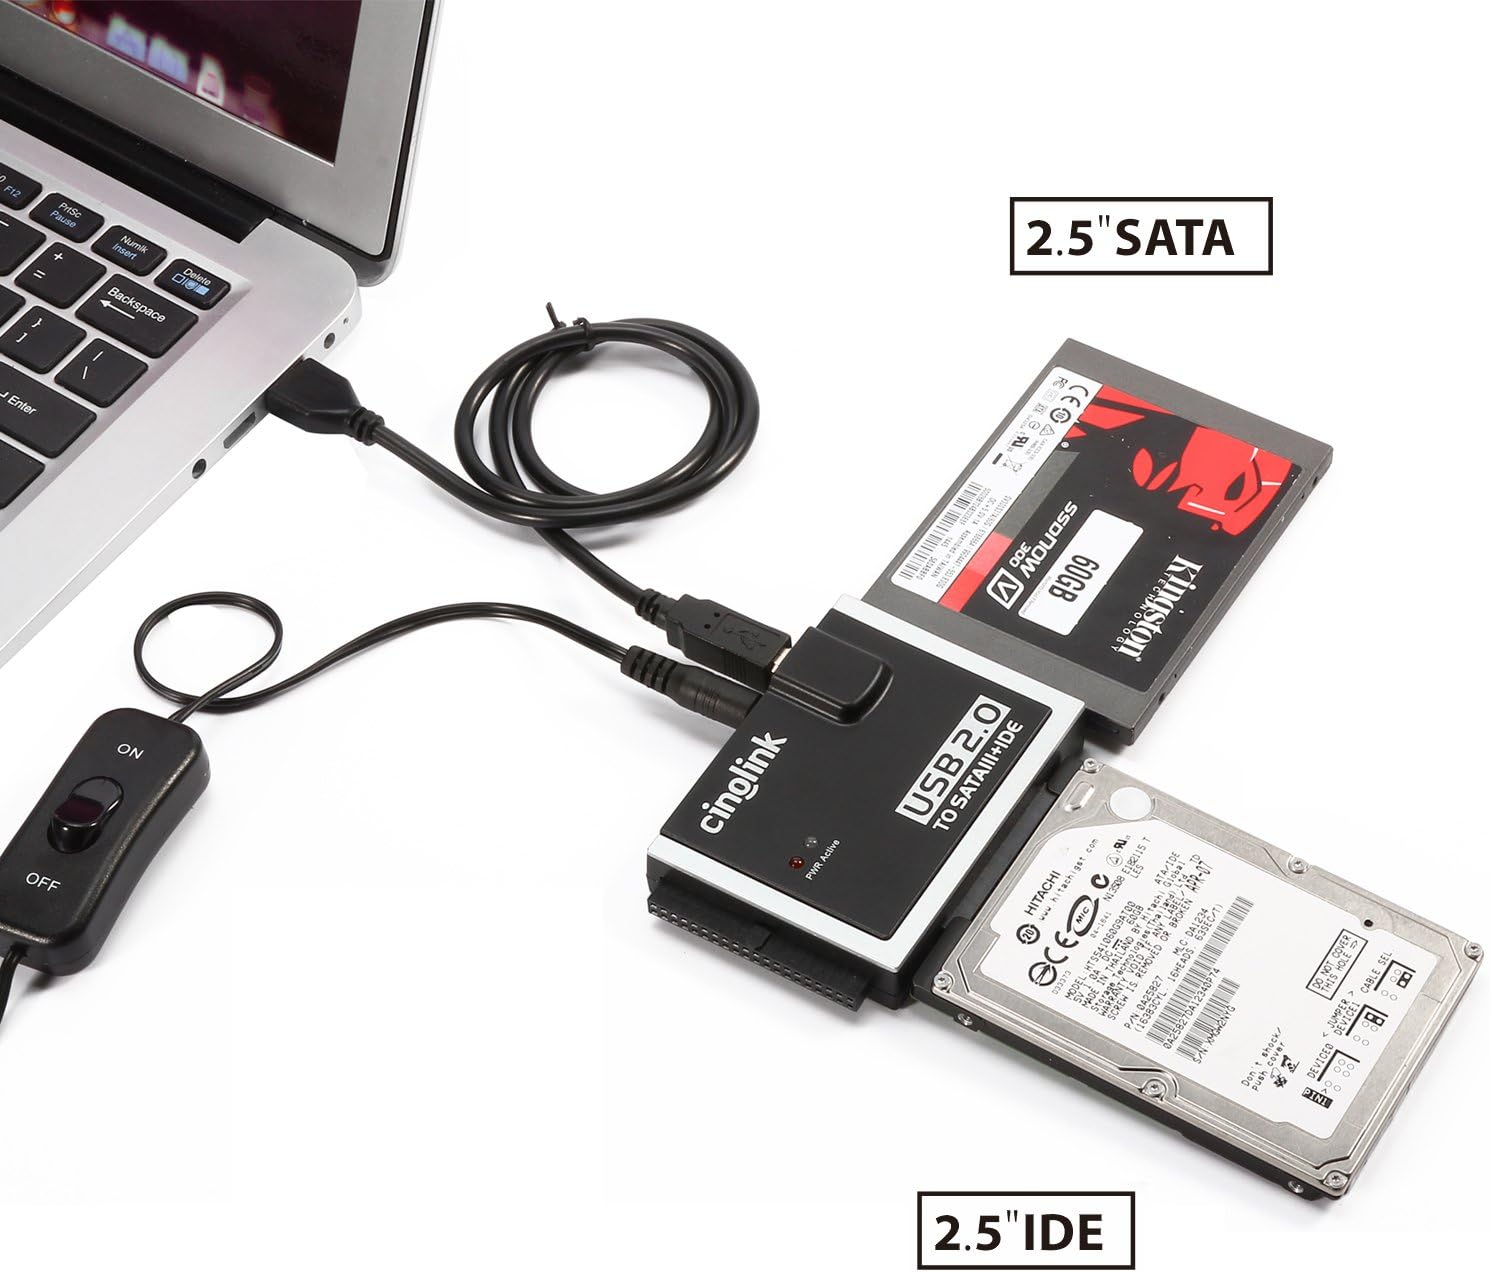
Figure 3.4: Simultaneous connection of 2.5" SATA and 2.5" IDE drives.
Note: When connecting IDE drives, ensure the IDE connector is firmly seated. Some connectors may require a gentle but firm push. If using a 3.5" IDE drive, ensure the jumper settings on the drive are correctly configured for "Master" or "Cable Select" if you encounter detection issues.
4. Operating Instructions
4.1. Accessing Your Drive
Once connected and powered on, your operating system (Windows, macOS, Linux) should automatically detect the connected drive. It will appear as a removable storage device.
- Windows: Open "This PC" or "My Computer". The drive will be listed under "Devices and drives".
- macOS: The drive icon will appear on your desktop or in Finder under "Locations".
- Linux: The drive will typically be mounted automatically and accessible via your file manager.
If the drive does not appear, it may need to be initialized, partitioned, and formatted. This is common for new drives or drives that have not been used with your current operating system. Refer to your operating system's documentation for instructions on disk management.
4.2. LED Indicator
The "PWR Active" LED on the Cinolink adapter indicates the power status:
- Solid Red: The adapter is receiving power and is active.
- Flashing Red: (If applicable, not explicitly stated but common) Indicates data activity.

Figure 4.1: Close-up of the adapter with the "PWR Active" LED.
4.3. Safe Disconnection
To prevent data corruption, always safely eject or unmount the drive before disconnecting it or turning off the power.
- Windows: Click the "Safely Remove Hardware and Eject Media" icon in the system tray, then select the drive.
- macOS: Drag the drive icon to the Trash or click the Eject button next to the drive in Finder.
- Linux: Right-click the drive in your file manager and select "Eject" or "Unmount".
After safely ejecting, turn off the power switch on the AC adapter, then disconnect the USB cable and the drive.
5. Maintenance
To ensure the longevity and optimal performance of your Cinolink Hard Drive Reader, follow these simple maintenance guidelines:
- Cleaning: Use a soft, dry cloth to clean the adapter. Avoid using liquid cleaners or solvents, which can damage the device.
- Storage: Store the adapter and its components in a cool, dry place away from direct sunlight and extreme temperatures.
- Handling: Handle the adapter and connected drives with care. Avoid dropping or subjecting them to physical shock.
- Cable Management: Do not bend or crimp the cables excessively. Ensure connections are secure but do not force them.
6. Troubleshooting
If you encounter issues while using the Cinolink Hard Drive Reader, refer to the following common problems and solutions:
6.1. Drive Not Detected
- Check Power: Ensure the external AC power adapter is securely connected to the Cinolink adapter and a power outlet, and the ON/OFF switch is in the "ON" position. The "PWR Active" LED should be illuminated. Remember, IDE drives and 3.5" SATA drives always require external power.
- Check Connections: Verify that all cables (USB, SATA, IDE, 4-pin power) are firmly and correctly connected to both the adapter and the drive.
- Try Another USB Port: Connect the USB cable to a different USB port on your computer.
- Try Another Computer: Test the adapter and drive on another computer to rule out computer-specific issues.
- Drive Condition: The drive itself might be faulty. If possible, test the drive directly in a computer or with another known-working adapter.
- IDE Jumper Settings: For IDE drives, ensure the jumper settings are correctly configured (e.g., Master or Cable Select). Incorrect jumper settings can prevent detection.
- New/Unformatted Drive: If it's a new drive or one that hasn't been used with your OS, it might need to be initialized, partitioned, and formatted through your operating system's Disk Management utility.
6.2. Slow Data Transfer Speeds
- USB 2.0 Limitation: This adapter uses USB 2.0, which has a maximum theoretical transfer rate of 480 Mbps. This is slower than USB 3.0 or native SATA connections.
- Computer USB Port: Ensure you are connecting to a functional USB 2.0 port. Using a faulty port can reduce speeds.
- Drive Speed: The speed of the connected hard drive or SSD itself will also affect transfer rates. Older IDE drives are inherently slower.
6.3. IDE Connector is Too Tight
Some users have reported that the IDE connector can be very tight. Apply firm, even pressure when connecting the IDE drive to the adapter. Avoid wiggling or forcing it at an angle to prevent damage to the pins. Ensure the adapter and drive are supported to prevent stress on the connection point.
6.4. 4-pin Power Cable (Molex) is Too Short
In some configurations, especially with certain 3.5" drives, the included 4-pin Molex power cable might be short. If this is the case, an extension cable may be required (not included).
7. Specifications
| Feature | Detail |
|---|---|
| Model Number | HA006 |
| Interface | USB 2.0 (backward compatible with USB 1.1) |
| Supported Drive Types | 2.5" / 3.5" SATA HDD/SSD, 2.5" / 3.5" IDE HDD, 5.25" SATA/IDE Optical Drives |
| Max Capacity Support | Up to 3 TB |
| Data Transfer Rate | Up to 480 Mbps (USB 2.0) |
| Power Supply | External AC Power Adapter (12V, 2A) |
| Operating System Compatibility | Windows PC, macOS |
| Product Dimensions | 6.4 x 5.2 x 2.3 inches |
| Item Weight | 0.32 ounces |
| Manufacturer | Cinolink |
8. Warranty and Support
Cinolink products are designed for reliability and performance. For specific warranty information, please refer to the warranty card included with your purchase or visit the official Cinolink website. If you require technical assistance or have questions regarding your Cinolink USB 2.0 to IDE/SATA Hard Drive Reader, please contact Cinolink customer support.
For further assistance, you may visit the Cinolink Store on Amazon.