1. Introduction
This manual provides comprehensive instructions for the assembly, operation, maintenance, and troubleshooting of your BESTAR Connexion L-Desk with Hutch, Model 93886-59. This L-shaped desk features an electric height-adjustable table and integrated storage solutions, designed for commercial-grade use. Please read this manual thoroughly before assembly and operation to ensure safe and efficient use of your product.

Image 1.1: Overview of the BESTAR Connexion L-Desk with Hutch in Slate/Sandstone. This image displays the complete L-shaped desk unit, including the electric height-adjustable section, the fixed desk section, the hutch with overhead storage, and the integrated three-drawer pedestal.
2. Important Safety Information
Failure to follow these safety instructions may result in injury or damage to the product.
- Always follow the assembly instructions carefully.
- Use two people for assembly due to the weight and size of the desk components.
- Keep the work area clear of obstacles when adjusting the desk height.
- Do not exceed the maximum weight recommendation of 300 pounds on the work surface.
- Ensure the desk is properly anchored to the floor to prevent tipping, especially when the height-adjustable section is extended.
- Keep children and pets away from the desk during operation and adjustment.
- Do not sit or stand on the desk.
3. Package Contents
Your BESTAR Connexion L-Desk with Hutch is shipped in multiple boxes. Verify that all components are present before beginning assembly. The complete unit includes:
- L-Shaped Standing Desk (Electric Height Adjustable Section)
- Fixed Desk Section
- Hutch with Overhead Storage
- Three-Drawer Pedestal (Utility and File Drawers)
- All necessary hardware for assembly (screws, dowels, etc.)
- Note: Assembly tools are not included. You will need standard household tools for assembly.
4. Setup and Assembly
Assembly of the BESTAR Connexion L-Desk requires careful attention to detail and adherence to the provided instructions. It is highly recommended that two adults perform the assembly due to the size and weight of the components.
4.1. Preparation
- Clear a large, open workspace. The desk arrives on a palette in 5 boxes.
- Unpack all boxes and identify all parts against the parts list provided in the separate assembly guide.
- Gather necessary tools (not included): screwdriver, hammer, measuring tape, etc.
4.2. Assembly Steps
Refer to the detailed assembly guide included with your product for step-by-step instructions. The general sequence involves:
- Assemble the electric height-adjustable desk frame.
- Attach the height-adjustable tabletop.
- Assemble the fixed desk section.
- Assemble the three-drawer pedestal and integrate it with the fixed desk section.
- Assemble the hutch and secure it to the fixed desk section.
- Connect the L-shaped sections.
- Perform initial calibration of the electric height adjustment mechanism as per the separate guide.

Image 4.1: Dimensional diagram of the BESTAR Connexion L-Desk with Hutch. This image provides key measurements for the desk, including overall width (71.1 inches), depth (70.9 inches), and height (65.9 inches), as well as the adjustable height range of the standing desk section (28 to 45 inches).
5. Operating Instructions
5.1. Electric Height Adjustment
The electric mechanism allows you to quickly and quietly adjust the height of the table. The height-adjustable section can be set between 28 inches (sitting height) and 45 inches (standing height).
- Control Panel: The desk features a digital display memory switch.
- Adjusting Height: Use the up and down arrows on the control panel to manually adjust the desk to your desired height.
- Memory Positions: The control panel includes 4 programmable memory positions. To save a height setting, adjust the desk to the desired height, then press and hold one of the numbered memory buttons (1-4) until you hear a beep or see a confirmation on the display.
- Recalling Memory Positions: Press a saved memory button (1-4) to automatically move the desk to the pre-set height.

Image 5.1: Illustration of the electric height adjustment feature. This image shows the height-adjustable desk section moving through various positions, demonstrating the sit-stand functionality.
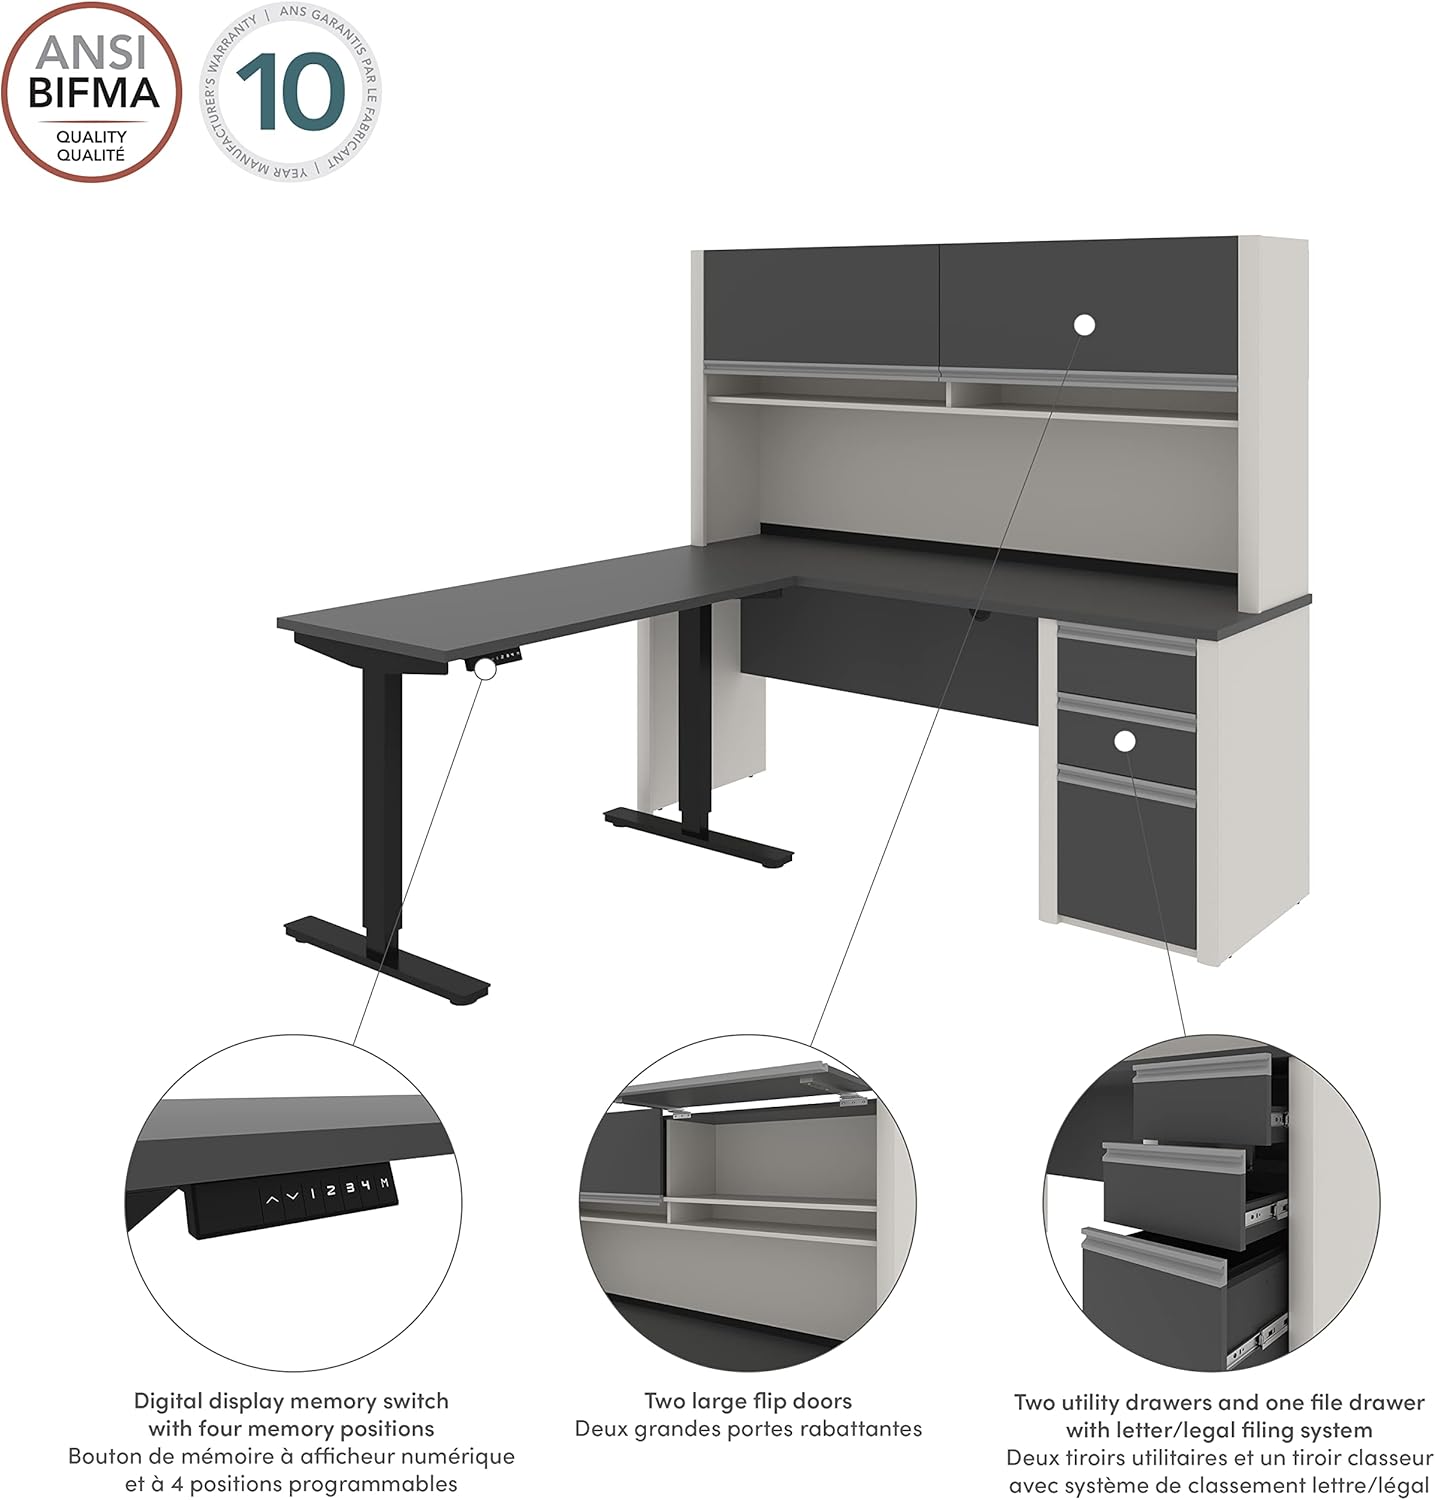
Image 5.2: Detailed diagram highlighting key features of the BESTAR Connexion L-Desk. This image points out the digital display memory switch with four programmable positions, the two large flip doors on the hutch, and the two utility drawers and one file drawer with a letter/legal filing system in the pedestal.
5.2. Storage Features
- Hutch: The hutch features two large flip doors for concealed storage and open shelving for easy access to frequently used items.
- Pedestal: The integrated pedestal includes two utility drawers and one file drawer designed for letter/legal filing. One lock secures the bottom two drawers for document security. The drawers operate on ball-bearing glides for smooth operation.

Image 5.3: Interior view of the hutch storage. This image shows the two flip-up doors in an open position, revealing the internal shelving for organized storage.

Image 5.4: Interior view of the pedestal drawers. This image displays the three drawers pulled open, showcasing the ball-bearing glides and the capacity for file storage in the bottom drawer.
6. Maintenance
Regular maintenance will ensure the longevity and optimal performance of your BESTAR Connexion L-Desk.
- Cleaning: Wipe surfaces with a soft, damp cloth. Avoid abrasive cleaners or harsh chemicals that can damage the melamine finish.
- Electric Mechanism: Periodically check the power cord and connections for any signs of damage. Ensure the motor area is free from dust and obstructions.
- Hardware: Periodically check all screws and fasteners to ensure they are tight. Re-tighten if necessary to maintain stability.
- Weight Distribution: Distribute weight evenly across the desk surface, especially on the height-adjustable section, to prevent strain on the mechanism.
7. Troubleshooting
If you encounter issues with your desk, refer to the following common problems and solutions:
| Problem | Possible Cause | Solution |
|---|---|---|
| Desk does not adjust height. | Power cord disconnected, motor overload, control panel malfunction. |
|
| Desk is wobbly or unstable. | Loose fasteners, uneven floor, improper assembly. |
|
| Drawers do not open/close smoothly or are misaligned. | Improper installation of drawer glides, obstruction, loose hardware. |
|
If the problem persists after attempting these solutions, please contact Bestar customer support.
8. Specifications
| Brand | Bestar |
| Model Number | 93886-59 |
| Model Name | Connexion |
| Product Dimensions (D x W x H) | 70.9"D x 71.1"W x 65.9"H |
| Color | Slate/Sandstone |
| Item Weight | 346 Pounds |
| Material | High-density commercial-grade particle board (Hutch), Wood (Base) |
| Finish Type | Melamine |
| Electric Height Adjustment Range | 28" (Minimum) to 45" (Maximum) |
| Maximum Weight Recommendation | 300 Pounds |
| Number of Drawers | 3 (2 Utility, 1 File) |
| Number of Enclosed Shelves | 2 (in hutch) |
| Required Assembly | Yes |
| Includes All Assembly Tools | No |
| Special Feature | Reversible configuration |
9. Warranty Information
The BESTAR Connexion L-Desk with Hutch comes with a manufacturer's warranty. The manufacturer warranty description states: "10 years; replacement of the damaged components of a unit."
For detailed warranty terms, conditions, and to make a claim, please refer to the warranty documentation included with your product or contact Bestar customer support.
10. Customer Support
If you have any questions, require assistance with assembly, or need to report a damaged component, please contact Bestar customer support. Please have your model number (93886-59) and purchase information ready when contacting support.
For more information, you may visit the Bestar Store on Amazon.


