
Introduction
This manual provides essential information for the safe and efficient operation, setup, and maintenance of your Toolcraft TC3307 AC Welder. The TC3307 is a 250 Amp alternating current (AC) welding machine designed for single-phase operation at 110-220V AC. It features a current adjustment knob for quick application changes, a 60Hz frequency, and a power output of 7.5/11.9 kVA. It is equipped with two exposed terminals for precise connections and a primary connection board for voltage selection. The unit includes an on/off switch with thermomagnetic protection and is compatible with 6010 (1/8"), 6011 (1/8", 3/32"), and 6013 (1/8", 5/32") electrodes. For ease of mobility, it comes with two wheels, a front support, and a long-reach handle. Please read this manual thoroughly before operating the welder.
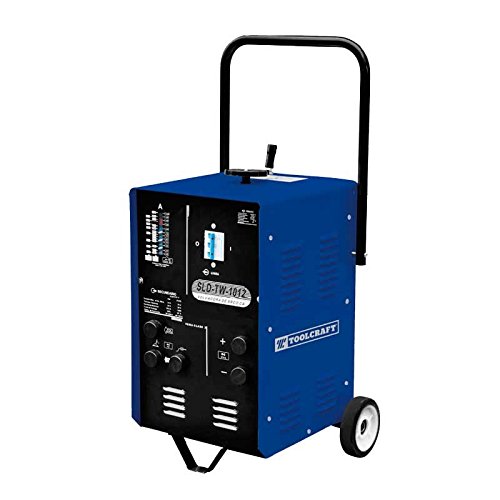
Figure 1: Toolcraft TC3307 AC Welder. This image shows the blue welding machine with its control panel, wheels, and top handle, designed for portability and ease of use.
Safety Information
Welding can be dangerous if proper safety precautions are not observed. Always prioritize your safety and the safety of others. This section outlines general safety guidelines. Refer to local regulations and industry standards for comprehensive safety practices.
- Electric Shock Hazard: Ensure the welder is properly grounded. Do not operate in wet conditions. Wear dry welding gloves and protective clothing.
- Fumes and Gases: Work in a well-ventilated area. Use fume extractors if necessary. Avoid breathing welding fumes.
- Arc Rays: Protect your eyes and skin from arc rays. Use a welding helmet with appropriate shade filter and protective clothing.
- Fire and Explosion: Keep flammable materials away from the welding area. Have a fire extinguisher readily available.
- Hot Parts: Allow welded materials and machine components to cool before handling.
- Personal Protective Equipment (PPE): Always wear appropriate PPE, including welding helmet, gloves, protective clothing, and safety shoes.
- Machine Disconnection: Disconnect the welder from the power supply before performing any maintenance or adjustments.
Setup
- Unpacking and Inspection: Carefully remove the welder from its packaging. Inspect the unit for any signs of damage that may have occurred during shipping. Report any damage to your supplier immediately.
- Wheel and Handle Assembly: Attach the two wheels to the designated axles at the rear of the unit. Secure the front support and the long-reach handle to their respective mounting points. Ensure all fasteners are tightened securely for stability and safe transport.
- Power Connection: The TC3307 operates on 110-220V AC, single-phase power.
- Locate the primary connection board for voltage change.
- Ensure the welder is disconnected from the power source before changing voltage settings.
- Configure the internal wiring according to the desired input voltage (110V or 220V AC) as indicated on the connection board diagram. If unsure, consult a qualified electrician.
- Connect the welder to a suitable power outlet with adequate current capacity. Ensure the power circuit is protected by a fuse or circuit breaker.
- Electrode Cable Connection: The welder features two exposed terminals for precise connection of welding cables (cables not included).
- Connect the electrode holder cable to one terminal and the work clamp cable to the other.
- Ensure connections are tight and secure to prevent arcing and overheating.
- Work Area Preparation: Clear the welding area of any flammable materials. Ensure adequate ventilation.
Operating Instructions
- Powering On: Once all connections are secure and the work area is prepared, turn the on/off switch to the "ON" position. The welder is equipped with thermomagnetic protection.
- Electrode Selection: The TC3307 is compatible with 6010 (1/8"), 6011 (1/8", 3/32"), and 6013 (1/8", 5/32") electrodes. Choose the appropriate electrode for your welding application.
- Current Adjustment: Use the knob on the control panel to adjust the welding current. The current range allows for quick application changes. Refer to the electrode manufacturer's recommendations for optimal current settings.
- Welding Process:
- Securely attach the work clamp to the workpiece, ensuring good electrical contact.
- Insert the chosen electrode into the electrode holder.
- Lower your welding helmet.
- Strike an arc by lightly touching the electrode to the workpiece and quickly lifting it slightly to establish the arc.
- Maintain a consistent arc length and travel speed to achieve a quality weld.
- Duty Cycle: The TC3307 has a duty cycle of 1 minute of operation followed by 9 minutes of rest. This means for every 1 minute of continuous welding, the machine requires 9 minutes to cool down to prevent overheating and damage. Adhering to the duty cycle is crucial for the longevity of the welder.
- Powering Off: After welding, turn the on/off switch to the "OFF" position. Disconnect the welder from the main power supply when not in use.
Maintenance
Regular maintenance ensures the longevity and safe operation of your Toolcraft TC3307 welder.
- Cleaning: Periodically clean the exterior of the welder with a dry, clean cloth. Ensure ventilation openings are free from dust and debris to allow proper airflow. Do not use solvents or abrasive cleaners.
- Cable and Connection Inspection: Regularly inspect welding cables, electrode holder, and work clamp for signs of wear, damage, or loose connections. Replace damaged components immediately. Ensure the two exposed terminals are clean and free of corrosion.
- Internal Inspection (Qualified Personnel Only): For internal cleaning or inspection, it is recommended to have the unit serviced by qualified personnel to avoid electric shock or damage to components.
- Storage: Store the welder in a clean, dry, and well-ventilated area, away from direct sunlight, moisture, and extreme temperatures.
Troubleshooting
This section provides solutions to common issues you might encounter with your welder.
| Problem | Possible Cause | Solution |
|---|---|---|
| Welder does not power on. | No power from outlet; Power switch off; Internal thermomagnetic protection tripped. | Check power supply and outlet; Ensure power switch is ON; Allow unit to cool down if thermomagnetic protection has activated, then restart. |
| Poor arc stability or weak weld. | Incorrect current setting; Poor work clamp connection; Incorrect electrode; Dirty workpiece. | Adjust current knob; Ensure work clamp has good contact; Use correct electrode type and size; Clean workpiece surface. |
| Welder overheats and shuts down. | Exceeded duty cycle; Blocked ventilation; High ambient temperature. | Allow welder to cool down for 9 minutes after 1 minute of use; Clear ventilation openings; Operate in a cooler environment. |
| Excessive sparking at connections. | Loose cable connections. | Tighten all cable connections, especially at the exposed terminals. |
Specifications
| Feature | Detail |
|---|---|
| Manufacturer | TOOLCRAFT |
| Part Number | TC3307 |
| Product Model Number | TC3307 |
| Welder Type | Alternating Current (AC) Welder |
| Current Output | 250 Amps |
| Input Voltage | 110-220V AC, Single-phase |
| Frequency | 60Hz |
| Power | 7.5/11.9 kVA |
| Duty Cycle | 1 minute work x 9 minutes rest |
| Compatible Electrodes | 6010 (1/8"), 6011 (1/8", 3/32"), 6013 (1/8", 5/32") |
| Terminals | Two exposed terminals for precise connection |
| Voltage Change | Primary connection board for voltage change |
| Protection | Thermomagnetic protection |
| Mobility Features | 2 wheels, front support, long-reach handle |
| Cables Included | No |
| Dimensions (L x W x H) | 45 x 30.8 x 40 cm (17.7 x 12.1 x 15.7 inches) |
| Weight | 22.5 kg (49.6 lbs) |
| Measurement System | Metric |
| Batteries Required | No |
| First Available Date | August 21, 2015 |
Warranty and Support
Specific warranty details for the Toolcraft TC3307 AC Welder are not provided in this manual. For information regarding warranty coverage, terms, and conditions, please refer to the documentation included with your purchase or contact Toolcraft customer support directly. For technical assistance, spare parts, or service inquiries, please reach out to the manufacturer or your authorized dealer.