Introduction
The Astromania Deluxe Red Dot Finderscope is a non-magnifying reflex sight designed to simplify and enhance the process of locating astronomical objects with your telescope. It projects a visible reticle pattern onto a viewing window, allowing for easy aiming day or night. This manual provides detailed instructions for its setup, operation, and maintenance.
Product Overview
Familiarize yourself with the components of your Astromania Deluxe Red Dot Finderscope:
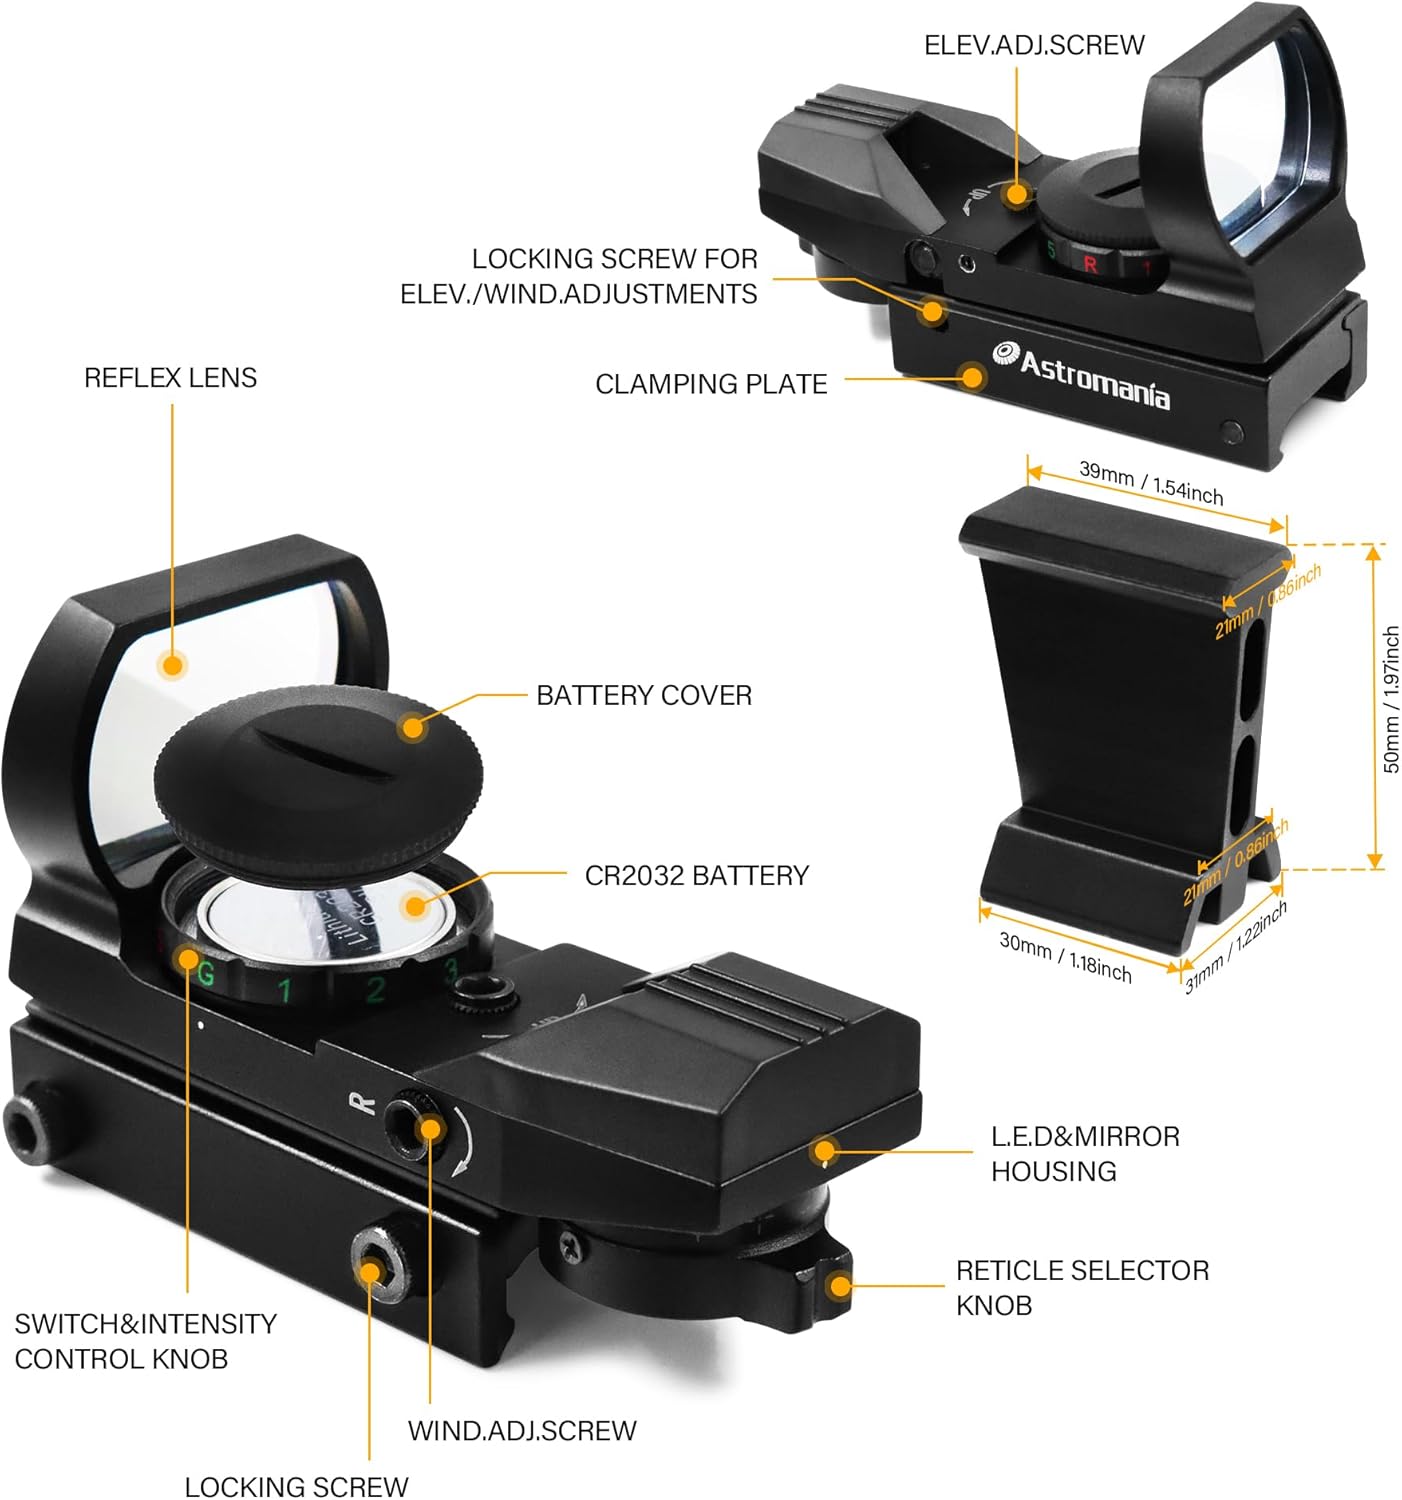
- Reflex Lens: The main viewing window where the reticle is projected.
- Battery Cover: Protects the CR2032 lithium button cell battery compartment.
- Switch & Intensity Control Knob: Turns the unit on/off and adjusts reticle brightness.
- Windage Adjustment Screw: Used for horizontal alignment of the reticle.
- Elevation Adjustment Screw: Used for vertical alignment of the reticle.
- Reticle Selector Knob: Allows selection of four different aiming patterns.
- Dovetail Finder Bracket: For mounting the finderscope to compatible telescopes.
Package Contents
Verify that all items are present in your package:

- Astromania Deluxe Red Dot Finderscope
- Dovetail Finder Bracket
- Allen Wrenches (2 sizes for adjustments)
- Cleaning Cloth
- Instruction Manual (this document)
Note: A CR2032 lithium button cell battery is required and may not be included in all packages. Please check your specific product details.
Setup
1. Battery Installation
- Locate the battery compartment on the top of the finderscope, covered by the battery cap.
- Unscrew the battery cap counter-clockwise.
- Insert one CR2032 lithium button cell battery with the positive (+) side facing upwards.
- Replace the battery cap by screwing it clockwise until secure.
2. Mounting the Finderscope
- Attach the dovetail finder bracket to your telescope's existing finder shoe. Ensure it is securely fastened.
- Slide the Astromania Deluxe Red Dot Finderscope into the dovetail bracket.
- Tighten the clamping plate screw on the bracket to hold the finderscope firmly in place.
Operation
1. Power On/Off and Brightness Adjustment
- Rotate the Switch & Intensity Control Knob to turn the finderscope ON. The knob has settings for both Red (R) and Green (G) reticles, each with 5 brightness levels (1-5).
- To select a red reticle, turn the knob towards 'R' and choose a brightness level from 1 (dimmest) to 5 (brightest).
- To select a green reticle, turn the knob towards 'G' and choose a brightness level from 1 (dimmest) to 5 (brightest).
- To turn the finderscope OFF, rotate the knob to the 'R' or 'G' position where the light is off (usually past level 1 or 5).

2. Reticle Pattern Selection
The finderscope offers four different aiming reticle patterns. Rotate the Reticle Selector Knob, located on the side of the unit, to cycle through the available patterns. Choose the pattern that best suits your viewing preference and conditions.

3. Aiming with the Finderscope
The Astromania Deluxe Red Dot Finderscope provides a non-magnified, upright view. Keep both eyes open when looking through the finderscope from approximately 20cm away. You will see an illuminated reticle floating in the sky. Move your telescope until the reticle pattern coincides with your desired target. Once aligned, the object should be visible in your main telescope eyepiece.

Alignment
Precise alignment of the finderscope with your main telescope is crucial for accurate targeting. This process involves adjusting the reticle's position to match the center of your telescope's view.
- Initial Setup: Point your main telescope at a distant, stationary object (e.g., a distant tree or street light) during daylight hours. Center the object in your main telescope's lowest power eyepiece.
- Loosen Locking Screws: Before making any adjustments, slightly loosen the small locking screw located near the Elevation Adjustment Screw and the Windage Adjustment Screw using the provided Allen wrench. This allows the adjustment screws to move freely.
- Adjust Elevation: Use the Elevation Adjustment Screw (marked 'UP' with an arrow) to move the reticle vertically until it is centered on the same object you centered in your main telescope. Turning the screw clockwise typically moves the reticle up, and counter-clockwise moves it down.
- Adjust Windage: Use the Windage Adjustment Screw (marked 'R' with an arrow) to move the reticle horizontally until it is centered on the object. Turning the screw clockwise typically moves the reticle right, and counter-clockwise moves it left.
- Tighten Locking Screws: Once the reticle is precisely centered on the object, gently tighten the locking screws to secure the adjustments. Avoid over-tightening.

Periodically check and re-align your finderscope, especially after transporting your telescope, to ensure continued accuracy.
Maintenance
- Cleaning: Use the provided cleaning cloth or a soft, lint-free cloth to gently wipe the reflex lens and exterior surfaces. Avoid abrasive materials or harsh chemicals.
- Battery Care: If the finderscope will not be used for an extended period, remove the CR2032 battery to prevent potential leakage and damage.
- Storage: Store the finderscope in a dry, dust-free environment when not in use.
Troubleshooting
- No Reticle Appears:
- Ensure the battery is correctly installed with the positive (+) side up.
- Check if the CR2032 battery needs replacement.
- Verify the Switch & Intensity Control Knob is turned to an active brightness level (1-5) for either Red or Green.
- Reticle is Dim:
- Increase the brightness level using the Switch & Intensity Control Knob.
- Replace the CR2032 battery if it is weak.
- Reticle Does Not Align with Telescope:
- Ensure the locking screws for elevation and windage adjustments are slightly loosened before attempting to adjust.
- Carefully follow the alignment procedure described in the 'Alignment' section.
- Confirm the finderscope is securely mounted to the dovetail bracket and the bracket to the telescope.
Specifications
| Feature | Specification |
|---|---|
| Brand | Astromania |
| Model Name | Deluxe Finder |
| Model Number | SKU_AM_RSEZ2 |
| Color | Black |
| Material | Metal |
| Item Weight | 6.1 Ounces |
| Product Dimensions | 4.61 x 3.57 x 1.82 inches |
| Objective Lens Diameter | 20.0 mm |
| Mounting Type | Dovetail Mount |
| Reticle Type | Custom (4 patterns) |
| Brightness Levels | 5 (Red and Green) |
| Battery Type | CR2032 Lithium Button Cell |
Warranty and Support
For warranty information or technical support regarding your Astromania Deluxe Red Dot Finderscope, please refer to the manufacturer's official website or contact their customer service directly. Keep your purchase receipt as proof of purchase.