Introduction
Thank you for choosing the ViewSonic VA2465SM-3 24-inch LED Monitor. This manual provides essential information for setting up, operating, maintaining, and troubleshooting your new monitor. The VA2465SM-3 features a Full HD 1920x1080 resolution, SuperClear VA technology for wide viewing angles, and integrated speakers, making it ideal for both home and office environments. It also includes ViewMode presets, Flicker-Free technology, and a Blue Light Filter to enhance viewing comfort.
Safety Information
Please read all instructions carefully before operating the monitor. Keep this manual for future reference.
- Ensure the power cord is properly grounded and connected to a compatible power outlet.
- Do not expose the monitor to rain or moisture to prevent fire or shock hazards.
- Do not block ventilation openings. Place the monitor in a well-ventilated area.
- Avoid placing the monitor on an unstable cart, stand, or table.
- Unplug the monitor from the power outlet before cleaning. Use a soft, dry cloth for cleaning.
- Refer all servicing to qualified service personnel.
Package Contents
Verify that all items are present in the package:
- ViewSonic VA2465SM-3 Monitor
- Power Cable
- VGA Cable
- Audio Cable (for integrated speakers)
- Quick Start Guide
- Monitor Stand (Base and Neck)
Setup
1. Assembling the Monitor Stand
- Carefully place the monitor face down on a soft, clean surface to prevent scratches.
- Attach the stand neck to the back of the monitor, aligning the tabs and pushing until it clicks into place.
- Attach the stand base to the stand neck, securing it with the captive screw on the underside of the base.

Figure 1: Rear view of the monitor, illustrating the stand attachment point and VESA mounting holes.
2. Connecting Cables
Connect the necessary cables to the monitor and your computer.
- Power Cable: Connect one end of the power cable to the monitor's power input and the other end to a grounded electrical outlet.
- Video Cable:
- VGA: Connect the VGA cable from your computer's VGA output to the monitor's VGA input.
- DVI: Connect the DVI cable from your computer's DVI output to the monitor's DVI input.
- Audio Cable: If you wish to use the integrated speakers, connect an audio cable from your computer's audio output to the monitor's audio input.
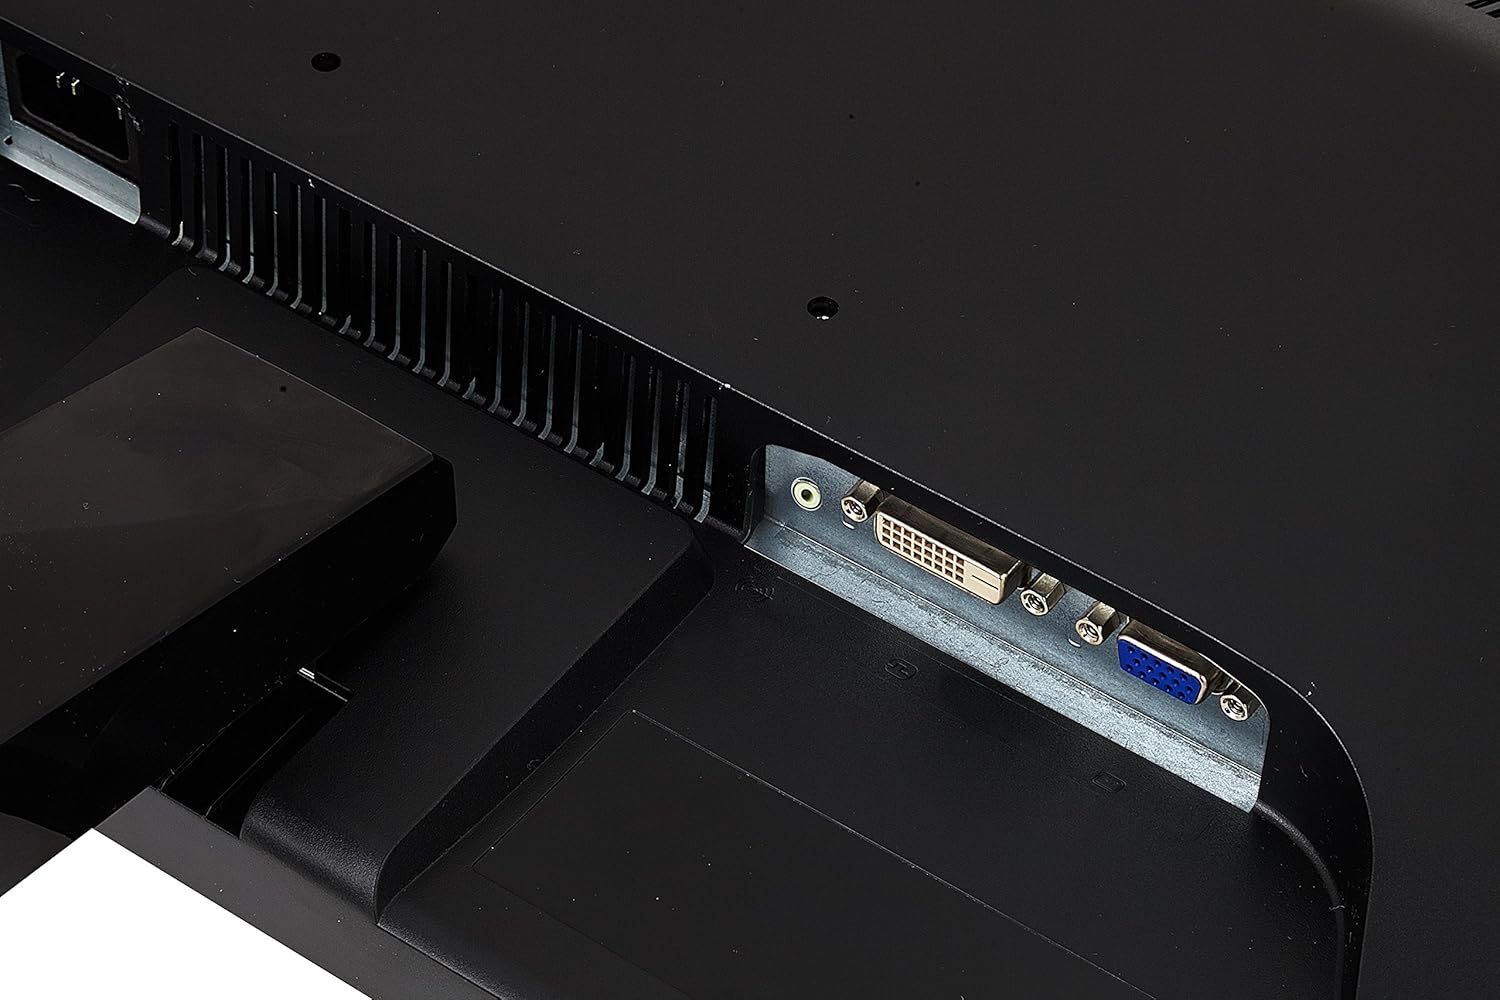
Figure 2: Detailed view of the monitor's rear input panel, showing the VGA and DVI ports.
3. Powering On
Press the power button located on the front right side of the monitor to turn it on. The power indicator light will illuminate.

Figure 3: Front view of the ViewSonic VA2465SM-3 monitor, showing the power button and OSD controls on the lower right bezel.
Operating the Monitor
On-Screen Display (OSD) Controls
The OSD menu allows you to adjust various monitor settings. The control buttons are located on the bottom right bezel of the monitor.
- Power Button: Turns the monitor on or off.
- Menu Button: Opens the OSD menu or selects an option.
- Up/Down Arrows: Navigate through menu options or adjust values.
- Select/Exit Button: Confirms a selection or exits the menu.
ViewMode Settings
The ViewMode feature provides optimized screen performance for different applications. Access these presets through the OSD menu.
- Standard: General use.
- Game: Enhanced contrast and response for gaming.
- Movie: Optimized for video playback.
- Web: Balanced settings for web browsing.
- Text: Reduced brightness and blue light for reading.
Flicker-Free and Blue Light Filter
These technologies are designed to reduce eye strain during extended viewing periods.
- Flicker-Free: Eliminates screen flickering at all brightness levels.
- Blue Light Filter: Reduces the emission of harmful blue light. Adjust the level through the OSD menu.
Integrated Speakers
The monitor includes a pair of integrated speakers. Ensure the audio cable is connected from your computer to the monitor's audio input. Adjust volume through your computer's sound settings or the monitor's OSD menu.
Maintenance
Cleaning the Monitor
- Always unplug the monitor from the power outlet before cleaning.
- Use a soft, lint-free cloth slightly dampened with water or a mild, non-abrasive screen cleaner.
- Do not spray cleaner directly onto the screen. Apply it to the cloth first.
- Avoid using benzene, thinner, ammonia, or abrasive cleaners, as they can damage the monitor's surface.
General Care
- Keep the monitor away from direct sunlight, heat sources, and excessive dust.
- Do not place heavy objects on the monitor or its cables.
- If the monitor will not be used for an extended period, unplug it from the power outlet.
Troubleshooting
If you encounter issues with your monitor, refer to the following common problems and solutions:
| Problem | Possible Cause | Solution |
|---|---|---|
| No Power | Power cable not connected; Power outlet not working; Monitor power button off. | Check power cable connections; Test power outlet with another device; Press the monitor's power button. |
| No Signal | Video cable not connected; Incorrect input source selected; Computer not powered on or in sleep mode. | Ensure video cable is securely connected; Use OSD to select correct input (VGA/DVI); Turn on computer or wake it from sleep. |
| Image is blurry or distorted | Incorrect resolution; Auto-adjust needed (VGA); Cable issue. | Set display resolution to 1920x1080; Use OSD auto-adjust function (VGA); Check video cable for damage. |
| No Audio | Audio cable not connected; Volume too low; Muted on computer or monitor. | Connect audio cable; Increase volume on computer and monitor OSD; Unmute audio. |
Specifications
| Feature | Specification |
|---|---|
| Model Name | VA2465SM-3 |
| Display Size | 24 Inches (23.6" viewable) |
| Panel Type | SuperClear VA |
| Resolution | 1920 x 1080 (Full HD) |
| Aspect Ratio | 16:9 |
| Static Contrast Ratio | 3000:1 |
| Response Time | 5.5ms |
| Refresh Rate | 75Hz |
| Connectivity | 1 x VGA, 1 x DVI |
| Audio | Integrated Speakers |
| Power Consumption | 22 Watts (typical) |
| Product Dimensions (W x H x D) | 56.3 x 34.7 x 4.5 cm (without stand) |
| Product Weight | 3.6 kg |
| VESA Mount Compatible | Yes |
Warranty and Support
ViewSonic offers a comprehensive warranty for its products. For detailed warranty information, including terms and conditions, please refer to the warranty card included with your product or visit the official ViewSonic website.
For technical support, driver downloads, or further assistance, please visit the ViewSonic support page: www.viewsonic.com/uk/support.