Introduction
This manual provides comprehensive instructions for the proper setup, operation, and maintenance of your Bunker BT29 High-End Telescopic Steering Wheel Brake Pedal Lock. Please read this manual thoroughly before using the device to ensure optimal security and longevity.

Image: The Bunker BT29 telescopic steering wheel brake pedal lock, showcasing its compact design and robust construction.
Product Features
The Bunker BT29 is engineered for enhanced vehicle security, incorporating several key features:
- Strong Anti-Theft Protection: Constructed from hardened alloy steel with a high-security, anti-drill and pick-resistant lock cylinder.
- Universal Compatibility: Telescopic design adjusts from approximately 11.4 inches (29 cm) to 28 inches (71 cm), fitting most cars, SUVs, vans, and motorhomes.
- Compact Storage: Folds down to a compact 11.4 inches (29 cm) for convenient storage in glove compartments or under seats.
- Easy Hook System: Designed for quick and effortless attachment to the brake pedal.
- Quick Daily Use: Once initially adjusted, locking and unlocking takes only seconds.
What's in the Box
Verify that all components are present upon unpacking:
- 1 x Bunker BT29 Anti-Theft Device
- 3 x Keys
Setup and Initial Adjustment
The Bunker BT29 requires a one-time initial adjustment to fit your specific vehicle. Once adjusted, daily use is quick and simple.
Step 1: Adjusting the Hook Length
- Locate the screw adjustment mechanism on the device. This allows for precise length customization.
- Unscrew the end hook to extend or retract the length.
- Align the internal holes and secure the adjustment by screwing the hook back into place. This ensures the device is set to the optimal length for your vehicle's pedal and steering wheel distance.

Image: Illustration showing the initial adjustment process for the lock's length.

Image: Close-up of the internal mechanism, demonstrating how to match the holes for secure length adjustment.
Step 2: Positioning in the Vehicle
- Ensure your steering wheel is in its lowest possible position for optimal fit and security.
- Hook the end of the device onto the brake pedal. Ensure it is securely seated.
- Extend the telescopic bar until the other end reaches the steering wheel. The device should be taut but not overly strained.

Image: Demonstrates lowering the steering wheel to its lowest position for proper lock installation.

Image: Close-up view of the lock's hook securely attached to the vehicle's brake pedal.
Operating Instructions
Once the initial adjustment is complete, using your Bunker BT29 lock is a straightforward process.
Locking the Device
- Ensure the device is correctly hooked onto the brake pedal.
- Extend the telescopic bar towards the steering wheel.
- Position the steering wheel end of the lock over a spoke or the rim of the steering wheel.
- Push the lock cylinder inwards until it clicks into place. The device is now locked. No key is required for locking.
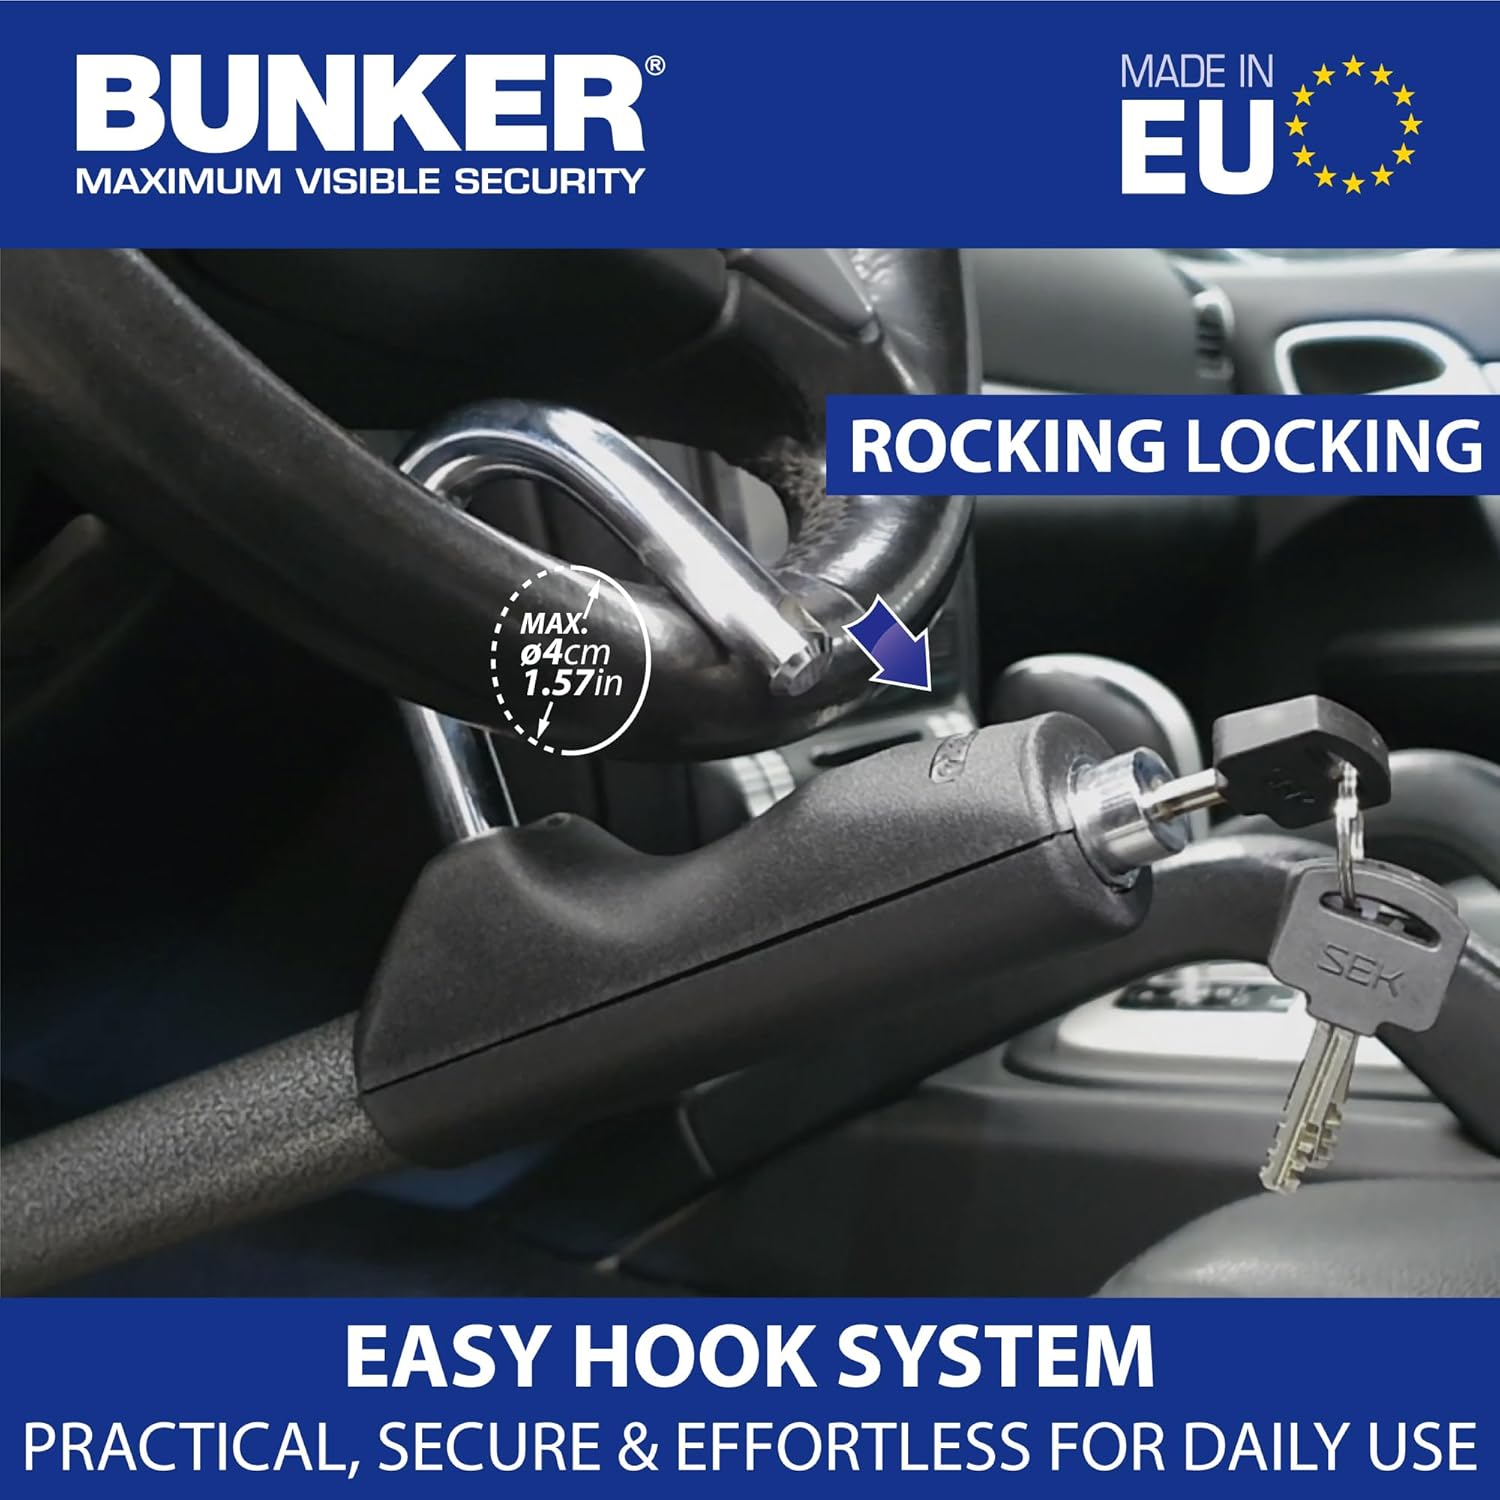
Image: The lock being pushed into place on the steering wheel, demonstrating the 'rocking locking' mechanism.

Image: The lock cylinder pushed in, indicating the device is securely locked to the steering wheel.
Unlocking the Device
- Insert one of the provided keys into the lock cylinder.
- Turn the key to release the locking mechanism.
- Remove the lock from the steering wheel and then from the brake pedal.
- Store the device in its compact, folded state.
Maintenance
The Bunker BT29 lock is designed for durability and requires minimal maintenance.
- Cleaning: Wipe the device with a damp cloth to remove dust and grime. Avoid harsh chemicals that may damage the finish.
- Lubrication: Periodically apply a small amount of graphite lubricant or a silicone-based spray to the lock cylinder to ensure smooth operation. Do not use oil-based lubricants as they can attract dirt.
- Storage: When not in use, store the lock in its folded position in a dry place, such as your glove compartment or under a seat.
Troubleshooting
If you encounter any issues with your Bunker BT29 lock, refer to the following common solutions:
- Difficulty Locking:
- Ensure the device is properly adjusted to the correct length for your vehicle. Re-check the initial adjustment steps.
- Verify that the hook is securely seated on the brake pedal and the steering wheel end is positioned correctly.
- Check for any obstructions preventing the lock cylinder from fully engaging.
- Difficulty Unlocking:
- Ensure you are using one of the original keys provided with the lock.
- Apply a small amount of graphite lubricant to the keyhole and gently try to turn the key.
- Avoid forcing the key, as this can damage the lock cylinder or the key itself.
- Telescopic Bar Sticking:
- Clean the telescopic sections to remove any dirt or debris.
- Apply a silicone-based spray lubricant to the sliding parts of the telescopic bar.
If problems persist after attempting these solutions, please contact Bunker customer support.
Specifications
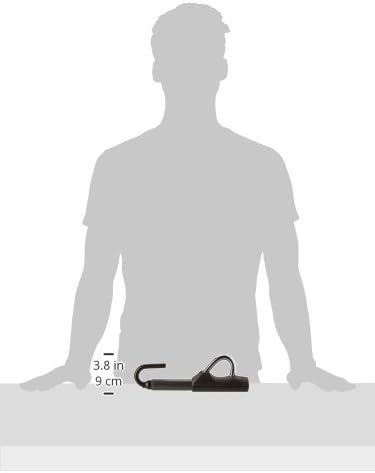
Image: Diagram illustrating the compact dimensions of the Bunker BT29 lock.
| Feature | Detail |
|---|---|
| Model Name | BT29B |
| Brand | Bunker |
| Material | Alloy Steel |
| Lock Type | Key Lock |
| Item Dimensions (L x W x H) | 9.06 x 1.18 x 1.18 inches (folded) |
| Adjustable Length | Up to 28 inches (71 cm) |
| Item Weight | 2.64 pounds (1.2 Kilograms) |
| Color | Gray |
| Included Components | Anti-Theft device, 3 Keys |
| Manufacturer | Groupe Artago |
Warranty and Support
Bunker products are manufactured with high-quality materials and undergo rigorous quality control. For specific warranty details or technical support, please refer to the documentation included with your purchase or visit the official Bunker website. You may also contact your retailer for assistance.