1. Introduction
This manual provides detailed instructions for the safe and efficient operation, setup, and maintenance of your Hanchen 20-3000G Automatic Powder and Particle Filling Machine. This machine is designed for precise filling of dry, mobile granular materials and powders into bags, bottles, or buckets.
Suitable Materials: Dry and mobile particles with a diameter between Φ1.2mm and 20mm, such as grains, beans, seeds, fruit, spices, electronic components, and small hardware. It is also suitable for dry powders like flour, milk powder, coffee powder, and chemical powders.
Unsuitable Materials: Wet materials, sticky materials, steel beads, ceramic beads, or leaf-like tea. For some light powders, the maximum filling capacity is 1500g.

Figure 1: Hanchen 20-3000G Automatic Powder and Particle Filling Machine.
2. Safety Instructions
- Always ensure the machine is unplugged before performing any cleaning, maintenance, or assembly tasks.
- Wear appropriate personal protective equipment, such as gloves, when handling the machine, especially during cleaning, as some edges may be sharp.
- Ensure the machine is placed on a stable, level surface. Consider elevating the machine to a comfortable working height to prevent back strain during prolonged use.
- Do not operate the machine with wet hands or in wet conditions.
- Keep children and unauthorized personnel away from the machine during operation.
- Before initial use, remove the four red shipping bolts located on the bottom of the machine. Failure to do so may cause damage during operation.
- Do not attempt to fill materials not specified as suitable for this machine.
3. Product Components
Familiarize yourself with the main components of the filling machine as illustrated below:

Figure 2: Main components of the Hanchen Filling Machine. Key parts include the Hopper, Inlet Valve, Transparent Window, Control Panel, Power Inlet, Storage Door, Four Wheels, and Outlet Lock.
- Hopper: Top container for holding the material to be filled (approx. 30L capacity).
- Inlet Valve: Controls the flow of material from the hopper, ensuring accuracy.
- Transparent Window: Allows observation of the internal working process.
- Control Panel: Features an LCD display for setting parameters like grams, package counting, weight, and speed.
- Power Inlet: Connection point for the power cable.
- Storage Door: Provides access to the internal storage area.
- Four Wheels: For easy movement of the machine.
- Outlet Lock: Secures the interchangeable outlets.
- Data Port: For potential data transfer or firmware updates.
4. Setup
- Unpacking and Placement:
- Carefully remove the machine from its packaging.
- Place the machine on a sturdy, level surface. For ergonomic operation, consider placing it on a riser to achieve a comfortable working height.
- Remove Shipping Bolts:
Locate and remove the four red shipping bolts on the bottom of the machine. These bolts are designed to prevent internal damage during transport and must be removed before operation.
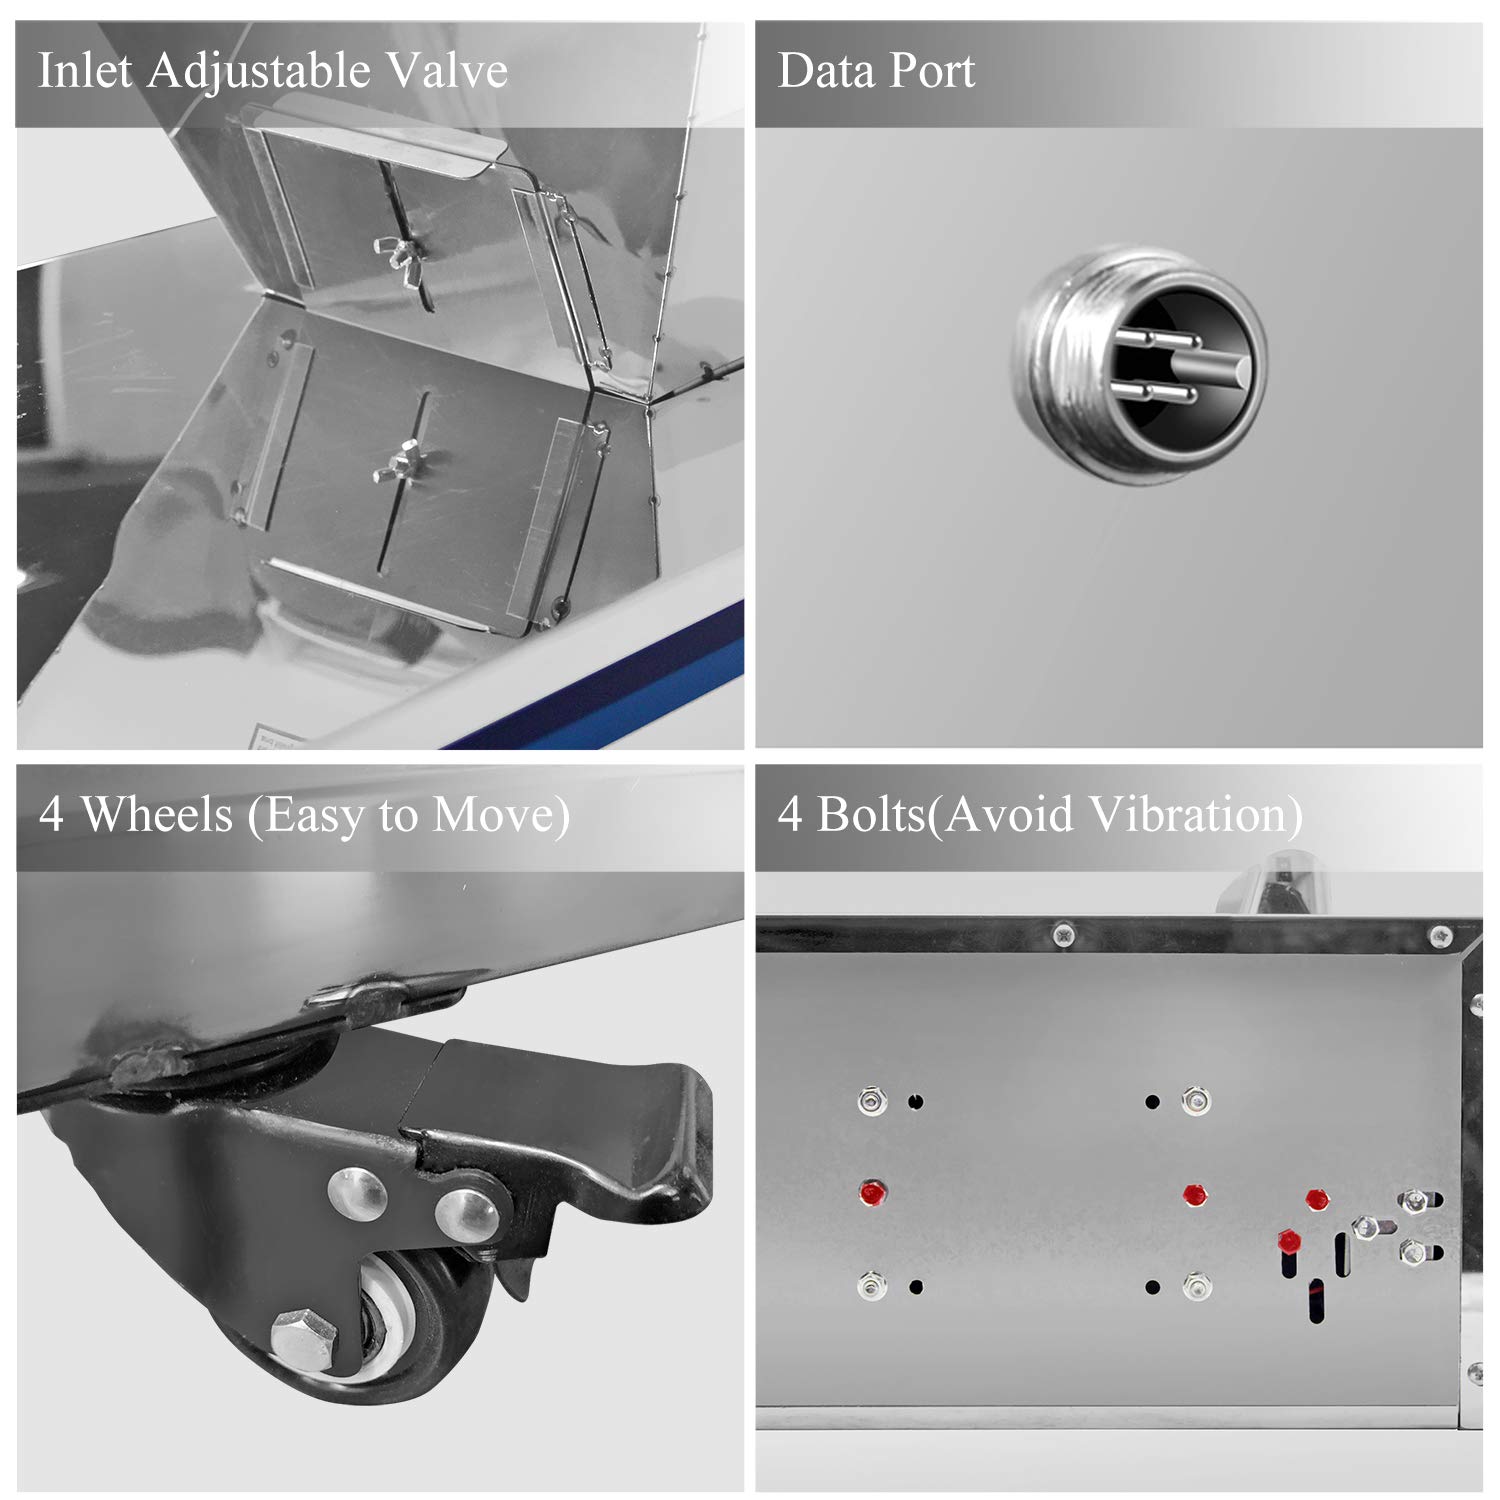
Figure 3: Location of the four shipping bolts (red dots) and the machine's wheels.
- Install Outlet:
Select the appropriate outlet size (11cm, 8cm, or 6cm width) for your container and material. Securely attach it using the outlet lock mechanism.
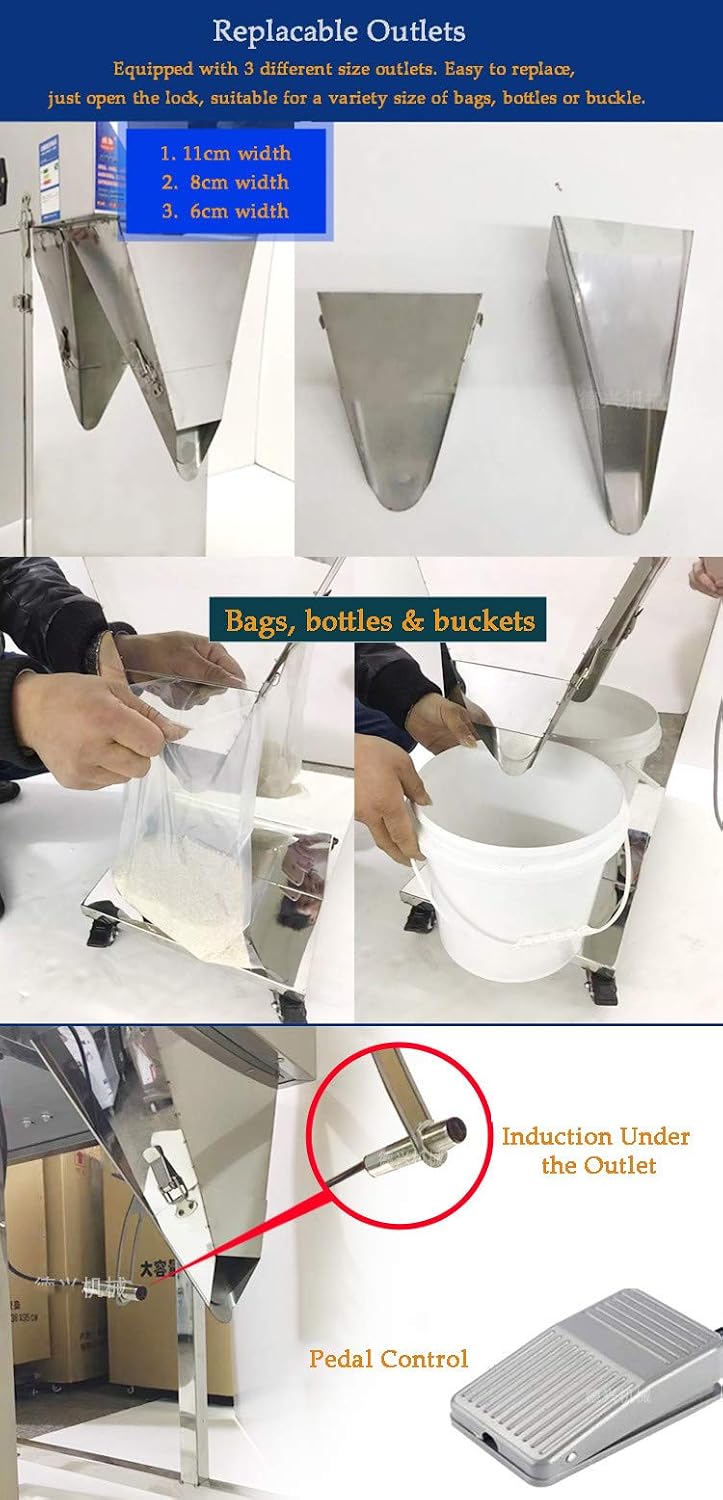
Figure 4: Replaceable outlets and examples of filling into bags and buckets.
- Power Connection:
Connect the power cable to the power inlet and then to a standard 110V electrical outlet.
5. Operation
- Power On: Turn on the machine using the main power switch. The LCD display will illuminate.
- Fill Hopper: Open the hopper lid and carefully pour your dry, mobile material into the hopper. Do not overfill.
- Adjust Inlet Valve: Use the adjustable inlet valve to control the flow of material into the weighing mechanism. This helps ensure accuracy.
- Set Filling Parameters (LCD Display):
Use the control panel and LCD display to set your desired filling parameters:

Figure 5: LCD Display showing various settings and control buttons.
- Grams: Set the target weight for each fill (range: 20-3000g).
- Package Counting: Monitor the number of filled packages.
- Weight Setting: Fine-tune the target weight.
- Speed Control: Select filling speed (Fast, Medium, Slow). Adjusting speed can impact accuracy, especially for smaller quantities. For example, use 'Slow' for quantities around 2.5oz to prevent overshooting.
- Stop or Start: Initiate or pause the filling process.
- Calibration (Important for Accuracy):
The machine's internal scale may have a slight offset. To ensure precise filling, it is recommended to calibrate the machine for your specific material. Perform a series of test fills, weighing the dispensed material with an external, accurate scale. If a consistent offset is observed (e.g., the machine dispenses 12% more than the set weight), adjust your target weight accordingly. For example, if you desire 454g (1 pound) and the machine consistently overfills by 12%, set the machine to dispense approximately 405g (454 / 1.12 = 405.3).
- Start Filling:
Place your bag, bottle, or bucket under the outlet. The infrared inductive head under the outlet will detect the container, and the filling process will start automatically. Alternatively, use the pedal control for manual initiation of each fill.
- Vibration Function:
The machine incorporates a vibrator to ensure smooth material flow and prevent sticking, contributing to filling speed and accuracy.
6. Maintenance and Cleaning
Regular cleaning and maintenance will prolong the life of your filling machine and ensure consistent performance.
- Daily Cleaning:
- After each use, unplug the machine.
- Remove any remaining material from the hopper and outlet.
- Wipe down all external surfaces with a dry or slightly damp cloth.
- Deep Cleaning (for fine powders):
For fine or dusty powders, a more thorough cleaning is recommended to prevent buildup and caking.
- Removable Parts: The upper lid can be removed by opening the upper locks (marked by red dots). The entire filling part can be separated from the support by opening the lower locks (marked by orange dots), allowing it to be placed directly on a table for easier cleaning.
- Internal Cleaning: The shaking trough inside the machine is not easily removable. Use a shop vacuum with a narrow attachment to clean around this area and remove any accumulated dust or powder.
- Dust Management: If filling dusty materials, consider using an external funnel and a plastic sleeve around the spout to minimize dust dispersion. A bucket placed under the spout can catch any dust shaken off during vibration, simplifying cleanup.

Figure 6: Upper and lower locks for easy disassembly and cleaning.
- General Maintenance:
- Regularly inspect all clips and connections to ensure they are secure.
- Check the power cord for any signs of damage.
- Ensure the wheels are clean and move freely if the machine is frequently relocated.
7. Troubleshooting
| Problem | Possible Cause | Solution |
|---|---|---|
| Machine does not power on | No power supply; Power cord damaged; Main switch off. | Check power connection; Inspect power cord; Ensure main switch is on. |
| Inaccurate filling weight | Incorrect calibration; Material properties (too sticky/wet); Inlet valve setting; Filling speed too high for material. | Perform calibration as described in Section 5; Ensure material is dry and mobile; Adjust inlet valve; Reduce filling speed. |
| Material not flowing smoothly | Material is wet or sticky; Hopper/trough buildup; Inlet valve closed. | Use only dry, mobile materials; Clean hopper and internal components; Open inlet valve. |
| Machine damaged upon arrival | Transit damage. | Contact Hanchen customer service immediately with photos of the damage. |
| Sharp edges encountered during handling | Manufacturing finish. | Wear protective gloves when assembling, disassembling, or cleaning the machine. |
8. Specifications
| Feature | Detail |
|---|---|
| Model | 20-3000G Automatic Powder and Particle Filling Machine |
| Brand | Hanchen |
| Material | Stainless Steel |
| Weighing Range | 20 - 3000 grams |
| Particle Diameter (Suitable) | Φ1.2mm - 20mm |
| Hopper Capacity | Approx. 30 Liters (8 US gallons) |
| Power Supply | 110V |
| Item Weight | Approx. 50 kg (110 pounds) |
| Control | LCD Display, Induction, Pedal Control |
| Outlets | Replaceable (11cm, 8cm, 6cm width) |
9. Warranty and Support
Hanchen provides a 1-year warranty for this product from the date of purchase. This warranty covers manufacturing defects and malfunctions under normal use. Please retain your proof of purchase for warranty claims.
For technical support, troubleshooting assistance, or warranty service, please contact Hanchen customer service. When contacting support, please have your product model number (20-3000G) and purchase details ready.
Note: Damage caused by improper use, neglect, unauthorized modifications, or failure to follow instructions in this manual is not covered under warranty.