Brinno BCC200BLE
Brinno BCC200-BLE Time Lapse Camera User Manual
Model: BCC200-BLE
Brand: Brinno
1. Product Overview
The Brinno BCC200-BLE is a specialized time-lapse camera system designed for indoor construction and remodeling projects. It features a High Dynamic Range (HDR) camera for optimal image quality in varying light conditions and is controlled wirelessly via a Bluetooth remote controller with a 2.8-inch touch panel. This system allows for flexible scheduling and easy management of your time-lapse recordings.

Image 1.1: The Brinno BCC200-BLE Time Lapse Camera (left) and its dedicated Bluetooth Remote Controller (right).

Image 1.2: Overview of the camera's key features, including HDR imaging, 2.8" touch panel, ready-to-view time-lapse video, flexible schedule setup, IPX4 weather resistance, and multilingual user interface.
2. Package Contents
Verify that all items listed below are included in your package:
- Brinno Time Lapse Camera (TLC200PRO-BLE)
- Bluetooth Remote Controller (ARC1000)
- Hand Rope and Hook (for controller)
- SD Card
- AA Batteries (for camera)
- Micro USB Cable
3. Initial Setup
3.1. Battery Installation
- Open the battery compartment on the Brinno Time Lapse Camera.
- Insert the provided AA batteries, ensuring correct polarity (+/-).
- Close the battery compartment securely.
3.2. SD Card Insertion
- Locate the SD card slot on the camera.
- Insert the provided SD card into the slot until it clicks into place. Ensure the card is oriented correctly.
- To remove, gently push the card in until it springs out.
3.3. Powering On
Press and hold the power button on the camera until the indicator light illuminates. Similarly, power on the Bluetooth Remote Controller.
3.4. Connecting the Remote Controller
The camera and controller are designed to pair automatically via Bluetooth 4.0 when both devices are powered on and within range (up to 33 feet). The controller's screen will display the camera's status once connected.
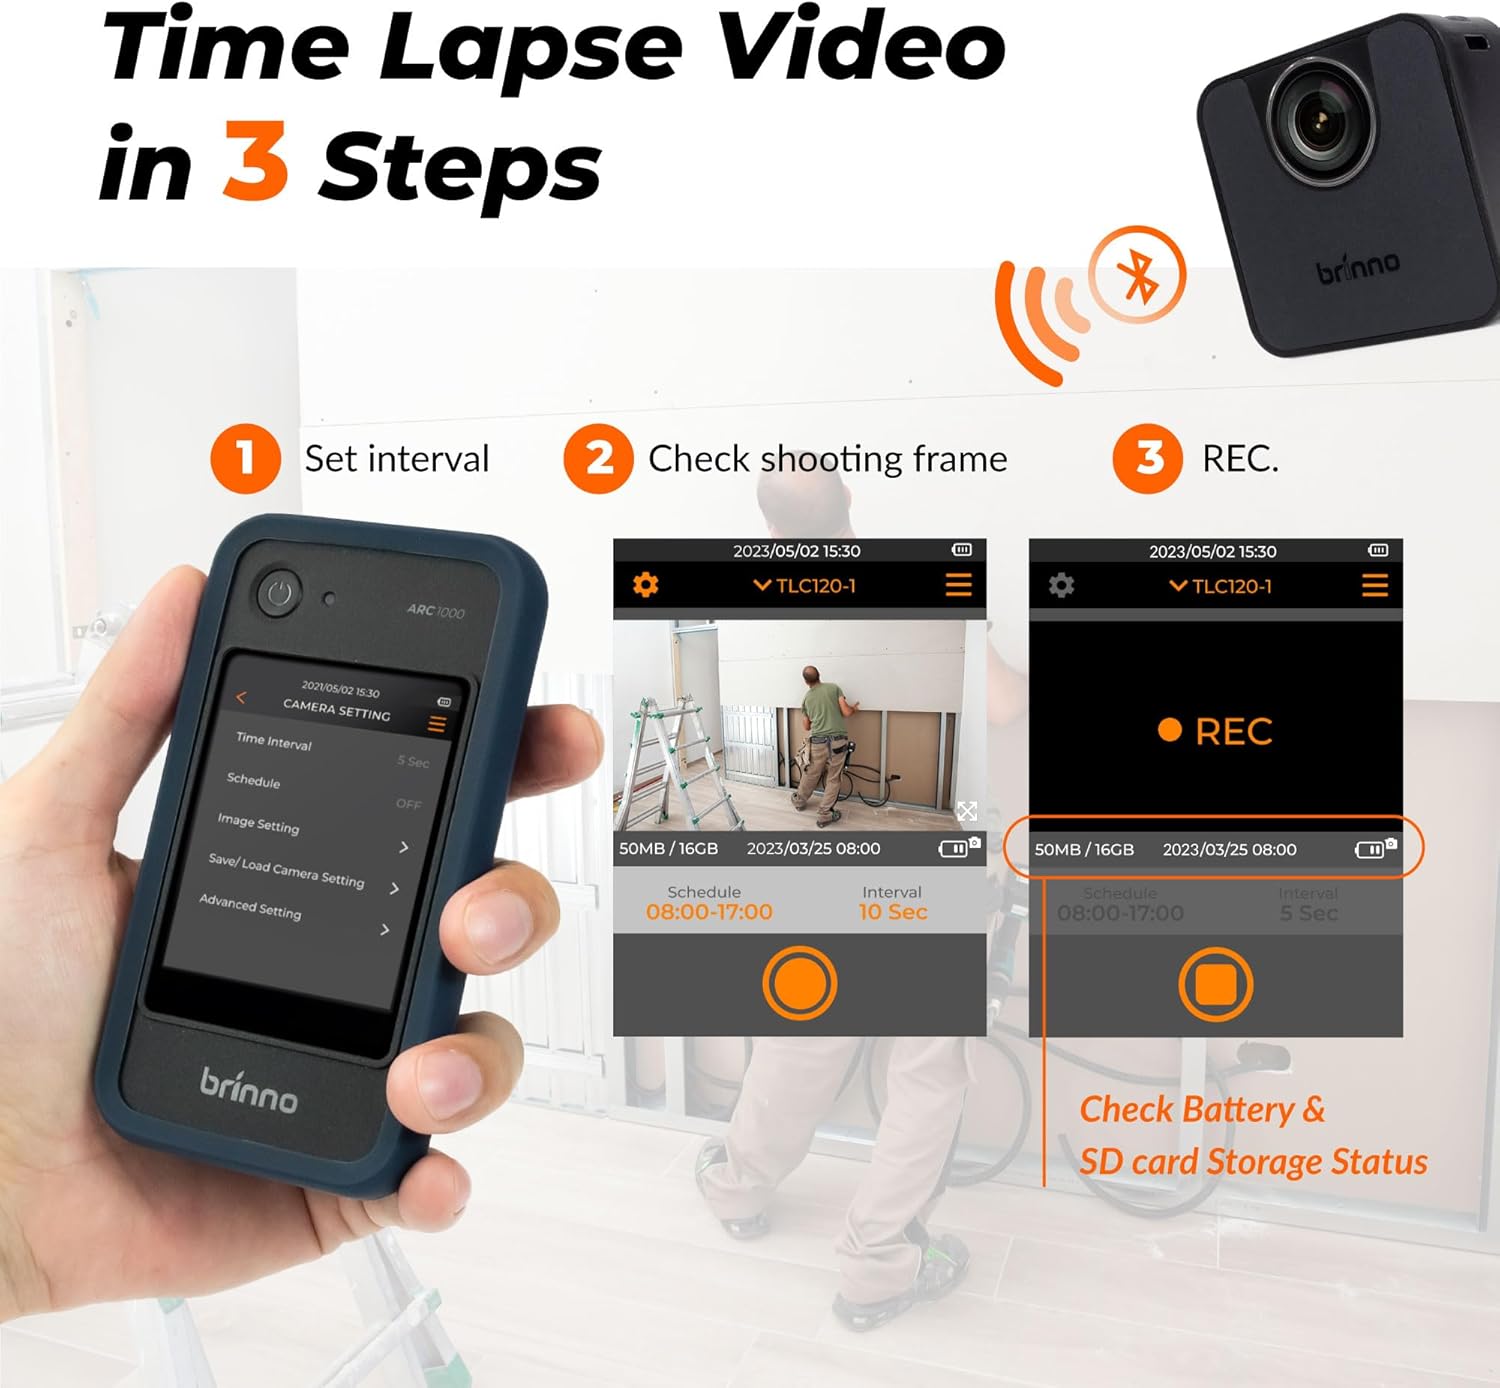
Image 3.1: The three-step process for time-lapse video creation: 1. Set interval on the controller, 2. Check shooting frame via live preview, 3. Initiate recording (REC). The controller also displays battery and SD card storage status.
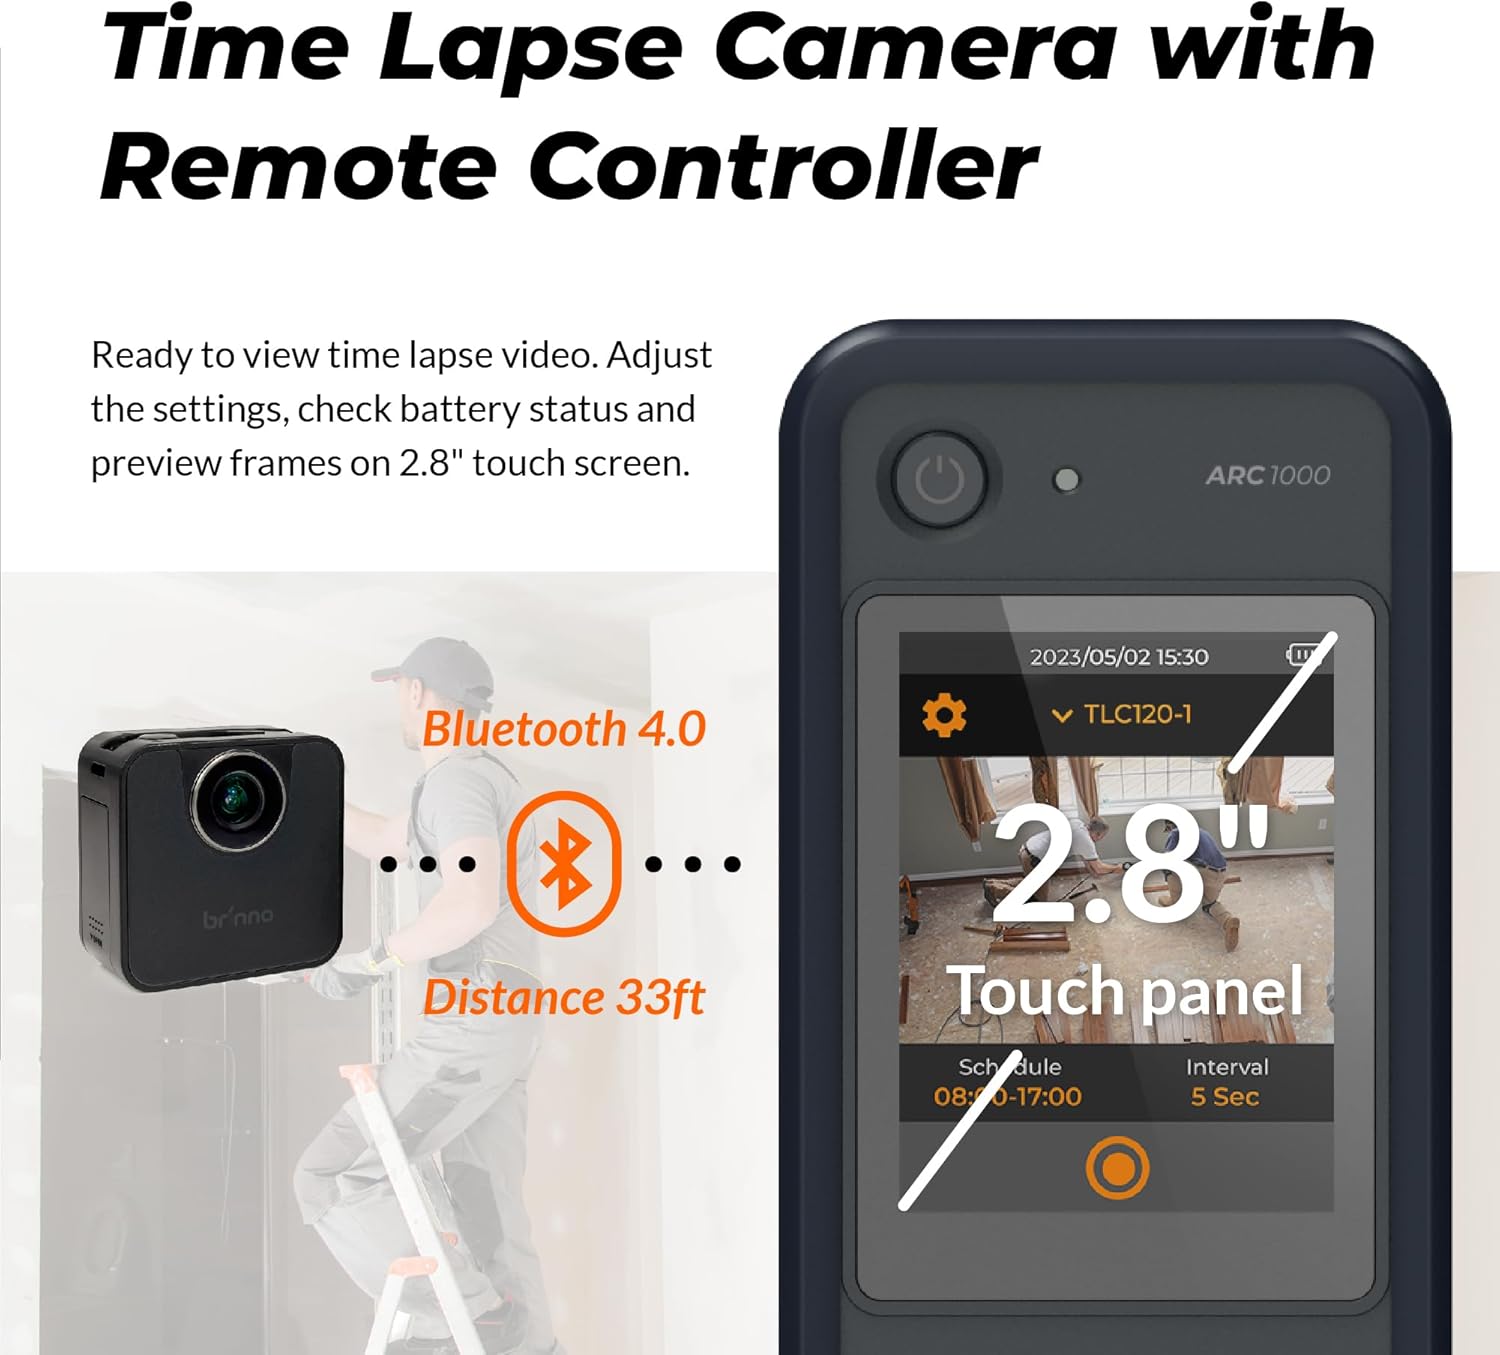
Image 3.2: Illustration of the Bluetooth 4.0 connection between the camera and controller, indicating a maximum effective distance of 33 feet.
4. Operating Instructions
4.1. Basic Recording
Once the camera and controller are connected, use the 2.8-inch touch panel on the controller to navigate the menu and initiate recording. The controller provides a live preview of the camera's field of view, allowing for precise framing.

Image 4.1: A user managing the Brinno camera with the BLE Remote Controller, highlighting the intuitive 2.8-inch touch panel for adjusting settings and previewing frames.
4.2. Setting Time-Lapse Intervals
From the controller's menu, select the desired time interval between captured frames. Options typically range from seconds to hours, depending on the total duration of your project and desired playback speed.
4.3. HDR Imaging
The camera features High Dynamic Range (HDR) technology, which enhances image quality in challenging lighting conditions, such as low light or high contrast environments. This ensures clear and detailed footage throughout the recording period.

Image 4.2: A sequence of images captured over time, demonstrating the camera's ability to maintain premium image quality in low light conditions using HDR technology, capturing the full dynamic range of scenes.

Image 4.3: A visual representation of the camera's imaging technologies at work in a construction environment, emphasizing its capability to handle low light and high contrast scenarios for visually striking time-lapse videos.
4.4. Flexible Schedule Setup
Program the camera to record only during specific hours or days using the flexible scheduling feature. This conserves battery life and storage space by capturing footage only when relevant.
4.5. Multilingual Interface
The user interface of the remote controller supports 8 languages: English, German, Italian, Spanish, French, Japanese, Traditional Chinese, and Simplified Chinese. You can select your preferred language from the settings menu.

Image 4.4: The Brinno controller screen showing the language selection menu, illustrating the availability of 8 different languages for the user interface.
4.6. Viewing Recorded Footage
To view the recorded time-lapse videos, remove the SD card from the camera and insert it into a computer or compatible device. The videos are saved in MP4 format for easy playback.
5. Maintenance
5.1. Cleaning the Camera and Controller
- Use a soft, dry cloth to wipe the exterior of the camera and controller.
- For stubborn dirt, slightly dampen the cloth with water. Avoid using harsh chemicals or abrasive materials.
- Keep the lens clean using a lens cleaning cloth or brush.
5.2. Battery Care
- Replace batteries when the low battery indicator appears on the controller.
- If storing the camera for an extended period, remove the batteries to prevent leakage.
5.3. Storage
Store the camera and controller in a cool, dry place away from direct sunlight and extreme temperatures. Use the original packaging or a protective case for storage and transport.
6. Troubleshooting Common Issues
- Camera not powering on: Ensure batteries are correctly inserted and fully charged. Try new batteries.
- Controller not connecting to camera: Ensure both devices are powered on and within the 33ft Bluetooth range. Restart both devices.
- Poor image quality: Check the lens for smudges or dirt. Ensure adequate lighting in the recording area. Verify HDR settings are appropriate for the environment.
- SD card error: Ensure the SD card is properly inserted. Try formatting the SD card via the controller's settings (this will erase all data). If the issue persists, try a different compatible SD card.
- Video playback issues on computer: Ensure your computer has the necessary codecs to play MP4 files. Try a different media player.
7. Technical Specifications
| Feature | Specification |
|---|---|
| Model Number | BCC200BLE |
| Brand | Brinno |
| Item Weight | 1.52 pounds |
| Product Dimensions | 11 x 7 x 3 inches |
| Batteries | 3 AA batteries required (included) |
| Color | Black |
| Special Features | Time Lapse, High Dynamic Range (HDR) |
| Photo Sensor Technology | Other |
| Video Capture Resolution | 720p |
| Maximum Focal Length | 35 Millimeters |
| Maximum Aperture | 2 f |
| Flash Memory Type | SD |
| Video Capture Format | MP4 |
| Screen Size (Controller) | 2.8 Inches |
| Connectivity Technology | Bluetooth |

Image 7.1: A comparison table highlighting the differences between the BCC200-BLE and the older BCC200 model, detailing aspects like LCD screen size, frame preview method, camera status display, wireless connectivity, multilingual options, and power source.
8. Warranty Information and Support
For detailed warranty information, please refer to the warranty card included with your product or visit the official Brinno website. If you encounter any issues not covered in this manual or require technical assistance, please contact Brinno customer support through their official channels.
No official product videos with 'Seller' as creator type were found in the provided data to embed in this manual.

Image 8.1: The Brinno camera shown with various compatible accessories, demonstrating its expandable versatility for different recording needs, such as outdoor housing, rechargeable power banks, and solar panels.
Ask a question about this manual
Ask about setup, troubleshooting, compatibility, parts, safety, or missing instructions. Manuals+ will review the question and use this page’s manual context to help answer it.