1. Introduction
This manual provides essential instructions for the safe and efficient operation of your De'Longhi ECP31.21 Traditional Espresso Coffee Maker. Please read this manual thoroughly before using the appliance and keep it for future reference. Proper use and maintenance will ensure optimal performance and longevity of your espresso machine.
2. Important Safety Instructions
When using electrical appliances, basic safety precautions should always be followed to reduce the risk of fire, electric shock, and/or injury to persons.
- Read all instructions before use.
- Do not touch hot surfaces. Use handles or knobs.
- To protect against fire, electric shock, and personal injury, do not immerse cord, plugs, or appliance in water or other liquid.
- Close supervision is necessary when any appliance is used by or near children.
- Unplug from outlet when not in use and before cleaning. Allow to cool before putting on or taking off parts, and before cleaning the appliance.
- Do not operate any appliance with a damaged cord or plug, or after the appliance malfunctions or has been damaged in any manner.
- The use of accessory attachments not recommended by the appliance manufacturer may result in fire, electric shock, or personal injury.
- Do not use outdoors.
- Do not let cord hang over edge of table or counter, or touch hot surfaces.
- Do not place on or near a hot gas or electric burner, or in a heated oven.
- Always attach plug to appliance first, then plug cord into the wall outlet. To disconnect, turn any control to "off", then remove plug from wall outlet.
- Do not use appliance for other than intended use.
- Exercise extreme caution when dispensing hot steam.
- This appliance is for household use only.
3. Product Overview
Familiarize yourself with the components of your De'Longhi ECP31.21 espresso machine.

Figure 3.1: Front view of the De'Longhi ECP31.21 Espresso Coffee Maker, showcasing its compact design, control knob, portafilter, and steam wand. Two cups of espresso and one cappuccino are displayed alongside the machine.

Figure 3.2: Detailed front view of the espresso machine, highlighting the main control dial, indicator lights (OK, I/O), and the De'Longhi logo. The water tank is visible on the left side.

Figure 3.3: Top-down view of the espresso machine, showing the cup warming tray and the integrated accessory storage compartment, which holds the filter baskets and coffee tamper.
Key Components:
- Water Tank: Removable tank for water supply (1.1 Liters capacity).
- Control Knob: Selects functions: Off, Espresso preparation, Steam/Hot Water.
- Indicator Lights: "OK" light indicates readiness for coffee, "I/O" light indicates power.
- Portafilter: Holds ground coffee or ESE pods.
- Filter Baskets: For 1 cup, 2 cups, or ESE pods.
- Steam Wand/Milk Frother: For frothing milk and dispensing hot water.
- Drip Tray: Collects excess liquid.
- Cup Warming Tray: Located on top of the machine to pre-warm cups.
- Coffee Tamper: Used to compress ground coffee in the portafilter.
4. Setup and First Use
4.1 Unpacking
Carefully remove all packaging materials from the appliance. Ensure all components are present and undamaged.
4.2 Filling the Water Tank
- Remove the water tank from the back of the machine.
- Fill the tank with fresh, cold drinking water up to the MAX level indicator.
- Replace the water tank securely into its position.
4.3 Priming the Circuit (First Use or After Extended Non-Use)
- Ensure the water tank is filled.
- Place a container under the steam wand.
- Plug the appliance into a suitable power outlet. The "I/O" light will illuminate.
- Turn the control knob to the "Steam" position (steam icon).
- Open the steam knob on the side of the machine to allow water to flow through the steam wand until a steady stream of water emerges.
- Close the steam knob and turn the control knob back to the "Off" position. The "OK" light will start flashing and then become steady, indicating the machine is ready.
5. Operating Instructions
5.1 Making Espresso with Ground Coffee
- Ensure the machine is plugged in and the "OK" light is steady.
- Insert the desired filter basket (1-cup or 2-cup) into the portafilter.
- Add ground espresso coffee to the filter basket. For a single espresso, use approximately 7 grams; for a double, use 14 grams.
- Distribute the coffee evenly and tamp it firmly using the coffee tamper.
- Clean any excess coffee from the rim of the portafilter.
- Attach the portafilter to the brewing head by aligning it and rotating it to the right until it is firmly locked.
- Place one or two pre-warmed cups under the portafilter spouts.
- Turn the control knob to the "Espresso" position (coffee cup icon). Coffee will begin to dispense.
- Once the desired amount of espresso is brewed, turn the control knob back to the "Off" position to stop the flow.
- Carefully remove the portafilter and discard the used coffee grounds.

Figure 5.1: Espresso being dispensed from the portafilter into a glass cup, illustrating the brewing process.
5.2 Making Espresso with ESE Pods
The ECP31.21 is compatible with Easy Serving Espresso (ESE) pods.
- Ensure the machine is plugged in and the "OK" light is steady.
- Insert the specific ESE pod filter basket into the portafilter.
- Place an ESE pod into the filter basket, ensuring it is centered.
- Attach the portafilter to the brewing head and lock it firmly.
- Place a pre-warmed cup under the portafilter spout.
- Turn the control knob to the "Espresso" position.
- Once the desired amount of espresso is brewed, turn the control knob back to the "Off" position.
- Carefully remove the portafilter and discard the used ESE pod.
5.3 Frothing Milk for Cappuccinos and Lattes
- Prepare your espresso first.
- Fill a milk frothing pitcher with cold milk (preferably whole milk) up to one-third full.
- Turn the control knob to the "Steam" position (steam icon). The "OK" light will flash, then become steady when the machine reaches steaming temperature.
- Position the steam wand just below the surface of the milk.
- Open the steam knob slowly to release steam. Move the pitcher up and down gently to incorporate air and create foam.
- Once the milk is frothed to your desired consistency and temperature (do not exceed 70°C/160°F), close the steam knob and turn the control knob back to the "Off" position.
- Wipe the steam wand immediately with a damp cloth to prevent milk residue from drying.
- Pour the frothed milk over your prepared espresso.
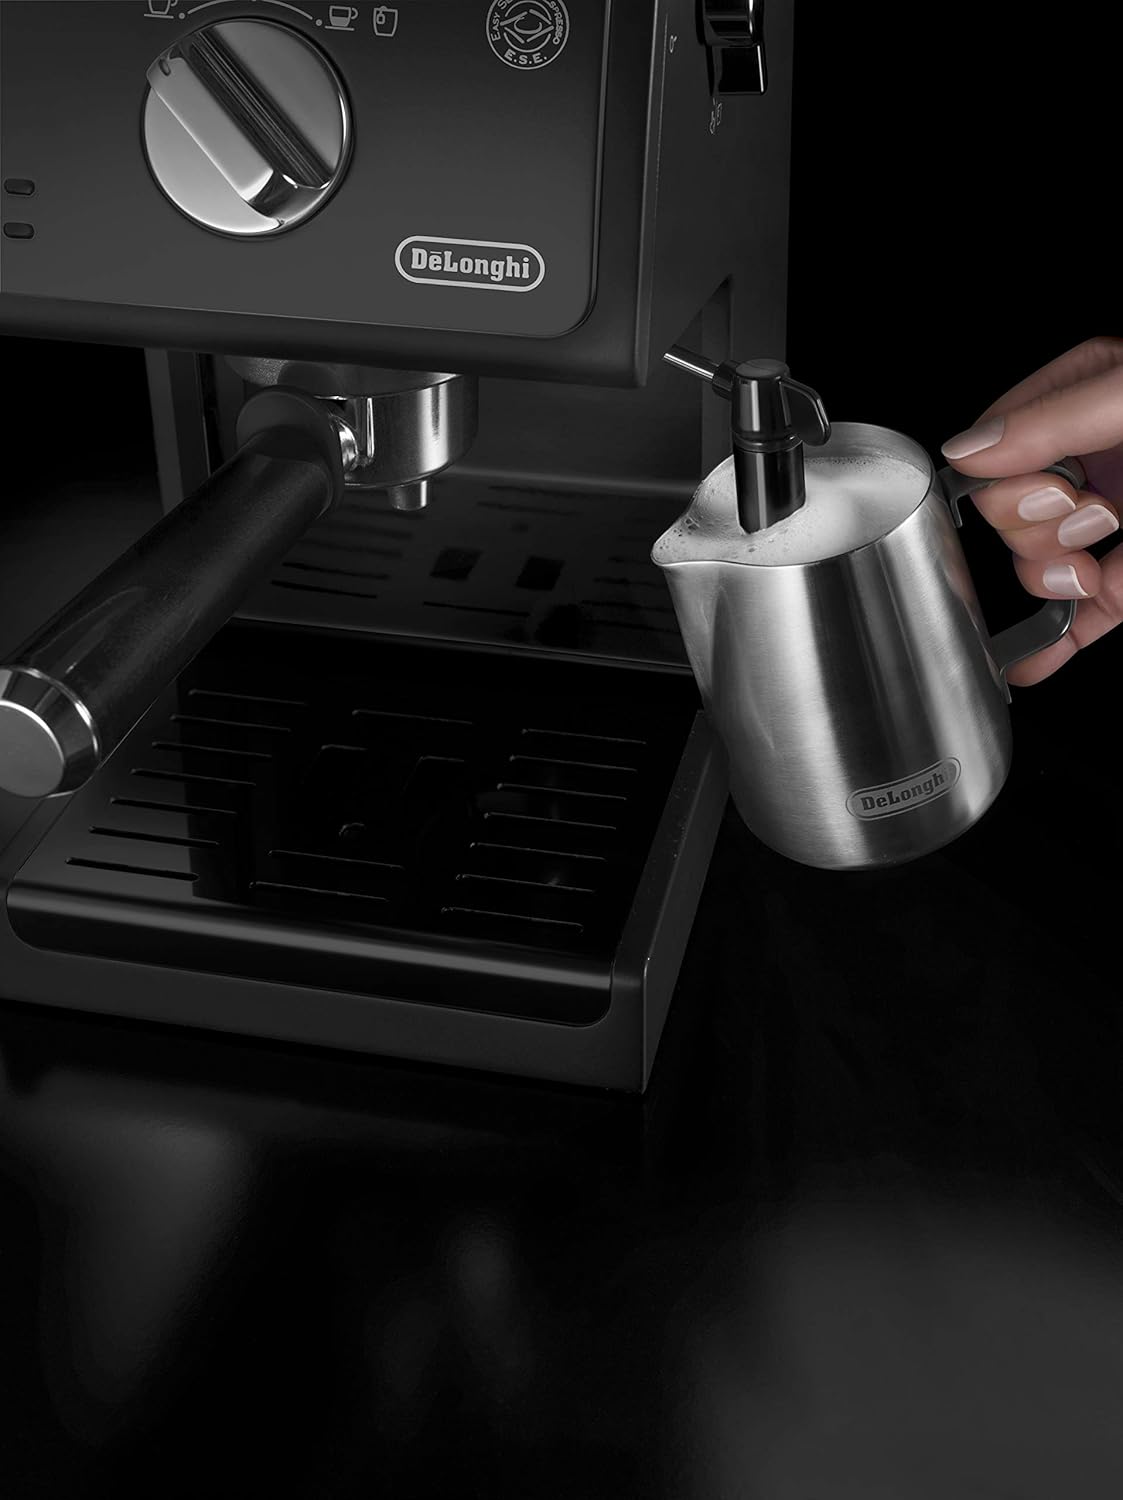
Figure 5.2: A hand holding a stainless steel pitcher, frothing milk using the steam wand of the De'Longhi ECP31.21 espresso machine.
5.4 Hot Water Function
The steam wand can also dispense hot water for tea or Americanos.
- Ensure the machine is plugged in and the "OK" light is steady.
- Place a cup under the steam wand.
- Turn the control knob to the "Steam" position.
- Open the steam knob to dispense hot water.
- Once the desired amount of hot water is dispensed, close the steam knob and turn the control knob back to the "Off" position.
6. Maintenance and Cleaning
Regular cleaning and maintenance are crucial for the performance and lifespan of your espresso machine. Always unplug the machine before cleaning.
6.1 Daily Cleaning
- Portafilter and Filter Baskets: After each use, remove the portafilter, discard coffee grounds, and rinse the portafilter and filter basket under running water.
- Drip Tray: Empty and rinse the drip tray daily or when the indicator floats up.
- Steam Wand: Immediately after frothing milk, wipe the steam wand with a damp cloth. Periodically, remove the nozzle and rinse it to clear any milk residue.
- Exterior: Wipe the exterior of the machine with a soft, damp cloth. Do not use abrasive cleaners or solvents.
6.2 Descaling
Mineral deposits from water can build up inside the machine, affecting performance. Descale your machine regularly (e.g., every 2-3 months, or more frequently with hard water). Use a suitable descaling solution recommended for espresso machines. Follow the descaling product's instructions carefully.
- Empty the water tank and fill it with the descaling solution mixed with water according to the descaler's instructions.
- Place a large container under the portafilter and steam wand.
- Turn on the machine and allow it to heat up.
- Run half of the solution through the portafilter by turning the control knob to "Espresso".
- Turn the control knob to "Steam" and open the steam knob to run the remaining solution through the steam wand.
- Turn off the machine and let it sit for 10-15 minutes.
- Rinse the water tank thoroughly and fill it with fresh water.
- Repeat steps 3-5 with fresh water to rinse the internal circuits.
7. Troubleshooting
Refer to the table below for common issues and their solutions.
| Problem | Possible Cause | Solution |
|---|---|---|
| No coffee dispenses. | No water in tank; machine not primed; clogged filter. | Fill water tank; prime the circuit; clean filter basket. |
| Coffee flows too slowly or not at all. | Coffee ground too fine; too much coffee; coffee tamped too hard; clogged filter. | Use coarser grind; reduce coffee amount; tamp less firmly; clean filter. |
| Coffee flows too quickly. | Coffee ground too coarse; too little coffee; coffee tamped too lightly. | Use finer grind; increase coffee amount; tamp more firmly. |
| No steam from steam wand. | Machine not at steaming temperature; steam wand clogged. | Wait for "OK" light to be steady in steam mode; clean steam wand nozzle. |
| Water leaks from under the machine. | Drip tray full; water tank not seated correctly. | Empty drip tray; ensure water tank is properly inserted. |
8. Technical Specifications
- Model: ECP31.21
- Brand: De'Longhi
- Power/Wattage: 1100 watts
- Voltage: 230 Volts
- Water Tank Capacity: 1.1 Liters
- Material: Acrylonitrile Butadiene Styrene
- Color: Black
- Product Dimensions (W x D x H): 9.45 cm x 7.28 cm x 12.01 cm
- Item Weight: 4.84 kg
- Special Features: Auto Shut-Off, Indicator light, Traditional milk frothing nozzle, Professional portafilter holder, Separate coffee tamper, Hot water function, Accessory storage.

Figure 8.1: Diagram showing the dimensions of the De'Longhi ECP31.21 Espresso Coffee Maker: 9.45cm width, 7.28cm depth, and 12.01cm height.
9. Warranty and Support
For detailed warranty information and customer support, please refer to the warranty card included with your product or visit the official De'Longhi website.
Online Support: www.delonghi.com