Introduction
Welcome to the instruction manual for your Proco WP2040 Studio Wall Plate. This document provides essential information for the safe and effective installation, operation, and maintenance of your new audio interconnection device. Please read this manual thoroughly before proceeding with installation or use.
Safety Information
To ensure safe operation and prevent damage to the unit or connected equipment, please observe the following safety precautions:
- Read all instructions before installation and use.
- Ensure power is disconnected from all audio equipment before making any electrical connections.
- Installation should be performed by qualified personnel if you are unsure about electrical wiring procedures.
- Do not expose the unit to moisture, liquids, or extreme temperatures.
- Use only appropriate tools for installation to prevent damage to the wall plate or mounting surface.
- Avoid placing heavy objects on the wall plate or connected cables.
Package Contents
The Proco WP2040 package typically includes:
- One (1) Proco WP2040 Studio Wall Plate
- Mounting screws (may vary by retailer)
Product Overview
The Proco WP2040 is a durable, brushed stainless steel (430-alloy) wall plate designed for professional studio environments. It provides convenient and secure audio interconnection points, allowing for clean and organized cable management.
Key features include:
- Two (2) Neutrik latching Female XLR connectors (XLRF)
- Two (2) Neutrik latching 1/4" TRS Female connectors (TRSF)
- Brushed stainless steel construction for durability and aesthetic integration.
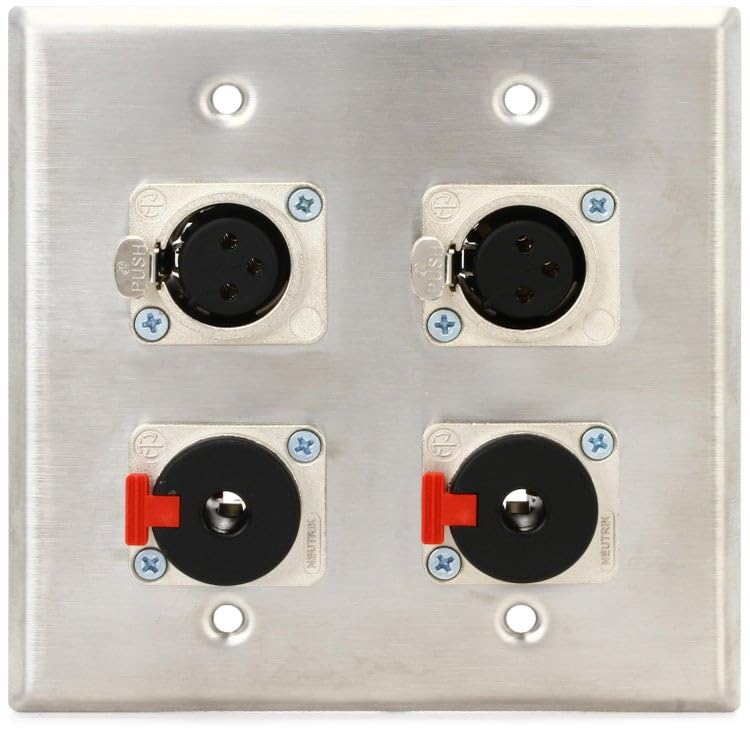
This image displays the front view of the Proco WP2040 Studio Wall Plate, showcasing its brushed stainless steel finish and the four audio connectors: two female XLR ports at the top and two 1/4-inch TRS female ports below them. The connectors are clearly labeled.
Setup and Installation
Proper installation is crucial for optimal performance and safety. Follow these steps carefully.
Tools Required (Suggested)
- Screwdriver (Phillips head)
- Wire strippers/cutters (if wiring custom cables)
- Drill (if creating a new mounting hole)
- Level (for aesthetic alignment)
Mounting the Wall Plate
- Select Location: Choose a suitable location on a wall or studio rack where the wall plate will be easily accessible and protected from physical damage. Ensure there is sufficient space behind the wall for cable routing and connections.
- Prepare Opening: If installing in a standard electrical box, ensure the box is securely mounted. If mounting directly to a surface, mark and cut an appropriate opening for the plate's rear connections, typically a standard single-gang or double-gang size depending on the plate's dimensions.
- Secure Plate: Position the WP2040 wall plate over the opening. Use the provided mounting screws to secure the plate firmly to the wall or electrical box. Do not overtighten, as this can damage the plate or mounting surface.
Wiring Connections
The WP2040 features pre-wired Neutrik connectors. For installation, you will connect your studio's internal wiring to the rear terminals of these connectors. Ensure all connections are secure and correctly polarized.
- XLR Connections: The XLRF connectors typically require three connections: Pin 1 (Ground/Shield), Pin 2 (Hot/+), and Pin 3 (Cold/-). Ensure correct polarity for balanced audio signals to prevent phase issues.
- 1/4" TRS Connections: The 1/4" TRSF connectors typically require three connections: Tip (Signal), Ring (Signal), and Sleeve (Ground). These are suitable for balanced audio or stereo unbalanced signals. Consult your equipment's manual for specific wiring requirements.
- Verify Connections: After wiring, carefully check all connections for proper soldering or crimping and ensure no bare wires are touching, which could cause short circuits or signal interference.
Operating Instructions
Using the Proco WP2040 is straightforward. Once installed and wired, simply connect your audio cables to the appropriate front-panel connectors.
- XLR Connections: Insert male XLR cables into the female XLR ports. The latching mechanism will secure the cable. To disconnect, press the release tab on the XLR cable connector and pull gently.
- 1/4" TRS Connections: Insert 1/4" TS or TRS cables into the 1/4" ports. These connectors are friction-fit. Pull gently to disconnect.
- Signal Flow: Ensure your audio equipment is correctly configured for input/output signals corresponding to the wall plate connections. Refer to your equipment's manual for proper signal routing.
Maintenance
The Proco WP2040 requires minimal maintenance to ensure long-lasting performance.
- Cleaning: Wipe the stainless steel surface with a soft, dry, or slightly damp cloth. Avoid abrasive cleaners, solvents, or harsh chemicals that could damage the finish or connectors.
- Inspection: Periodically inspect the connectors for any signs of wear, corrosion, or damage. Ensure all mounting screws remain tight.
- Cable Care: Always handle audio cables by the connector, not the cable itself, to prevent strain on the wall plate's internal connections and the cables themselves.
Troubleshooting
If you experience issues with your Proco WP2040, consider the following troubleshooting steps:
No Audio Signal
- Check Cables: Ensure all audio cables connected to the wall plate and your equipment are fully inserted and in good condition. Test cables with other equipment if possible to rule out cable failure.
- Verify Wiring: Re-check the internal wiring connections to the rear of the wall plate. Ensure correct polarity and secure connections for all pins/terminals.
- Equipment Settings: Confirm that your audio equipment (mixers, interfaces, amplifiers) is correctly configured for the inputs/outputs connected to the wall plate. Check input selections and gain levels.
Intermittent Signal or Noise
- Grounding: Ensure proper grounding throughout your audio system. A poor ground connection can introduce hum or noise.
- Cable Shielding: Use high-quality shielded cables to minimize electromagnetic interference.
- Loose Connections: Check for any loose connections at the wall plate, on your audio equipment, or within the internal wiring.
- Environmental Interference: Ensure the wall plate and cables are not running parallel to power lines or other sources of electromagnetic interference.
Specifications
| Feature | Detail |
|---|---|
| Model | WP2040 |
| Connectors | 2x Neutrik Latching Female XLR, 2x Neutrik Latching 1/4" TRSF |
| Material | Brushed Stainless Steel (430-alloy) |
| Item Weight | 7.4 ounces (approx. 210 grams) |
| Product Dimensions | 8.3 x 6.1 x 1.65 inches (approx. 21.1 x 15.5 x 4.2 cm) |
Warranty and Support
For specific warranty information regarding your Proco WP2040, please refer to the documentation provided at the time of purchase or contact your retailer. Proco products are designed for reliability and performance.
If you require technical assistance or have questions not covered in this manual, please contact Proco customer support or your authorized dealer for further guidance.


