Product Overview
The ASUS Z170-K is a high-value ATX motherboard designed for Intel LGA 1151 processors, supporting DDR4 memory. It integrates advanced features for enhanced performance and entertainment, including M.2 and SATA Express support, USB 3.1 Boost, and ASUS's 5X Protection II for durability. This manual provides detailed instructions for setting up, operating, maintaining, and troubleshooting your motherboard.
Key Features:
- Dual Intelligent Processors 5 with 5-Way Optimization for system tuning.
- USB 3.1 Boost for faster data transfer speeds.
- M.2 and SATA Express Support for high-speed storage solutions.
- 5X Protection II for enhanced hardware safeguards.
- DTS Studio Sound for immersive audio experience.
Setup Guide
Pre-installation Checklist:
Before you begin, ensure you have the following components:
- ASUS Z170-K Motherboard
- Compatible Intel LGA 1151 Processor
- DDR4 RAM Modules
- Graphics Card (if not using integrated graphics)
- Storage Devices (SSD/HDD, M.2 NVMe/SATA)
- Power Supply Unit (PSU)
- Computer Case
- Screwdriver and anti-static wrist strap (recommended)
Motherboard Layout:
Familiarize yourself with the key components and connectors on your ASUS Z170-K motherboard. Refer to the image below for a visual guide.
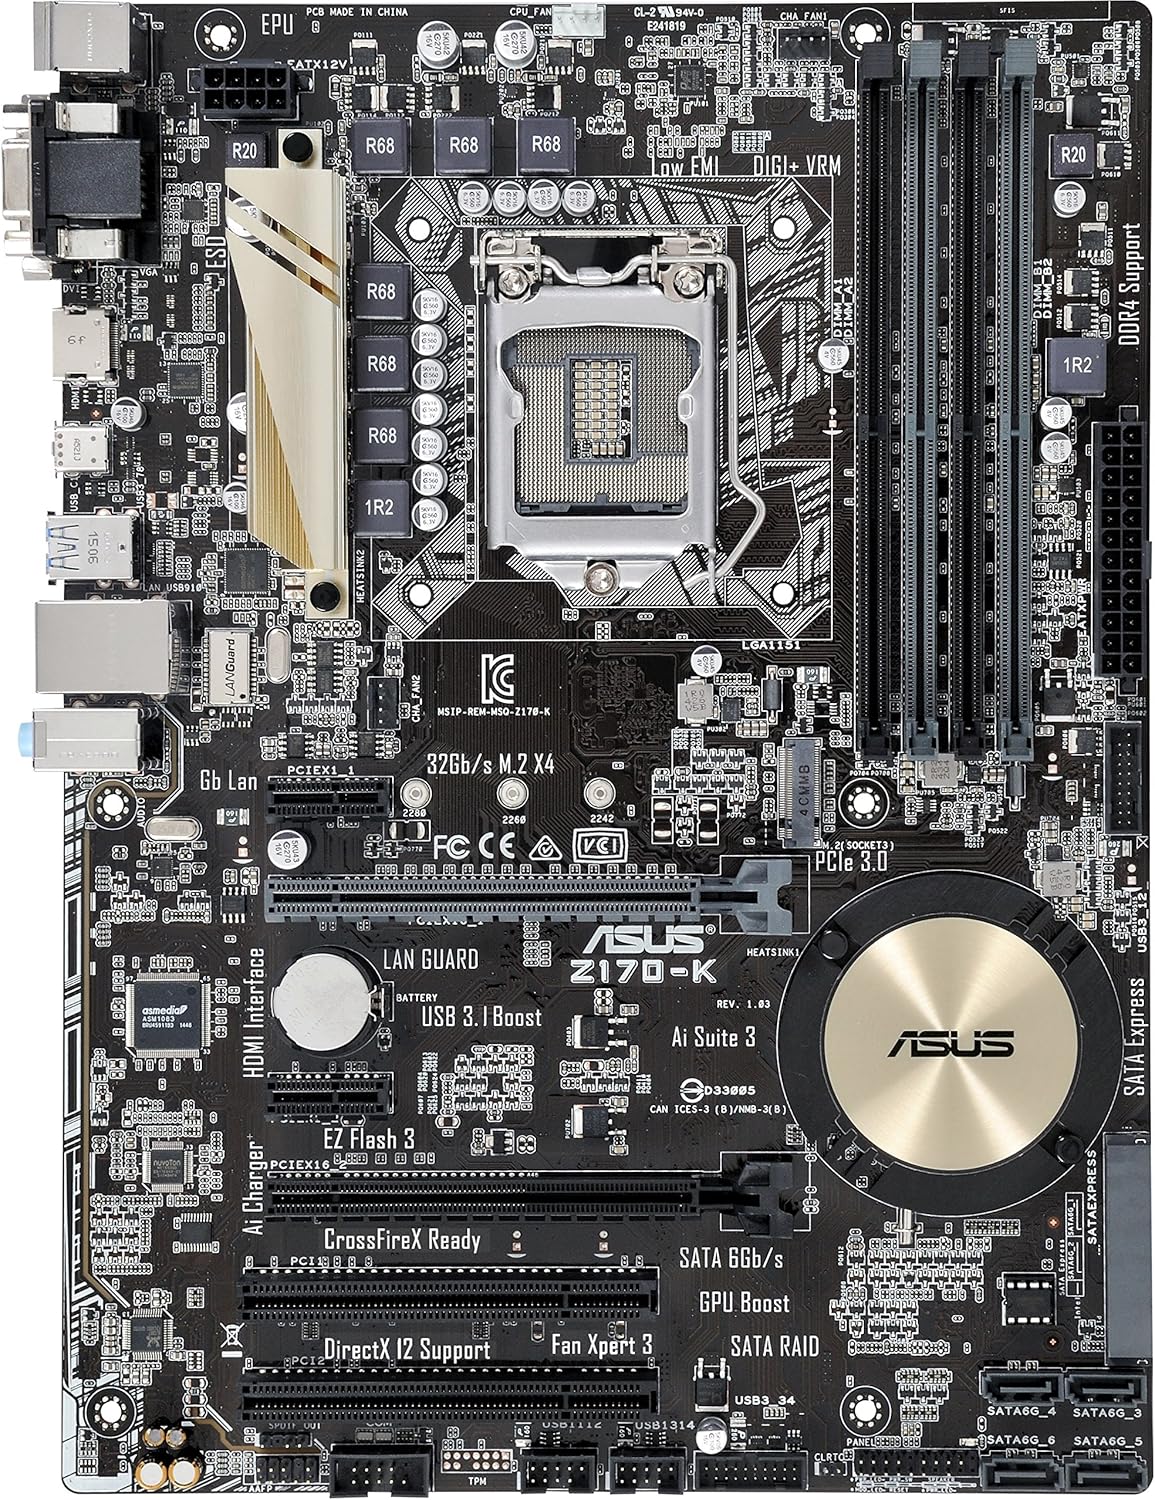
Image: Overview of the ASUS Z170-K ATX DDR4 Motherboard, highlighting key components such as the CPU socket, DDR4 DIMM slots, PCIe slots, SATA ports, and various headers.
- CPU Socket (LGA 1151): Located centrally, this is where your Intel processor is installed.
- DDR4 DIMM Slots: Four slots for installing DDR4 memory modules, supporting up to 64GB.
- PCIe Slots: Includes one PCIe 3.0 x16 slot for a graphics card, and multiple PCIe x1 slots for expansion cards.
- SATA 6Gb/s Ports: Multiple ports for connecting SATA storage devices like SSDs and HDDs.
- SATA Express Port: For high-speed SATA Express devices.
- M.2 Socket: Supports M.2 SSDs for ultra-fast storage.
- USB Headers: Various headers for front panel USB 2.0 and USB 3.0 ports, including a USB 3.1 Boost header.
- Front Panel Headers: Connectors for power button, reset button, HDD LED, and power LED.
- Rear I/O Panel: Includes ports for USB, LAN (Gb Lan), HDMI, DVI, VGA, and audio.
Installation Steps:
- Prepare the Case: Install the I/O shield into your computer case.
- Install the CPU:
- Open the CPU socket lever and remove the protective cover.
- Carefully align the CPU with the socket, ensuring the golden triangle on the CPU matches the triangle on the socket.
- Gently place the CPU into the socket. Do not force it.
- Close the lever to secure the CPU.
- Install the CPU Cooler: Follow the cooler manufacturer's instructions to install the CPU cooler onto the motherboard.
- Install RAM Modules:
- Open the clips on both ends of the DIMM slots.
- Align the notch on the RAM module with the notch in the DIMM slot.
- Press down firmly on both ends of the module until the clips snap into place.
- Install M.2 SSD (if applicable):
- Insert the M.2 SSD into the M.2 socket at a slight angle.
- Push down the SSD and secure it with the provided screw.
- Install Motherboard into Case: Carefully place the motherboard into the case, aligning it with the standoffs. Secure it with screws.
- Connect Power Supply:
- Connect the 24-pin ATX power connector from the PSU to the motherboard.
- Connect the 8-pin (or 4-pin) ATX 12V power connector to the motherboard.
- Install Graphics Card (if applicable): Insert the graphics card into the PCIe 3.0 x16 slot and secure it. Connect PCIe power cables from the PSU if required.
- Connect Storage Devices: Connect SATA data cables from your SSDs/HDDs to the SATA ports on the motherboard. Connect SATA power cables from the PSU to the drives.
- Connect Front Panel Cables: Connect the power switch, reset switch, HDD LED, and power LED cables from your case to the corresponding headers on the motherboard. Refer to the motherboard manual for exact pinouts.
- Connect USB and Audio Headers: Connect front panel USB and audio cables to their respective headers.
Operating Instructions
BIOS/UEFI Setup:
The UEFI BIOS (Unified Extensible Firmware Interface Basic Input/Output System) is a firmware that initializes hardware components and launches the operating system. To enter the BIOS setup utility, press the Delete key during the Power-On Self-Test (POST) process.
- Navigation: Use the keyboard (arrow keys, Enter, Esc) or mouse to navigate the UEFI interface.
- Boot Order: Configure the boot priority for your storage devices.
- XMP Profile: Enable XMP (Extreme Memory Profile) for optimal RAM performance if your memory supports it.
- Fan Control: Adjust fan speeds using Fan Xpert 3 settings within the BIOS or AI Suite 3 software.
Driver Installation:
After installing your operating system, it is crucial to install the latest drivers for your motherboard components to ensure optimal performance and stability. Drivers can be found on the official ASUS support website for the Z170-K model.
- Chipset Drivers: Essential for proper communication between the CPU and other components.
- LAN Drivers: Required for network connectivity.
- Audio Drivers: For sound functionality.
- USB Drivers: For optimal USB port performance, especially USB 3.0/3.1.
- Graphics Drivers: If using integrated graphics, install the Intel graphics drivers. For discrete graphics cards, install drivers from NVIDIA or AMD.
ASUS Software Utilities:
ASUS provides several utilities to enhance your computing experience:
- AI Suite 3: An all-in-one software suite for system tuning, monitoring, and power management. Includes 5-Way Optimization.
- Fan Xpert 3: Advanced fan control utility for precise system cooling.
- EZ Flash 3: A utility integrated into the UEFI BIOS for easy and safe BIOS updates.
Maintenance
Regular maintenance helps ensure the longevity and stable operation of your motherboard and PC system.
Cleaning:
- Dust Removal: Periodically clean dust from inside your PC case, especially around fans, heatsinks, and motherboard components. Use compressed air or a soft brush. Ensure the PC is powered off and unplugged before cleaning.
- Component Inspection: Visually inspect components for any signs of damage or loose connections.
Software Updates:
- BIOS Updates: Check the ASUS support website for the latest BIOS versions. BIOS updates can improve compatibility, stability, and performance. Use the EZ Flash 3 utility for safe updates.
- Driver Updates: Regularly update your motherboard drivers (chipset, LAN, audio, etc.) and graphics card drivers to benefit from performance improvements and bug fixes.
Troubleshooting
This section provides solutions to common issues you might encounter.
Common Issues and Solutions:
- No Power/No POST:
- Ensure all power cables (24-pin ATX, 8-pin CPU) are securely connected to the motherboard and PSU.
- Verify the PSU is switched on and connected to a working power outlet.
- Check front panel power switch connection to the motherboard.
- Try booting with only essential components (CPU, one RAM stick, CPU cooler) to isolate the issue.
- No Display:
- Ensure the monitor is connected to the correct display output (either motherboard integrated graphics or discrete graphics card).
- Reseat the graphics card and RAM modules.
- Test with a different monitor or display cable if possible.
- System Instability/Crashes:
- Ensure all drivers are up to date.
- Check CPU and GPU temperatures to prevent overheating.
- Run memory diagnostic tools to check for faulty RAM.
- Verify PSU wattage is sufficient for all components.
- Operating System Not Booting:
- Check boot order in BIOS/UEFI.
- Ensure storage drives are properly connected and detected.
- If recently installed, verify OS installation media integrity.
If you continue to experience issues, consult the detailed troubleshooting section in the full user manual available on the ASUS support website or contact ASUS customer support.
Specifications
Below are the technical specifications for the ASUS Z170-K Motherboard:
| Feature | Specification |
|---|
| Brand | ASUS |
| Series | Z170-K |
| Model Name | Z170-K |
| CPU Socket | LGA 1151 |
| Chipset Type | Intel Z170 |
| RAM Memory Technology | DDR4 SDRAM |
| RAM Memory Maximum Size | 64 GB |
| Memory Speed | 3466 MHz |
| Number of USB 2.0 Ports | 2 (internal headers) |
| Product Dimensions (LxWxH) | 10.4 x 2.1 x 12.9 inches |
| Item Weight | 1.98 pounds |
| First Available Date | August 5, 2015 |
Warranty and Support
Warranty Information:
ASUS products typically come with a limited warranty. For specific warranty terms and conditions applicable to your ASUS Z170-K motherboard, please refer to the warranty card included with your product or visit the official ASUS support website.
Customer Support:
For technical assistance, driver downloads, BIOS updates, or further inquiries, please visit the official ASUS support website. You can find comprehensive resources, FAQs, and contact information for customer service there.
ASUS Support Website: www.asus.com/support/
Ask a question about this manual
Ask about setup, troubleshooting, compatibility, parts, safety, or missing instructions. Manuals+ will review the question and use this page’s manual context to help answer it.