1. Introduction
This manual provides essential information for the installation, operation, and maintenance of your ASUS Z170-A ATX DDR4 Motherboard. The ASUS Z170-A is designed for enhanced performance and entertainment, featuring One-Click Total System Optimization, M.2 and SATA Express support, high-clarity Crystal Sound 3, and enduring 5X Protection II.
For detailed instructions and advanced configurations, please refer to the official User Guide (PDF).
2. Product Overview
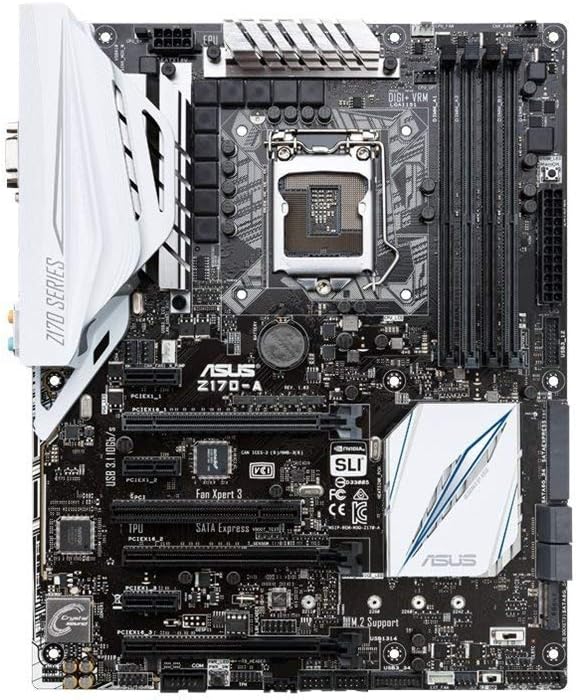
Figure 2.1: Top view of the ASUS Z170-A Motherboard, showcasing the CPU socket, RAM slots, PCIe slots, and various headers.
The ASUS Z170-A motherboard is an ATX form factor board compatible with Intel LGA 1151 processors and DDR4 RAM. It offers a robust platform for building high-performance desktop systems.
Key Features:
- Dual Intelligent Processors 5 with 5-Way Optimization: Provides comprehensive system tuning with a single click.
- USB 3.1 Boost: Enhances USB 3.1 transfer speeds.
- M.2 and SATA Express Support: Offers flexible and high-speed storage options.
- 5X Protection II: Ensures hardware safeguards for long-term durability.
- DTS Studio Sound: Delivers high-quality audio experience.

Figure 2.2: Angled view of the ASUS Z170-A Motherboard, highlighting the I/O shield area and various connectivity ports.
3. Setup and Installation
Proper installation is crucial for the stable operation of your motherboard. Always ensure your system is powered off and unplugged before handling components.
3.1. Pre-Installation Checklist:
- Ensure you have a compatible Intel LGA 1151 CPU.
- Acquire DDR4 RAM modules (2133 MHz recommended, check QVL for compatibility).
- Prepare a suitable ATX PC case and power supply unit.
- Gather necessary tools: Phillips-head screwdriver, anti-static wrist strap.
3.2. Component Installation Sequence:
- CPU Installation: Carefully open the CPU socket lever, align the CPU with the triangle marker, gently place it into the socket, and close the lever.
- CPU Cooler Installation: Mount your chosen CPU cooler according to its manufacturer's instructions.
- RAM Installation: Open the DIMM slot clips, align the RAM modules with the key notch, and press firmly until the clips snap into place.
- Motherboard Mounting: Install standoffs in your PC case, then carefully place the motherboard and secure it with screws.
- Storage Device Installation: Connect SATA drives to the SATA ports or install M.2 SSDs into the M.2 slot.
- Graphics Card (GPU) Installation: Insert your graphics card into the primary PCIe x16 slot and secure it.
- Power Supply Connections: Connect the 24-pin ATX power connector and the 8-pin CPU power connector from your power supply to the motherboard. Connect power to other components as needed.
- Front Panel Connections: Connect the case's front panel headers (power button, reset button, USB, audio) to the corresponding pins on the motherboard. Refer to the motherboard manual for pinout diagrams.
4. Operating Instructions
Once all components are installed and connected, you can power on your system.
4.1. Initial Boot and BIOS/UEFI Setup:
- Press the power button on your PC case.
- During the boot process, repeatedly press the DEL key or F2 key to enter the BIOS/UEFI setup utility.
- In the BIOS/UEFI, you can configure boot order, enable XMP profiles for RAM, adjust fan speeds, and perform basic overclocking.
- Save changes and exit the BIOS/UEFI to continue booting.
4.2. Operating System and Driver Installation:
- Install your preferred operating system (e.g., Windows, Linux) from a bootable USB drive or optical disc.
- After OS installation, install the latest drivers for your motherboard chipset, audio, LAN, and other integrated components from the ASUS support website or the provided driver CD/USB.
- Install drivers for your graphics card and other peripheral devices.
5. Maintenance
Regular maintenance helps ensure the longevity and optimal performance of your motherboard and PC system.
- Dust Removal: Periodically clean dust from inside your PC case, especially from fans, heatsinks, and motherboard components, using compressed air or a soft brush. Ensure the system is powered off and unplugged.
- BIOS/UEFI Updates: Check the ASUS support website for the latest BIOS/UEFI updates. Updates can improve stability, compatibility, and performance. Follow the update instructions carefully to avoid issues.
- Driver Updates: Keep your system drivers updated to ensure compatibility and optimal performance with new software and hardware.
- Cable Management: Ensure internal cables are neatly routed to improve airflow and prevent interference.
6. Troubleshooting
If you encounter issues, the following basic troubleshooting steps may help. For more complex problems, refer to the comprehensive User Guide (PDF) or contact technical support.
- No Power/No Boot:
- Verify all power cables (24-pin ATX, 8-pin CPU) are securely connected to the motherboard and power supply.
- Ensure the power supply switch is in the ON position.
- Check front panel power button connection to the motherboard.
- No Display:
- Ensure the monitor is connected to the graphics card (or integrated graphics port) and powered on.
- Reseat the graphics card and RAM modules.
- Try booting with only one RAM stick.
- System Instability/Crashes:
- Check CPU and GPU temperatures. Ensure adequate cooling.
- Verify RAM is properly seated and compatible. Run memory diagnostic tools.
- Update chipset and graphics drivers.
- Peripheral Not Detected:
- Ensure the device is properly connected.
- Install or update drivers for the peripheral.
- Try a different port or slot.
7. Specifications
| Feature | Specification |
|---|---|
| Brand | ASUS |
| Model Name | FBA_90MB0LS0-M0EAY0 (Z170-A) |
| CPU Socket | LGA 1151 |
| Compatible Processors | Intel LGA 1151 Processors |
| RAM Memory Technology | DDR4 |
| Memory Speed | 2133 MHz |
| Memory Storage Capacity | 64 GB (Max) |
| Chipset Type | Intel Z170 |
| Number of USB 2.0 Ports | 6 |
| Product Dimensions (LxWxH) | 10.4 x 2.7 x 12.9 inches |
| Item Weight | 3 pounds |
| Manufacturer | ASUS Computer International Direct |
| First Available Date | August 5, 2015 |
8. Warranty and Support
Your ASUS Z170-A Motherboard is manufactured by ASUS Computer International Direct. For specific warranty terms and conditions, please refer to the documentation included with your purchase or visit the official ASUS support website.
Contacting Support:
For technical assistance, driver downloads, or further information, please visit the official ASUS support website. You can typically find support resources by searching for "ASUS Support" online and navigating to the support section for your specific model (Z170-A).


