ZOSI FBA_ZG2621N-K8+ZR08HF/00
ZOSI 8CH Security Camera System User Manual
Model: FBA_ZG2621N-K8+ZR08HF/00
1. Introduction
This manual provides detailed instructions for the installation, operation, and maintenance of your ZOSI 8CH Security Camera System. This system features a 1080P HD-TVI DVR and 2.0MP bullet/dome weatherproof CCTV cameras, designed for reliable surveillance in various environments.
The system utilizes H.265/H.265+ video compression for efficient storage and offers advanced features such as customizable motion detection, email alerts, and remote access via smartphone or PC.

Figure 1.1: ZOSI 8CH Security Camera System overview, showing the DVR unit and a mix of bullet and dome cameras.
2. Package Contents
Please verify that all components listed below are included in your package. If any items are missing or damaged, please contact ZOSI customer support.
- 1 x 8-Channel 1080P HD-TVI DVR
- 8 x 2.0MP Weatherproof CCTV Cameras (Bullet and/or Dome type)
- 8 x 60ft BNC Video Cables
- 2 x 1-to-4 Power Splitter Cables
- 2 x Power Adapters (for DVR and cameras)
- 1 x USB Mouse
- Mounting Screws and Plugs
- User Manual (this document)
Note: Hard drive is NOT included and must be purchased separately (3.5 inch SATA 500GB to 2TB recommended).

Figure 2.1: All components included in the ZOSI 8CH Security Camera System package.
3. Setup Guide
3.1 Camera Installation
The cameras are designed for both indoor and outdoor use, featuring IP67 weatherproof housing. They can be wall-mounted or ceiling-mounted using the 3-axis mounting bracket for flexible positioning.
- Choose a Location: Select a strategic location that provides optimal viewing angles and coverage, while also considering cable routing.
- Mount the Camera: Use the provided screws and wall plugs to securely mount the camera bracket to the desired surface. Ensure the cable is protected, ideally routed through the mounting surface or a conduit.
- Adjust Angle: Loosen the adjustment screws on the bracket to set the desired viewing angle. Tighten securely once positioned.

Figure 3.1: Illustration of wall and ceiling mounting options, highlighting the 3-axis adjustable bracket and internal cable routing.

Figure 3.2: Examples of camera placement for indoor and outdoor monitoring, demonstrating waterproof housing and day/night capabilities.
3.2 DVR and Camera Connections
Follow these steps to connect your cameras to the DVR and prepare the system for operation.
- Install Hard Drive (if not pre-installed): Open the DVR casing, connect the SATA data and power cables to the hard drive, and secure it inside the DVR. Close the casing.
- Connect Cameras to DVR: Connect the BNC connector of each camera's video cable to the corresponding "VIDEO IN" port on the back of the DVR.
- Connect Camera Power: Use the 1-to-4 power splitter cables to connect the power input of up to four cameras to a single power adapter. Connect the power adapters to a power outlet.
- Connect DVR to Monitor: Connect a monitor to the DVR using either the VGA or HDMI port.
- Connect USB Mouse: Plug the included USB mouse into one of the USB ports on the DVR.
- Connect to Network (Optional for Remote Access): Connect an Ethernet cable from the DVR's RJ45 port to your router for network access.
- Power On: Connect the DVR's power adapter to a power outlet. The system will boot up.

Figure 3.3: Detailed view of the ZOSI DVR's rear panel, showing video input (BNC), video output (VGA, HDMI), audio input/output, LAN, USB, and power ports.
4. Operating Instructions
4.1 Initial Setup Wizard
Upon first boot-up, the DVR will guide you through an initial setup wizard. This typically includes setting the language, date/time, network configuration, and hard drive formatting (if a new hard drive is installed).
4.2 Local Viewing and Control
Once the system is powered on and connected to a monitor, you can view live feeds, access menus, and configure settings using the USB mouse. Right-click on the screen to bring up the main menu.
4.3 Remote Access (Mobile App)
The ZOSI system supports remote viewing via a dedicated mobile application. Follow these steps to set up remote access:
- Connect DVR to Network: Ensure your DVR is connected to your router via an Ethernet cable.
- Download Zosi Smart App: Search for "Zosi Smart" in your smartphone's app store or scan the QR codes below.
- Register Account: Open the app and register a new account.
- Add Device: Follow the in-app instructions to add your DVR. This usually involves scanning a QR code on the DVR or manually entering its serial number.
- Enjoy Live View: Once added, you can view live camera feeds, play back recordings, and receive motion alerts from anywhere with an internet connection.
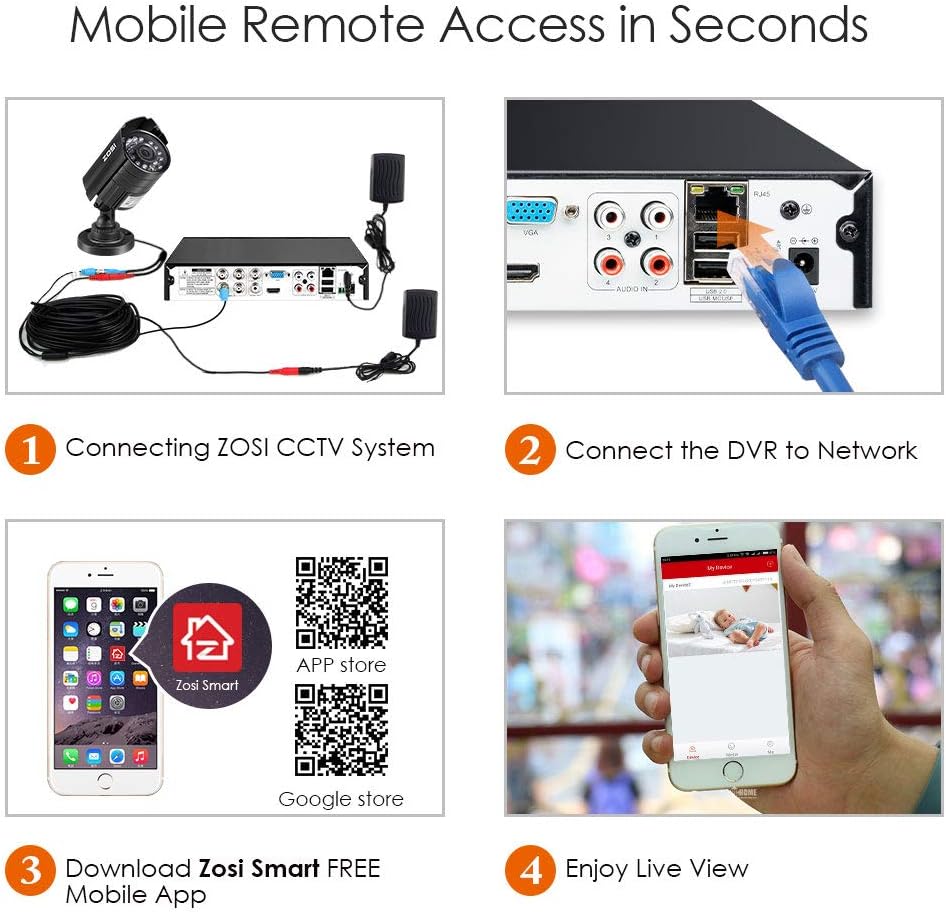
Figure 4.1: Visual guide for connecting the ZOSI CCTV system, connecting the DVR to the network, downloading the Zosi Smart app, and enjoying live view.
4.4 Recording Modes and Playback
The DVR supports various recording modes, including continuous recording, scheduled recording, and motion-triggered recording. You can configure these settings via the DVR's main menu.
- Motion Detection: Enable motion detection for specific cameras to trigger recording and send alerts when movement is detected. Sensitivity and detection areas can be customized.
- Playback: Access recorded footage through the DVR's playback menu or the mobile app. You can search by date, time, and event type.
- Data Backup: Recorded video files can be transferred to a USB memory stick or external hard drive via the DVR's USB port.
5. Maintenance
Regular maintenance ensures optimal performance and longevity of your security system.
- Clean Cameras: Periodically clean the camera lenses with a soft, damp cloth to remove dust, dirt, or water spots that may obstruct the view.
- Check Cables: Inspect all cables for wear, damage, or loose connections, especially for outdoor installations.
- DVR Ventilation: Ensure the DVR is placed in a well-ventilated area to prevent overheating. Keep vents clear of obstructions.
- Firmware Updates: Check the ZOSI official website periodically for firmware updates for your DVR to ensure you have the latest features and security patches.
- Hard Drive Management: The DVR can be set to automatically overwrite the oldest footage when the hard drive is full. Regularly back up important footage.
6. Troubleshooting
This section addresses common issues you might encounter with your ZOSI security system.
| Problem | Possible Cause | Solution |
|---|---|---|
| No video display on monitor. | Loose video cable, incorrect input selected on monitor, DVR not powered on. | Check all video cable connections (BNC, VGA, HDMI). Ensure monitor is set to correct input. Verify DVR power indicator is on. |
| One or more cameras show "Video Loss". | Loose BNC cable, camera power issue, damaged cable. | Check the BNC connection at both the camera and DVR ends. Verify camera is receiving power (check power adapter and splitter). Inspect cable for damage. |
| Cannot access DVR remotely via app. | DVR not connected to network, incorrect network settings, firewall blocking. | Ensure Ethernet cable is securely connected to DVR and router. Check DVR's network settings (DHCP enabled or static IP configured correctly). Verify router's firewall settings. Restart DVR and router. |
| Motion detection not working. | Motion detection not enabled, sensitivity too low, detection area not set. | Access DVR menu: enable motion detection for the specific channel, adjust sensitivity, and define the detection area. |
| No recording or hard drive error. | Hard drive not installed, not formatted, or faulty. | Ensure hard drive is correctly installed and connected. Format the hard drive via the DVR menu. If issues persist, the hard drive may be faulty and require replacement. |
7. Specifications
Key technical specifications for the ZOSI 8CH Security Camera System.
| Feature | Detail |
|---|---|
| Brand | ZOSI |
| Model Number | FBA_ZG2621N-K8+ZR08HF/00 |
| Connectivity Technology | Wired |
| Video Capture Resolution | 1080p |
| Number of Channels | 8 |
| Video Compression | H.265/H.265+ |
| Camera Resolution | 2.0MP (1920TVL) |
| Camera Type | Bullet/Dome, Weatherproof (IP67) |
| Night Vision | Built-in IR LEDs (up to 65ft) |
| Recording Mode | Motion detection, Continuous, Scheduled |
| Compatible Devices | Personal Computers, Smartphones, TV |
| Operating System (App) | Android, iOS |
| DVR Dimensions (L x W x H) | 17.3 x 12.2 x 11.3 inches |
| Item Weight | 17.3 pounds (system) |
| Hard Drive Support | 3.5 inch SATA (500GB to 2TB, not included) |

Figure 7.1: Detailed specifications for the ZOSI bullet camera, including 3.6mm lens, IR-Cut filter, IP67 rating, 24 IR LEDs for night vision, and glass cover.
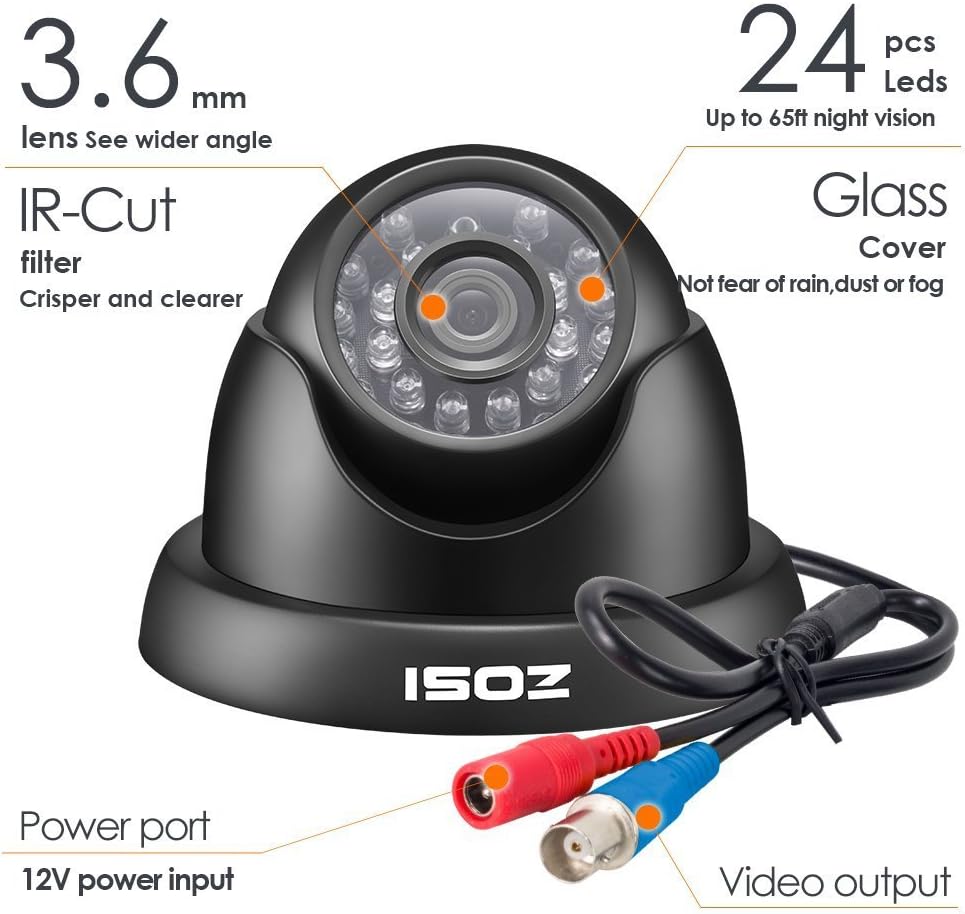
Figure 7.2: Detailed specifications for the ZOSI dome camera, including 3.6mm lens, IR-Cut filter, 24 IR LEDs for night vision, and glass cover.
8. Warranty and Support
ZOSI products typically come with a manufacturer's warranty. Please refer to the warranty card included in your package or visit the official ZOSI website for specific warranty terms and conditions.
For technical support, troubleshooting assistance, or any inquiries regarding your ZOSI security system, please contact ZOSI customer service through their official website or the contact information provided in your product packaging.
Online Resources:
Ask a question about this manual
Ask about setup, troubleshooting, compatibility, parts, safety, or missing instructions. Manuals+ will review the question and use this page’s manual context to help answer it.