
1. Introduction
Thank you for choosing the Nodor Mirage 700 BK Wall-Mounted Range Hood. This manual provides essential information for the safe and efficient installation, operation, and maintenance of your appliance. Please read this manual thoroughly before use and keep it for future reference.
The Nodor Mirage 700 BK is a stylish and powerful wall-mounted hood featuring a glass and stainless steel design with touch control operation, LED lighting, and a super quiet SilenTech motor. It is suitable for both extraction and recirculation modes.
2. Safety Information
Always adhere to the following safety precautions to prevent personal injury or damage to the appliance.
- Ensure the power supply matches the voltage specified on the rating plate.
- Installation must be performed by a qualified technician in accordance with local regulations.
- Do not operate the hood without the grease filters properly installed.
- Regularly clean the grease filters to maintain optimal performance and prevent fire hazards.
- Do not flambé under the range hood.
- Ensure adequate ventilation in the room when the range hood is used simultaneously with appliances burning gas or other fuels.
- Disconnect the appliance from the power supply before any cleaning or maintenance.
- This appliance is not intended for use by persons (including children) with reduced physical, sensory or mental capabilities, or lack of experience and knowledge, unless they have been given supervision or instruction concerning use of the appliance by a person responsible for their safety.
3. Product Overview and Components

Figure 1: Front view of the Nodor Mirage 700 BK Wall-Mounted Range Hood, showcasing its sleek stainless steel and glass design, integrated LED lighting, and touch control panel.
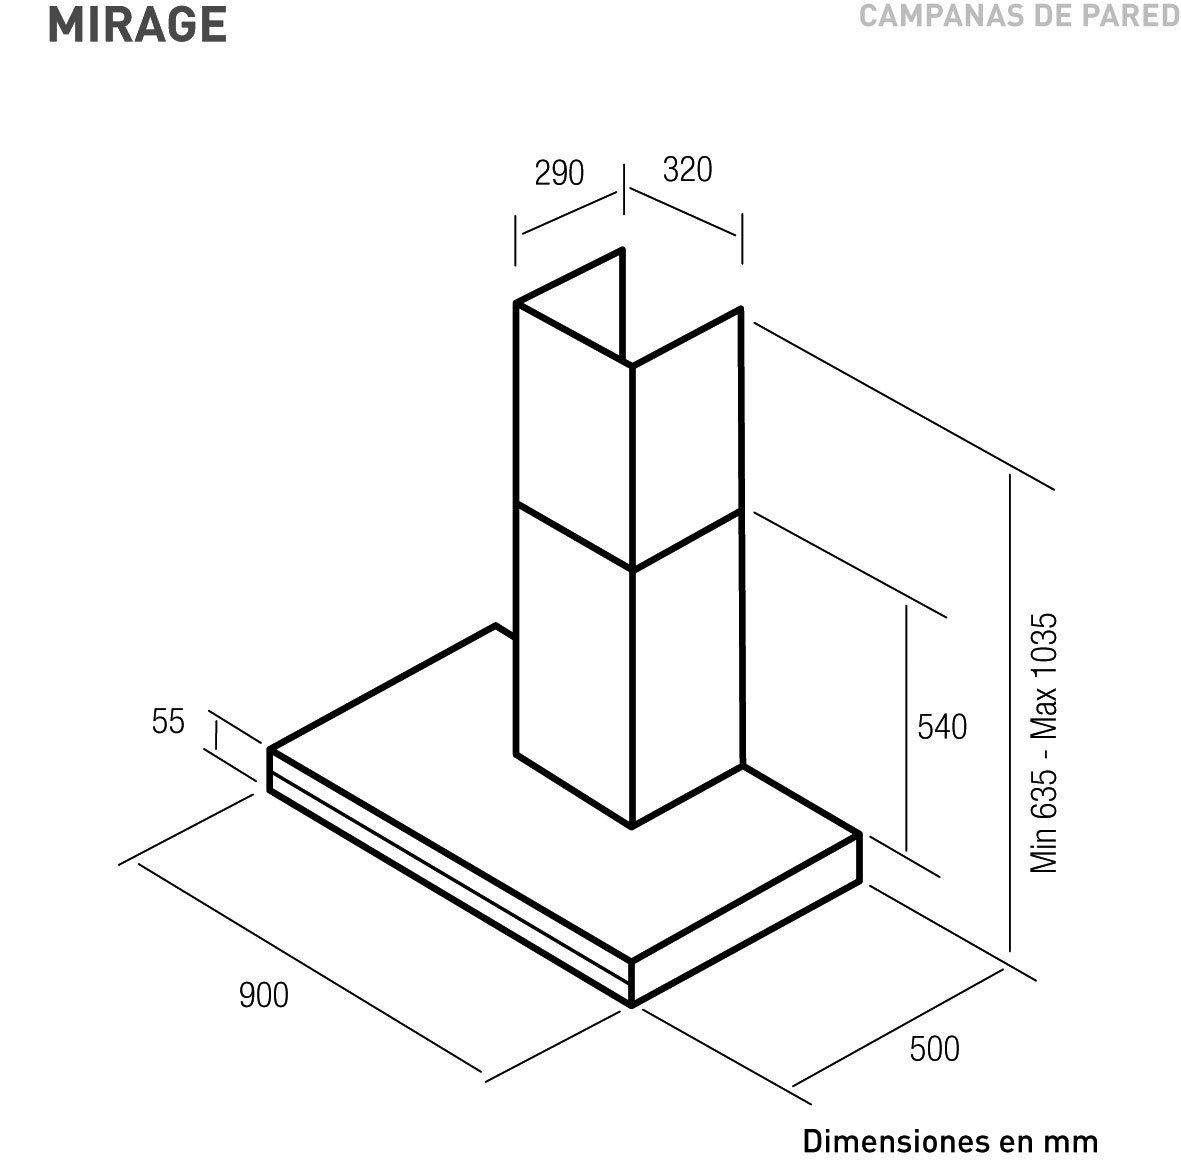
Figure 2: Technical drawing illustrating the dimensions of the Nodor Mirage 700 BK range hood in millimeters, including width, depth, and adjustable height range.
Key Features:
- Touch Control Sensor Buttons
- 5 Power Levels, including Turbo Mode
- ECO-LED Lighting (2 x 2.9 Watt) with Dimming Function
- Automatic Run-on Timer (up to 15 minutes)
- 3 x Metal Grease Filters
- Filter Saturation Indicator
- SilenTech Motor 130 W
4. Installation and Setup
4.1 Wall Mounting
The Nodor Mirage 700 BK is designed for wall mounting. Ensure the wall is strong enough to support the weight of the hood. Refer to Figure 2 for precise dimensions and mounting points.
- Mark the drilling points on the wall according to the provided template or dimensions (Figure 2).
- Drill holes and insert wall plugs suitable for your wall type.
- Secure the mounting bracket to the wall.
- Carefully lift and attach the range hood to the mounting bracket.
- Connect the exhaust ducting (for extraction mode) or install carbon filters (for recirculation mode). The exhaust outlet diameter is Ø 150 mm / Ø 125 mm.
- Connect the power cable to a suitable electrical outlet (220 - 240V/50 Hz).
4.2 Ducting Options
- Extraction Mode: Air is expelled outside through a ducting system. Use a duct with a diameter of 150mm for optimal performance.
- Recirculation Mode: Air is filtered through activated carbon filters and recirculated back into the kitchen. Activated carbon filters (Art.-Nr. 02859392) or DUAL Combi Metal Grease Filters (Art. Nr. 02800918) are required and sold separately. Three pieces of the DUAL Combi filters are needed.
5. Operation
The Nodor Mirage 700 BK features intuitive touch control buttons located on the front panel.
5.1 Power On/Off
Press the power button to turn the hood on or off.
5.2 Fan Speed Adjustment
Select from 5 power levels, including a turbo mode, to adjust the extraction power according to your cooking needs. Higher speeds are recommended for intense cooking with strong odors or steam.
5.3 Lighting Control
Activate the ECO-LED lighting to illuminate your cooking area. The lighting features a dimming function, allowing you to adjust the brightness.
5.4 Automatic Run-on Timer
The hood is equipped with an automatic run-on timer, which allows the fan to continue operating for up to 15 minutes after cooking to ensure complete air purification before automatically shutting off.
6. Maintenance
Regular maintenance ensures the longevity and optimal performance of your range hood. Always disconnect the power supply before performing any maintenance.
6.1 Metal Grease Filters
The hood is equipped with 3 metal grease filters. A filter saturation indicator will alert you when cleaning is required.
- Cleaning: The metal grease filters are dishwasher safe. Alternatively, they can be washed by hand using hot water and a mild detergent. Ensure they are completely dry before re-installing.
- Frequency: Clean filters at least once a month, or more frequently depending on cooking habits.
6.2 Activated Carbon Filters (for Recirculation Mode)
If using the hood in recirculation mode, activated carbon filters are essential for odor removal. These filters are not washable and must be replaced periodically.
- Replacement: Replace activated carbon filters (Art.-Nr. 02859392) every 3-6 months, depending on usage.
- DUAL Combi Filters: If using DUAL Combi Metal Grease Filters (Art. Nr. 02800918) with integrated washable Longlife carbon filters, follow the cleaning instructions for metal filters.
6.3 General Cleaning
Clean the exterior of the hood with a soft cloth and a non-abrasive cleaner. Avoid using harsh chemicals or abrasive materials that could damage the stainless steel or glass surfaces.
7. Troubleshooting
| Problem | Possible Cause | Solution |
|---|---|---|
| Hood does not turn on. | No power supply. | Check if the power cord is properly plugged in and the circuit breaker is not tripped. |
| Low extraction performance. | Clogged grease filters or saturated carbon filters. | Clean metal grease filters. Replace activated carbon filters if in recirculation mode. |
| Excessive noise. | Improper installation or foreign objects in the fan. | Check for loose parts or obstructions. Ensure proper ducting installation. |
| Lights not working. | Faulty LED module. | Contact qualified service personnel for replacement. |
If the problem persists after checking the above, please contact customer support. Do not attempt to repair the appliance yourself.
8. Technical Specifications
| Specification | Value |
|---|---|
| Model Number | 8435025716131 |
| Mounting Type | Wall Mount |
| Control Type | Touch Control |
| Number of Speeds | 5 |
| Item Weight | 16.2 Kilograms (approx. 35.69 Pounds) |
| Light Source Type | LED |
| Product Dimensions (L x W x H) | 50 x 70 x 56 cm |
| Energy Efficiency Class | A+ (EU Directive 65/2014) |
| Annual Energy Consumption | 25.4 Kwh/year |
| Fluid Dynamic Efficiency | A / 33 |
| Lighting Efficiency | A / 35 |
| Grease Filter Efficiency | B / 91.2 |
| Noise Level (min - max) | 40 dB (A) - 64 dB (A) |
| Noise Level (Turbo Mode) | 67 dB |
| Airflow (min - max) | 200 m³/h - 645 m³/h (according to EN 61951) |
| Airflow (Turbo Mode) | 820 m³/h |
| Free Air Flow | 1,050 m³/h |
| Maximum Pressure | 455 Pa / Turbo Mode 470 Pa |
| Power Consumption (Off State) | 0.41 W |
| Power Consumption (Standby) | 0.41 W |
| Electrical Input Power at Max Efficiency | 168.7 W |
| Nominal Power Lighting System | 6 W |
| Average Illumination on Cooking Surface | 210 lux |
| Connection Value | 240 W |
| Voltage | 220 - 240V/50 Hz |
| Exhaust Outlet Diameter | Ø 150 mm / Ø 125 mm |
| Material | Glass, Stainless Steel |
| Color | Black |
9. Warranty and Support
Nodor products are manufactured to the highest quality standards. For warranty information and customer support, please refer to the warranty card included with your purchase or visit the official Nodor website. Keep your proof of purchase for any warranty claims.
For technical assistance or spare parts, please contact your local Nodor service center.


