1. Introduction
This manual provides comprehensive instructions for the installation, operation, and maintenance of your DIYSecuritycameraworld TRIDVR-ELE8ME 8-Channel Tribrid Security Surveillance DVR. This device supports multiple video input types, including Analog (960H), HD-CVI, and up to 2 IP channels at 1080p, offering a versatile solution for your surveillance needs. Please read this manual thoroughly before using the product to ensure proper setup and functionality.
2. Package Contents
Carefully unpack the box and verify that all items listed below are present and in good condition. If any items are missing or damaged, please contact your vendor.
- TRIDVR-ELE8ME Tribrid DVR Unit
- Power Adapter
- USB Mouse
- Remote Control
- SATA Cable (for hard drive connection)
- Mounting Screws (for hard drive)
- Quick Start Guide
- Software CD
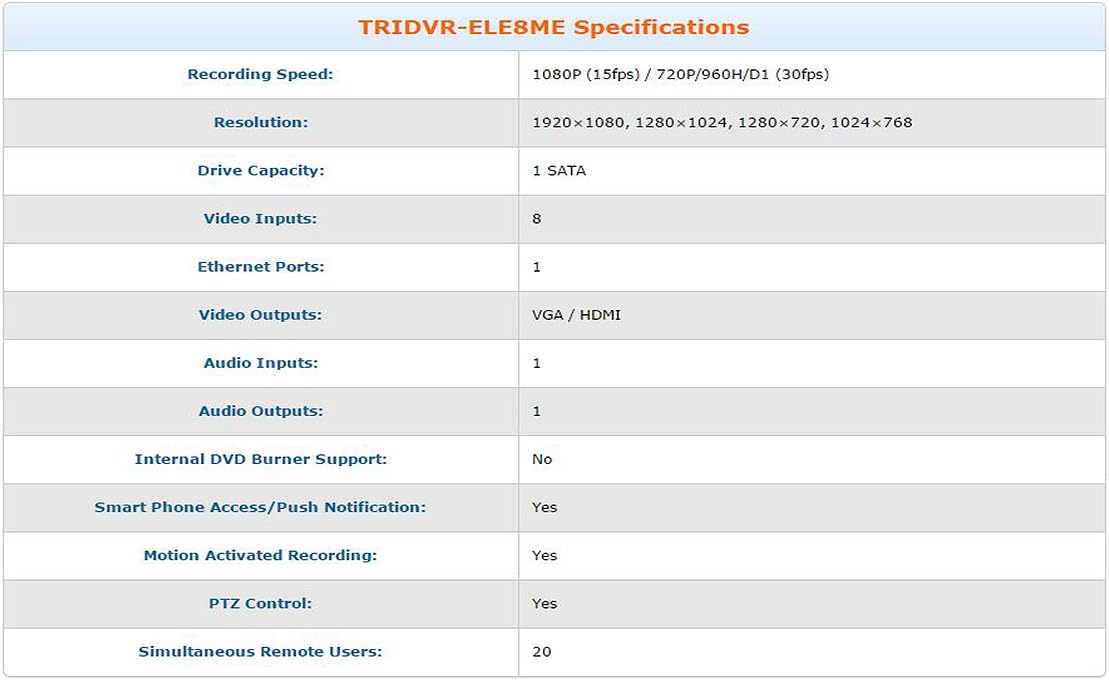
Figure 2.1: Included accessories and components with the TRIDVR-ELE8ME DVR.
3. Product Overview
3.1 Front Panel

Figure 3.1: Front view of the TRIDVR-ELE8ME DVR.
- USB Port: For connecting a USB mouse, USB flash drive for backup, or external hard drive.
- Indicator Lights:
- Alarm: Indicates an alarm event.
- NET: Indicates network activity.
- HDD: Indicates hard disk drive activity.
- Navigation Buttons: Used to navigate menus and control functions on the DVR. Includes Esc, Fn, directional arrows, and Enter.
- Power Button: To power on or off the DVR.
3.2 Rear Panel

Figure 3.2: Rear view of the TRIDVR-ELE8ME DVR with connection ports.
- Power Switch: Main power toggle.
- VGA Output: Connects to a VGA monitor.
- DC12V Power Input: Connect the provided power adapter here.
- USB Ports: Additional USB ports for peripherals.
- HDMI Output: Connects to an HDMI monitor or TV.
- Ethernet Port (LAN): Connects to your network router or switch.
- Audio Input/Output (RCA): For connecting external audio devices.
- Video Input (BNC): 8 channels for connecting Analog or HD-CVI cameras.
4. Setup
4.1 Hard Drive Installation
The TRIDVR-ELE8ME DVR does not include a pre-installed hard drive. A SATA hard drive (up to 4TB capacity) must be installed for recording video. Follow these steps:
- Unscrew and remove the top cover of the DVR chassis.
- Connect the SATA data cable and power cable to the hard drive.
- Align the hard drive with the mounting holes at the bottom of the DVR and secure it with the provided screws.
- Replace the top cover and secure it with screws.
- After powering on, navigate to the DVR's menu to format the newly installed hard drive. Refer to the "Operating Instructions" section for menu navigation.
4.2 Connecting Cameras
The DVR supports Analog (960H), HD-CVI, and IP cameras. Connect your cameras to the BNC video input ports on the rear panel. For IP cameras, ensure they are on the same network as the DVR and configure them through the DVR's network settings.
4.3 Connecting to a Monitor
Connect a monitor to the DVR using either the VGA or HDMI output port on the rear panel. Use the provided USB mouse for easier navigation.
4.4 Network Connection
Connect an Ethernet cable from the DVR's LAN port to your router or network switch. This is required for remote access and IP camera integration.
4.5 Powering On
Connect the DC12V power adapter to the DVR and a power outlet. Flip the power switch on the rear panel to the "ON" position. The DVR will boot up, and the initial setup wizard should appear on the connected monitor.
5. Operating Instructions
5.1 Initial Setup Wizard
Upon first boot, the DVR will guide you through an initial setup wizard. This typically includes setting the date/time, network configuration, and hard drive formatting. Follow the on-screen prompts.
5.2 Live View
After setup, the DVR will display the live view from connected cameras. Use the mouse or remote control to switch between single-camera view, multi-camera grid view, and access the main menu.
5.3 Recording Configuration
Access the main menu and navigate to the "Record" settings. Here you can configure recording schedules (continuous, motion detection, alarm-triggered) for each channel. Ensure your hard drive is formatted and recognized by the system.
5.4 Playback
To review recorded footage, go to the "Playback" menu. Select the date, time, and channel you wish to view. You can fast-forward, rewind, and pause playback.
5.5 Remote Access
The DVR supports remote access via a web browser or a dedicated smartphone application. Configure network settings (e.g., port forwarding, DDNS) in the DVR's menu and download the appropriate app for your mobile device. Refer to the software CD or manufacturer's website for specific application details.
6. Maintenance
6.1 Hard Drive Management
Regularly check the hard drive status in the DVR's menu. If the hard drive becomes full, the DVR is typically configured to overwrite the oldest footage. You can also manually format the hard drive if needed, which will erase all recorded data.
6.2 Firmware Updates
Periodically check the DIYSecuritycameraworld website for firmware updates. Firmware updates can improve performance, add features, or fix bugs. Follow the instructions provided with the firmware update package carefully to avoid damaging the device.
6.3 Cleaning
Ensure the DVR is powered off and unplugged before cleaning. Use a soft, dry cloth to wipe the exterior. Do not use liquid cleaners or abrasive materials. Keep ventilation openings clear of dust and obstructions.
7. Troubleshooting
- No Video Output:
- Check power connections to the DVR and monitor.
- Verify VGA/HDMI cable connections.
- Ensure the correct input source is selected on your monitor.
- No Camera Image:
- Check camera power supply.
- Verify BNC cable connections for Analog/HD-CVI cameras.
- For IP cameras, ensure they are properly configured on the network and added to the DVR.
- No Recording:
- Ensure a hard drive is installed and properly formatted.
- Check recording schedules and settings in the DVR menu.
- Verify hard drive status; it may be full or faulty.
- Remote Access Not Working:
- Verify network cable connection to the DVR.
- Check network settings (IP address, gateway, DNS) on the DVR.
- Ensure port forwarding is correctly configured on your router, if applicable.
- Confirm the mobile app or web browser settings are correct.
For further assistance, please refer to the detailed user manual on the software CD or contact DIYSecuritycameraworld technical support.
8. Specifications
The following table outlines the key technical specifications for the TRIDVR-ELE8ME DVR:

Figure 8.1: Detailed specifications for the TRIDVR-ELE8ME DVR.
| Feature | Detail |
|---|---|
| Model Number | TRIDVR-ELE8ME |
| Number of Channels | 8 (Analog/HD-CVI) + 2 (IP) |
| Video Inputs | 8 BNC |
| Video Outputs | 1x VGA, 1x HDMI |
| Audio Inputs | 1 RCA |
| Audio Outputs | 1 RCA |
| Recording Speed | 1080P (15fps) / 720P/960H/D1 (30fps) |
| Resolution | 1920x1080, 1280x1024, 1280x720, 1024x768 |
| Drive Capacity | 1 SATA (up to 4 TB) |
| Ethernet Ports | 1 |
| USB Ports | Multiple (Front & Rear) |
| Smart Phone Access | Yes |
| Motion Activated Recording | Yes |
| PTZ Control | Yes |
| Simultaneous Remote Users | Up to 20 |
| Item Weight | 7 pounds |
9. Warranty and Support
For information regarding warranty coverage, technical support, or service, please refer to the documentation included with your product or visit the official DIYSecuritycameraworld website. Keep your purchase receipt as proof of purchase for warranty claims.
For direct support, you may contact DIYSecuritycameraworld customer service through the contact information provided on their official website.