1. Introduction
This manual provides essential information for the safe and effective use of the ELMI CM-50MP MiniPrep Master System Centrifuge. This semi-automated system is designed for nucleic acid extraction and is compatible with various commercial plasmid isolation kits. Please read this manual thoroughly before operating the device.
2. Safety Information
Always follow standard laboratory safety procedures when operating the ELMI CM-50MP Centrifuge.
- Ensure the centrifuge is placed on a stable, level surface.
- Do not open the lid while the rotor is spinning. Wait for the rotor to come to a complete stop.
- Balance tubes properly before operation to prevent vibration, potential damage to the unit, and inaccurate results.
- Use only compatible tubes and rotors as specified by the manufacturer.
- Disconnect power before cleaning or performing any maintenance.
- Do not operate the device if it is visibly damaged or malfunctioning.
- Wear appropriate personal protective equipment (PPE) as required by laboratory protocols.
3. Product Overview
The ELMI CM-50MP MiniPrep Master System Centrifuge is engineered for efficient and accurate semi-automated nucleic acid extraction. It integrates advanced rotor technology with functions for bacterial pellet re-suspension and precise mixing of lysis and neutralizing buffers.
3.1 Key Features
- Gentle bacterial pellet re-suspension system.
- Advanced mixing capabilities for Lysis and Neutralizing buffers.
- Pre-set programs for various nucleic acid extraction steps.
- Custom program functionality for compatibility with diverse extraction kits.
- Temperature elevation within the rotor chamber during the final step to enhance plasmid yield.
- Integrated Mix, Spin, and Shake functions.
- Designed to reduce user error, optimize reagent use, and deliver repeatable, accurate results.
3.2 Components
The ELMI CM-50MP unit includes the main centrifuge body, rotor, and control panel. Familiarize yourself with the key external and internal components.
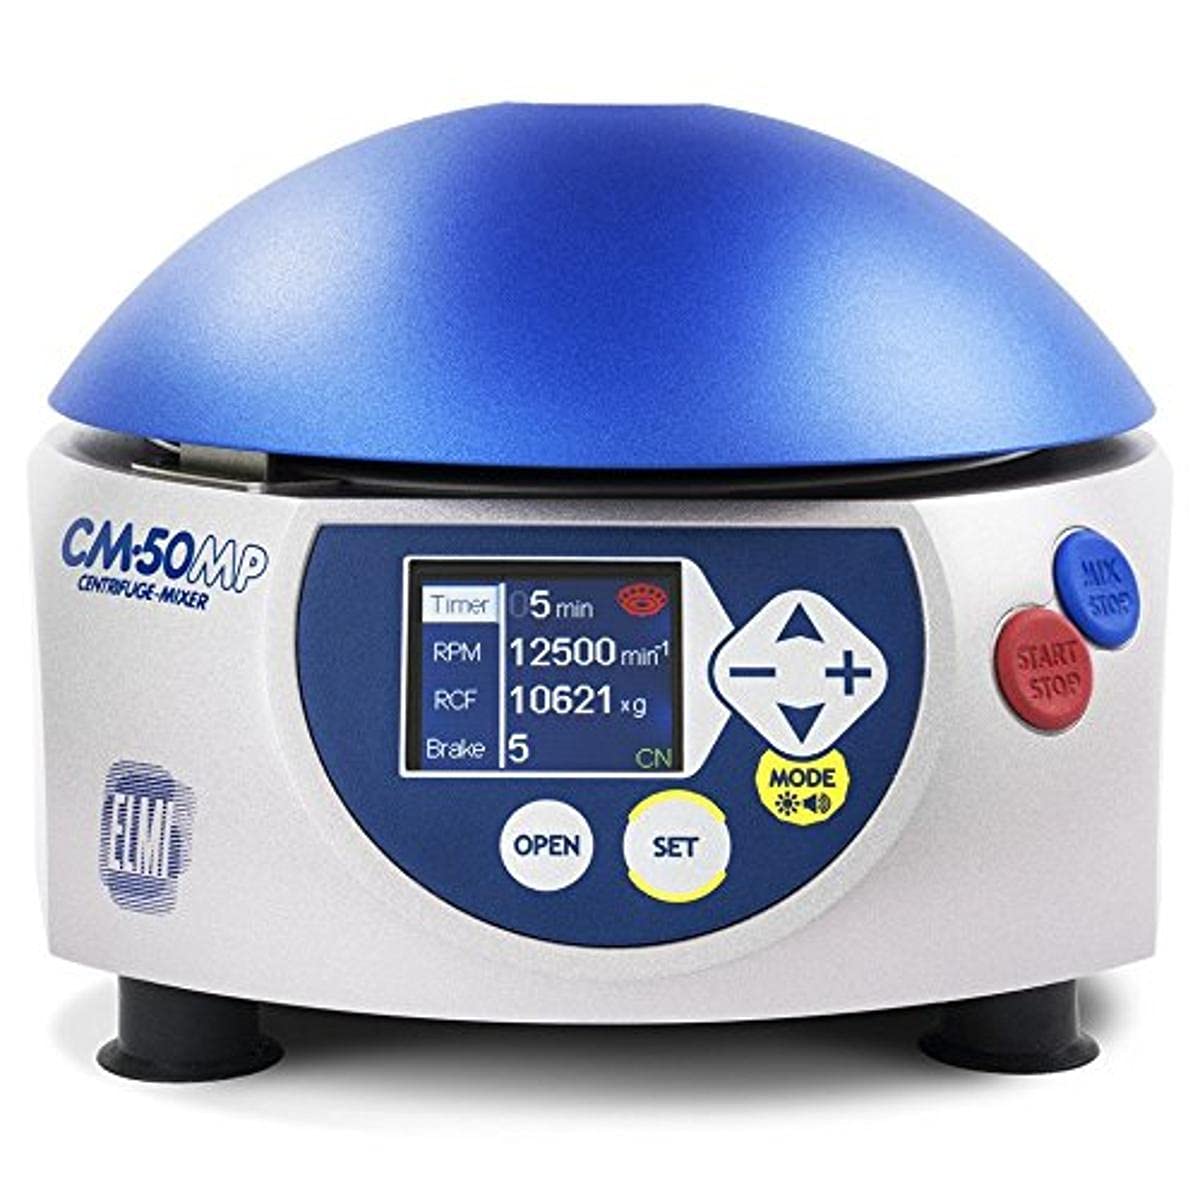
Figure 1: Front view of the ELMI CM-50MP Centrifuge, highlighting the control panel with its digital display, function buttons (OPEN, SET, MODE), and operational buttons (MIX/STOP, START/STOP).
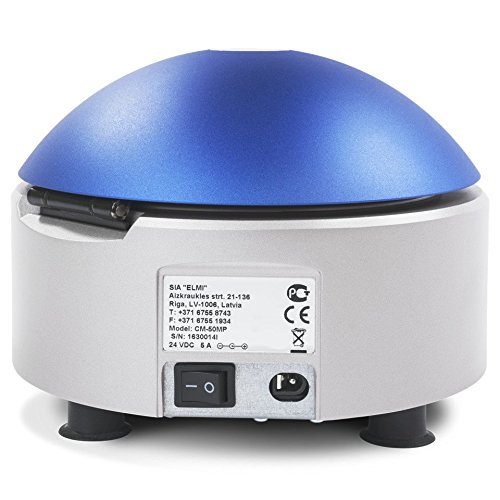
Figure 2: Rear view of the ELMI CM-50MP Centrifuge, displaying the main power switch, power input, and the product information label.

Figure 3: The ELMI CM-50MP Centrifuge with its lid open, showing the internal rotor chamber designed for sample tubes.
4. Setup
- Unpacking: Carefully remove the centrifuge from its packaging. Retain all packaging materials for future transport or storage.
- Placement: Position the centrifuge on a stable, level, and vibration-free surface. Ensure adequate clearance around the unit for proper ventilation.
- Power Connection: Connect the provided power cord to the centrifuge's power input and then to a grounded electrical outlet.
- Initial Inspection: Before first use, inspect the rotor and rotor chamber for any debris or damage. Clean if necessary according to the maintenance section.
5. Operation
5.1 Loading Samples
- Press the OPEN button to unlock and open the centrifuge lid.
- Carefully place sample tubes into the rotor. Ensure tubes are balanced symmetrically to prevent imbalance during operation. Refer to Figure 3 for rotor chamber view.
- Close the lid firmly until it latches securely.
5.2 Selecting Programs
The CM-50MP offers pre-set programs and a custom program option, displayed on the digital screen.
- Pre-set Programs: Use the MODE button to cycle through available pre-set programs optimized for common nucleic acid extraction steps. The display will show program parameters such as Timer, RPM, RCF, and Brake settings.
- Custom Program: To create a custom program, press SET to enter parameter adjustment mode. Use the + and - buttons to adjust parameters like Timer, RPM, RCF, and Brake settings. Press SET again to confirm each parameter.
5.3 Starting and Stopping
- After selecting or setting the desired program, press the START/STOP button to begin operation.
- To stop operation prematurely, press the START/STOP button again.
- The MIX/STOP button can be used to initiate mixing functions or to stop a mixing cycle.
5.4 Mix, Spin, and Shake Functions
The centrifuge integrates specific functions for various laboratory procedures:
- Mix: Activates the semi-automated vortex and mixing functions for reagents, ensuring thorough sample preparation.
- Spin: Initiates the centrifugation process at the set RPM/RCF, separating components based on density.
- Shake: Provides a shaking action for specific applications requiring agitation.
Refer to the display and control panel for specific button functions and indicators during operation.
6. Maintenance
6.1 Cleaning
Regular cleaning ensures optimal performance and longevity of the centrifuge.
- Exterior: Wipe the exterior surfaces with a soft, damp cloth and a mild, non-abrasive detergent. Avoid harsh chemicals or solvents.
- Rotor Chamber: Clean the rotor chamber with a soft cloth. If spills occur, clean immediately with a suitable laboratory disinfectant.
- Rotor: Remove the rotor for cleaning. Wash with mild detergent and rinse thoroughly with distilled water. Ensure it is completely dry before re-installing.
6.2 Inspection
Periodically inspect the rotor, rotor chamber, and lid for any signs of wear, corrosion, or damage. Pay close attention to the rotor's integrity. If any damage is observed, discontinue use and contact ELMI support for assistance.
7. Troubleshooting
| Problem | Possible Cause | Solution |
|---|---|---|
| Centrifuge does not power on | Power cord not connected; Power switch off; No power from electrical outlet | Check power cord connection; Ensure main power switch is ON; Test electrical outlet with another device |
| Excessive vibration during operation | Unbalanced tubes in rotor; Damaged rotor; Centrifuge not on a level surface | Ensure tubes are balanced symmetrically; Inspect rotor for damage and replace if necessary; Verify centrifuge is on a stable, level surface |
| Lid does not open | Rotor still spinning; Lid lock malfunction; Power interruption | Wait for rotor to come to a complete stop (indicated by display); If issue persists after power cycle, contact support |
| Error message on display | Specific internal error condition | Note the error code and refer to the specific error code section in the full user manual or contact ELMI support for diagnosis. |
8. Specifications
| Feature | Detail |
|---|---|
| Model Name | CM-50MP |
| Item Model Number | CM-MC-14 |
| Manufacturer | ELMI |
| Dimensions (L x W x H) | Approximately 13.5 x 13 x 6.5 inches |
| Weight | Approximately 7.8 Pounds |
| Compatibility | Compatible with major commercial plasmid isolation kits (e.g., Qiagen, Thermo Scientific, Sigma) |
| Functions | Centrifugation, Mixing, Shaking, Bacterial Pellet Re-suspension |
| Control Interface | Digital display with adjustable Timer, RPM, RCF, Brake settings; Pre-set and Custom programs |
| Date First Available | June 22, 2015 |
9. Warranty and Support
For warranty information, technical support, or service inquiries, please contact ELMI customer service. Refer to your purchase documentation for specific warranty terms and contact details.
You can also visit the official ELMI website for additional resources and support information.
This manual is subject to change without notice. The latest version can be found on the manufacturer's website.