Introduction
Welcome to the Bellema Melon Double Electric Breast Pump user manual. This guide provides detailed instructions for the safe and effective use, assembly, operation, cleaning, and maintenance of your breast pump. Please read this manual thoroughly before first use and keep it for future reference.
The Bellema Melon Double Electric Breast Pump is designed to help mothers express breast milk efficiently and comfortably, supporting their breastfeeding journey.
Important Safety Information
WARNING: Read all instructions before using this product. Failure to follow these instructions may result in electric shock, fire, or serious injury.
- Always unplug the pump immediately after use and before cleaning.
- Do not use while bathing or showering.
- Do not place or store the pump where it can fall or be pulled into a tub or sink.
- Do not place in or drop into water or other liquid.
- Do not reach for a product that has fallen into water; unplug immediately.
- This pump is a single-user product. Use by more than one person may present a health risk.
- Inspect all components before each use. Discard and replace any damaged or worn parts.
- Keep out of reach of children.
- Use only the original power adapter provided with the pump.
Package Contents
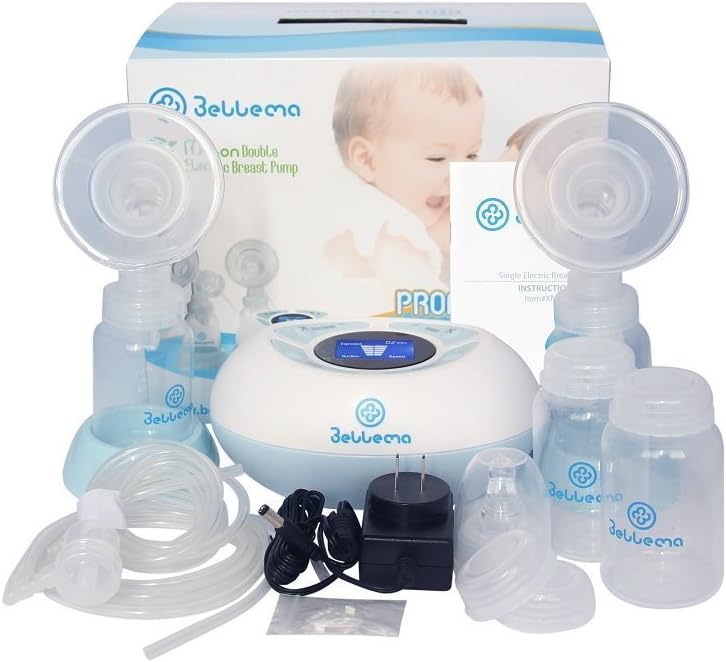
Image: All components included in the Bellema Melon Double Electric Breast Pump package.
Your Bellema Melon Double Electric Breast Pump package includes the following items:
- 1 x Pump Motor Unit
- 2 x Milk Collection Kits (includes flanges, connectors, valves)
- 2 x Tubing Sets
- 4 x Milk Storage Bottles
- 2 x Bottle Stands
- 1 x Set of Nipple Assemblies (nipple, collar, cap)
- 1 x Power Adapter
- 1 x User Manual
Product Overview

Image: The Bellema Melon Double Electric Breast Pump with two milk collection kits assembled and connected to the main unit.
The Bellema Melon Double Electric Breast Pump consists of a central motor unit and two milk collection kits. Key components include:
- Motor Unit: The main control unit with digital display, suction and speed adjustment buttons, and power input.
- Flange: The part that fits over the nipple and areola to create a seal for suction.
- Connector: Connects the flange to the bottle and tubing.
- Valve: Creates the vacuum for milk expression.
- Tubing: Connects the milk collection kit to the motor unit, creating the vacuum.
- Milk Storage Bottle: Collects and stores expressed breast milk.
Setup and Assembly
Before first use, and after each use, all parts that come into contact with breast milk should be cleaned and sterilized. Refer to the "Cleaning and Maintenance" section for detailed instructions.
- Prepare Components: Ensure all parts are clean, dry, and free from damage.
- Assemble Milk Collection Kit:
- Insert the valve into the bottom of the connector.
- Attach the flange to the top of the connector, ensuring a secure fit.
- Screw a clean milk storage bottle onto the bottom of the assembled connector and flange.
- Connect Tubing:
- Attach one end of the tubing to the port on the top of the connector.
- Connect the other end of the tubing to the corresponding port on the pump motor unit. For double pumping, connect both tubing sets. For single pumping, ensure the unused port on the motor unit is capped or sealed if applicable.
- Connect Power: Insert the power adapter into the power input port on the pump motor unit, then plug the adapter into a suitable electrical outlet.
Operating Instructions
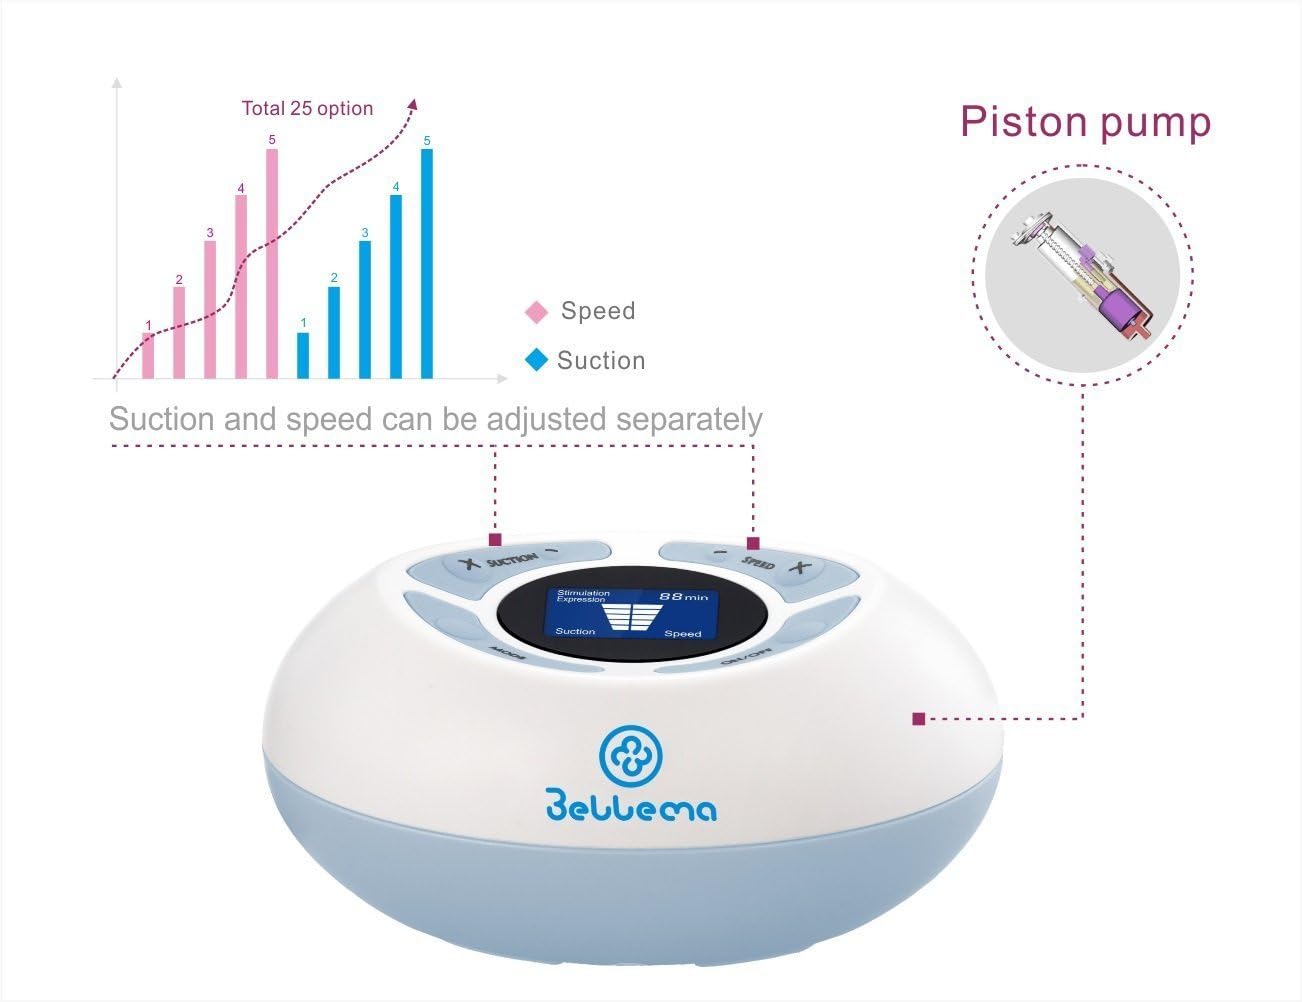
Image: Close-up of the Bellema Melon Breast Pump control panel showing speed and suction adjustment options.
- Power On: Press the "ON/OFF" button to turn on the pump. The pump will typically start in Stimulation mode.
- Stimulation Mode: This mode uses a faster, lighter suction to stimulate milk let-down. The pump will run in this mode for a set duration (e.g., 2 minutes) or until you manually switch modes.
- Expression Mode: Once milk let-down occurs, press the "Mode" button to switch to Expression mode. This mode uses a slower, stronger suction to efficiently express milk.
- Adjusting Suction and Speed:
- Use the "Suction +" and "Suction -" buttons to increase or decrease the vacuum strength.
- Use the "Speed +" and "Speed -" buttons to adjust the cycling speed.
- The pump offers 25 customized setting options by combining different suction and speed levels. Adjust to find the most comfortable and effective setting for you.
- Memory Function: The pump features a memory function that remembers your last used settings, allowing for quick recall during subsequent pumping sessions.
- Pumping Duration: The built-in timer on the display tracks your pumping session duration. Pump until your breasts feel empty or milk flow significantly slows.
- Power Off: Press the "ON/OFF" button to turn off the pump when finished.
Cleaning and Maintenance
Proper cleaning and maintenance are crucial for hygiene and the longevity of your breast pump. All parts that come into contact with breast milk must be cleaned and sterilized after each use.
- Disassembly:
- Unplug the pump from the power outlet.
- Carefully detach the tubing from the motor unit and the connectors.
- Disassemble all milk collection kit components: separate bottles, flanges, connectors, and valves.
- Cleaning:
- Rinse all disassembled parts (except tubing and motor unit) under cold running water to remove any milk residue.
- Wash parts in warm, soapy water using a clean brush dedicated for feeding equipment. Ensure all crevices are thoroughly cleaned.
- Rinse thoroughly under clean running water.
- Sterilization:
- Sterilize parts by boiling them in water for 5 minutes, using a steam sterilizer, or a dishwasher with a sanitizing cycle.
- Allow parts to air dry completely on a clean drying rack or paper towel. Do not use cloth towels as they may transfer germs.
- Tubing and Motor Unit:
- The tubing and motor unit should not be washed or submerged in water.
- If milk or condensation enters the tubing, clean and dry it immediately. If milk enters the motor unit, discontinue use and contact customer support.
- Wipe the exterior of the motor unit with a clean, damp cloth.
- Storage: Store all clean and dry components in a clean, dry place until next use.
Troubleshooting
| Problem | Possible Cause | Solution |
|---|---|---|
| No suction or weak suction |
|
|
| Pump not turning on |
|
|
| Milk entering tubing |
|
|
Specifications
- Model Number: XN-2203H2
- Material: Silicone (for parts in contact with milk)
- Dimensions: 17.78 x 12.07 x 8.89 cm (7 x 4.75 x 3.5 inches)
- Weight: Approximately 421.84 g (0.93 lbs)
- Phases: 2-Phase Expression (Stimulation & Expression)
- Customization: 25 adjustable settings (combination of 5 suction levels and 5 speed levels)
- Features: Memory function, quiet operation, lightweight and portable.
- Safety: FDA approved, all parts are BPA-free.
Warranty and Support
For warranty information, please refer to the documentation provided at the time of purchase or contact your retailer. Bellema products are typically covered by a manufacturer's warranty against defects in materials and workmanship.
If you experience any issues not covered in the troubleshooting section or require further assistance, please contact Bellema customer support or your authorized retailer. Keep your proof of purchase for warranty claims.


