
1. Introduction
This manual provides detailed instructions for the installation, operation, and maintenance of your Excalibur X280.4 MOSFET 4-Channel Car Amplifier. Designed for automotive audio systems, this amplifier delivers powerful and stable performance. Please read this manual thoroughly before attempting installation or operation to ensure proper use and to prevent damage.

Figure 1: Top view of the Excalibur X280.4 amplifier, showcasing its sleek black design with silver stripes and model number.
Key features of the Excalibur X280.4 amplifier include:
- 4-channel MOSFET design for stable power delivery.
- Maximum output power of 1120 Watts (4 x 280 W).
- RMS power of 200 Watts (4 x 50 W).
- Bridgable to 2 channels for higher power output.
- Wide frequency response from 10 Hz to 25,000 Hz.
- 2 Ohm stable operation.
- Adjustable low-pass and high-pass filters.
- Adjustable input sensitivity (150 mV - 8 V).
- Protection against overheating, overload, and short circuits.
2. Safety Information
Always observe the following safety precautions to prevent injury or damage to the amplifier or vehicle:
- Professional Installation Recommended: Installation of car audio equipment can be complex. If you are unsure about any part of the installation process, seek assistance from a qualified professional.
- Power Supply: Ensure the vehicle's battery is disconnected before making any power connections to the amplifier. Incorrect wiring can cause severe damage or fire.
- Wiring: Use appropriate gauge wiring for power, ground, and speaker connections as specified in this manual. Ensure all connections are secure and insulated to prevent short circuits.
- Mounting: Mount the amplifier securely in a location that allows for adequate ventilation and is protected from moisture and excessive heat. Avoid mounting in areas that obstruct vehicle operation or safety features.
- Volume Levels: Prolonged exposure to high volume levels can cause hearing damage. Adjust volume to a comfortable level.
- Ventilation: Do not block the amplifier's cooling fins or vents. Adequate airflow is crucial for preventing overheating.
3. Setup and Installation
Proper installation is crucial for optimal performance and longevity of your amplifier. Follow these steps carefully.
3.1. Mounting the Amplifier
The Excalibur X280.4 is designed for surface mounting. Choose a location that is:
- Dry and free from moisture.
- Well-ventilated to allow for heat dissipation.
- Secure and protected from physical damage.
- Accessible for wiring and adjustments.
Avoid mounting the amplifier directly on carpet or in enclosed spaces without airflow. Use the provided mounting hardware to secure the amplifier firmly to a solid surface in your vehicle.
3.2. Wiring Connections
Before making any connections, disconnect the negative terminal of your vehicle's battery to prevent electrical shorts.
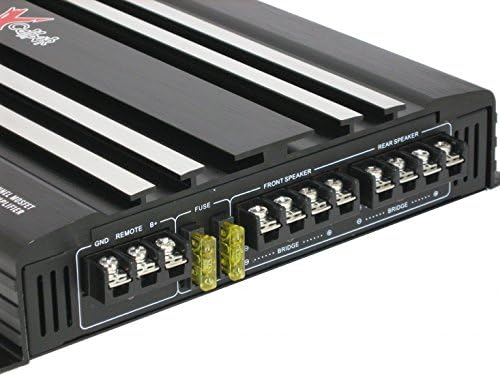
Figure 2: Rear view of the Excalibur X280.4 amplifier, showing power, ground, remote, fuse, and speaker output terminals.
3.2.1. Power Connections
- B+ (12V Power): Connect a heavy-gauge power cable (e.g., 8 AWG or thicker, depending on cable length and power requirements) directly from the positive terminal of the vehicle's battery to the B+ terminal on the amplifier. Install an in-line fuse holder with an appropriate fuse (not supplied) as close to the battery as possible.
- GND (Ground): Connect a heavy-gauge ground cable of the same size as the power cable from the GND terminal on the amplifier to a clean, unpainted metal surface of the vehicle's chassis. Ensure a good electrical connection by scraping away any paint or rust.
- REMOTE (Remote Turn-On): Connect a smaller gauge wire (e.g., 18 AWG) from the REM terminal on the amplifier to the remote turn-on output of your head unit. This wire signals the amplifier to turn on and off with your head unit.
3.2.2. Speaker Connections
Connect your speakers to the designated speaker output terminals. The amplifier supports both stereo and bridged configurations.
- Stereo Mode: Connect each speaker to its respective positive (+) and negative (-) terminals for Front Speaker and Rear Speaker outputs. Ensure correct polarity. The amplifier is 2 Ohm stable.
- Bridged Mode: For higher power output to subwoofers or single speakers, the amplifier can be bridged. Connect the speaker's positive (+) terminal to the right channel's positive (+) output and the speaker's negative (-) terminal to the left channel's negative (-) output for each bridged pair (e.g., Front L-R Bridge, Rear L-R Bridge). Refer to the markings on the amplifier. The minimum impedance for bridged operation is 4 Ohms.
3.2.3. Audio Input Connections
Connect the RCA output cables from your head unit to the LINE IN inputs on the amplifier. Ensure the left (L) and right (R) channels are connected correctly for both front and rear inputs.
4. Operating Instructions
Once all connections are made and verified, reconnect the vehicle's battery. Turn on your head unit to activate the amplifier.

Figure 3: Front view of the Excalibur X280.4 amplifier, displaying gain controls, crossover switches, and RCA input/output jacks.
4.1. Initial Setup and Adjustments
- Gain Control (Input Sensitivity): This control matches the amplifier's input sensitivity to the output voltage of your head unit. Start with the gain control set to minimum (Min). Play a familiar piece of music at a moderate volume on your head unit (around 75% of max volume). Slowly increase the amplifier's gain control until you hear slight distortion, then back it off slightly until the sound is clear. The adjustable range is 150 mV to 8 V.
- Crossover Settings (HPF/LPF/FULL): The amplifier features adjustable high-pass (HPF) and low-pass (LPF) filters for each channel pair (Front and Rear).
- FULL: Full range audio output. Use for speakers that reproduce the entire frequency spectrum.
- HPF (High-Pass Filter): Allows frequencies above the set point to pass through. Useful for protecting smaller speakers from low bass frequencies. Adjustable from 120 Hz to 3 kHz for Front, and 50 Hz to 250 Hz for Rear.
- LPF (Low-Pass Filter): Allows frequencies below the set point to pass through. Essential for subwoofers to reproduce only bass frequencies. Adjustable from 50 Hz to 250 Hz for Rear.
4.2. Status Indicators
- POWER LED: Illuminates when the amplifier is powered on and operating normally.
- PROTECTION LED: Illuminates if the amplifier detects a fault condition (e.g., overheating, short circuit, overload). If this LED lights up, turn off your audio system immediately and troubleshoot the issue.
5. Maintenance
Regular maintenance ensures the longevity and optimal performance of your amplifier.
- Cleaning: Periodically clean the exterior of the amplifier with a soft, dry cloth. Do not use harsh chemicals or abrasive cleaners. Ensure the cooling fins are free from dust and debris to maintain proper heat dissipation.
- Connections: Occasionally check all power, ground, remote, and speaker connections to ensure they are secure and free from corrosion. Loose connections can lead to poor performance or damage.
- Fuse Replacement: If the amplifier's internal fuse blows, replace it only with a fuse of the exact same type and rating. Using an incorrect fuse can cause serious damage to the amplifier or vehicle's electrical system. The amplifier uses standard automotive blade fuses, typically located near the power input terminals.
6. Troubleshooting
If you experience problems with your amplifier, refer to the following troubleshooting guide before contacting customer support.
| Problem | Possible Cause | Solution |
|---|---|---|
| No Power (POWER LED off) | Blown fuse (in-line or internal) Loose power/ground/remote connection No remote turn-on signal | Check and replace fuses. Ensure all power, ground, and remote wires are securely connected. Verify head unit's remote output. |
| Protection LED on | Overheating Speaker short circuit Speaker impedance too low DC offset | Allow amplifier to cool. Check speaker wiring for shorts. Verify speaker impedance meets amplifier requirements (2 Ohm stereo, 4 Ohm bridged). Consult a professional for DC offset. |
| No Sound | RCA input cables disconnected/damaged Speaker wires disconnected/damaged Gain set too low Head unit output issue | Check RCA connections. Verify speaker wiring. Adjust gain control. Test head unit with another amplifier or headphones. |
| Distorted Sound | Gain set too high Improper crossover settings Damaged speakers Poor ground connection | Reduce gain. Adjust HPF/LPF settings. Test speakers. Ensure ground connection is clean and secure. |
| Amplifier gets hot | Inadequate ventilation Speaker impedance too low Gain set too high | Ensure proper airflow around the amplifier. Verify speaker impedance. Reduce gain. |
7. Specifications
Technical specifications for the Excalibur X280.4 MOSFET 4-Channel Car Amplifier:
| Feature | Specification |
|---|---|
| Model Number | X280.4 |
| Channels | 4 |
| Amplifier Class | MOSFET |
| Maximum Output Power | 1120 Watts (4 x 280 W) |
| RMS Output Power | 200 Watts (4 x 50 W) |
| Bridged Output Power (Max) | 2 x 560 Watts |
| Bridged Output Power (RMS) | 2 x 160 Watts |
| Frequency Response | 10 - 25,000 Hz (+-2dB) |
| Input Sensitivity | 150 mV - 8 V |
| Signal-to-Noise Ratio (S/N) | > 92 dB |
| Minimum Impedance | 2 Ohm stable |
| Low-Pass Filter (LPF) | Adjustable (50 Hz - 250 Hz) |
| High-Pass Filter (HPF) | Adjustable (120 Hz - 3 kHz) |
| Mounting Type | Surface Mount |
| Dimensions (W x H x D) | 225 x 48 x 340 mm |
| Weight | 1.6 kg |
| Protection Features | Overheating, Overload, Short Circuit |
8. Warranty Information
Specific warranty details for the Excalibur X280.4 amplifier are not provided in this document. Please refer to the warranty card included with your product packaging or visit the official Excalibur website for comprehensive warranty terms and conditions.
9. Customer Support
For technical assistance, service, or further inquiries regarding your Excalibur X280.4 amplifier, please consult the contact information provided on the product packaging or visit the official Excalibur brand website for customer support resources.