
Introduction
This manual provides comprehensive instructions for the setup, operation, and maintenance of your Kooltech TIMEMARK Digital Wall Clock, model SL-500. Please read this manual thoroughly before using the device to ensure proper functionality and longevity.
Product Overview
The Kooltech TIMEMARK SL-500 is a versatile digital wall clock designed for clear time, date, day, week, and temperature display. Its large, easy-to-read digital segments make it suitable for various environments.
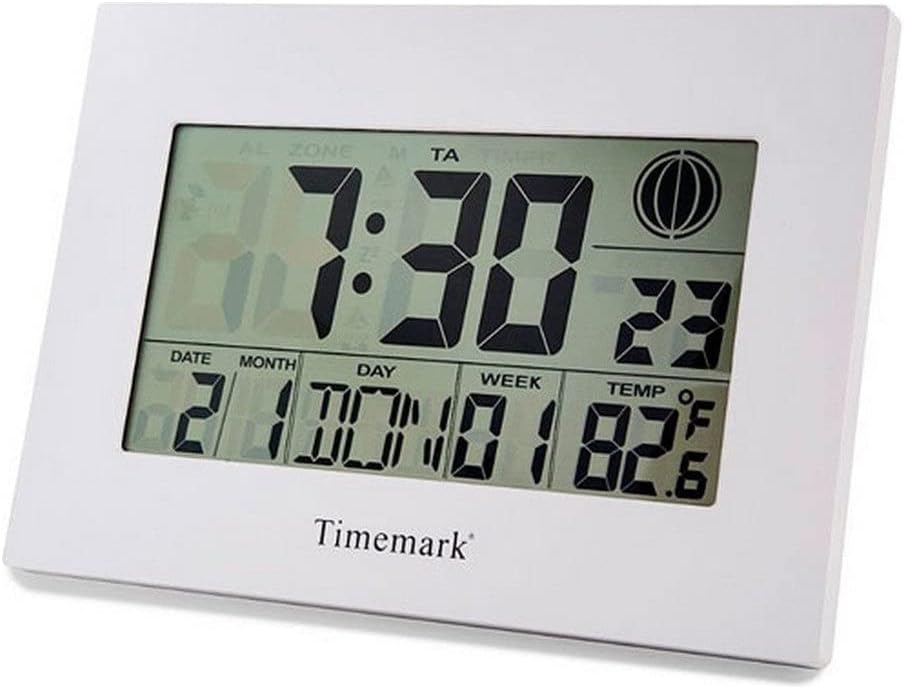
Figure 1: Front view of the Kooltech TIMEMARK SL-500 Digital Wall Clock. The display shows the current time (7:30), date (February 10th), day of the week (Day 1), week number (Week 1), and temperature (82.6°F). Indicators for Alarm (AL), Zone, Month (M), and Timer (TA) are also visible at the top of the display.
Setup
1. Battery Installation
- Locate the battery compartment on the back of the clock.
- Open the battery compartment cover.
- Insert the required batteries (typically AA or AAA, refer to the compartment label) ensuring correct polarity (+ and -). The product specifications indicate batteries are included.
- Close the battery compartment cover securely.
2. Initial Power-On and Time/Date Setting
Upon battery installation, the clock will power on. You will need to set the current time, date, and other preferences.
- Identify the setting buttons, usually labeled "SET", "MODE", "UP", "DOWN", or similar, located on the back or side of the clock.
- Press the "SET" or "MODE" button to enter time setting mode. The hour display will likely flash.
- Use the "UP" or "DOWN" buttons to adjust the hour.
- Press "SET" or "MODE" again to move to minute setting, then adjust with "UP"/"DOWN".
- Continue this process for setting the year, month, date, and day of the week.
- Some models may allow setting the time zone ("ZONE" indicator) and temperature unit (°C/°F). Refer to the specific button functions on your device.
- Once all settings are complete, press "SET" or "MODE" one last time to exit the setting mode.
Operating Instructions
1. Display Information
The clock's display provides the following information:
- Time: Large digits indicate the current time (e.g., 7:30).
- Date: Displays the month and day (e.g., 2/10 for February 10th).
- Day: Indicates the day of the week (e.g., Day 1).
- Week: Shows the current week number.
- Temperature: Displays the ambient temperature (e.g., 82.6°F).
- Indicators: Icons for Alarm (AL), Time Zone (ZONE), Month (M), and Timer (TA) may be present.
2. Alarm Function (if available)
If your clock features an alarm function (indicated by "AL" on the display):
- Press the "ALARM" or "MODE" button repeatedly until the alarm time is displayed or flashing.
- Use "UP" or "DOWN" buttons to set the desired alarm hour and minute.
- Press "ALARM" or "SET" to confirm and activate the alarm. An alarm icon will typically appear on the display.
- To deactivate the alarm, press the "ALARM" button again until the icon disappears.
- To snooze, press any button (except "OFF") when the alarm sounds. To turn off the alarm completely, press the designated "OFF" or "ALARM" button.
3. Timer Function (if available)
If your clock features a timer function (indicated by "TIMER" or "TA" on the display):
- Press the "TIMER" or "MODE" button repeatedly until the timer setting mode is active.
- Use "UP" or "DOWN" buttons to set the desired countdown duration (hours, minutes, seconds).
- Press "START" or "TIMER" to begin the countdown.
- To pause or stop the timer, press "PAUSE" or "STOP" respectively.
Maintenance
1. Cleaning
- Wipe the clock's surface with a soft, dry cloth.
- Do not use abrasive cleaners, solvents, or chemical sprays, as these can damage the display or casing.
- Avoid getting moisture into the clock's internal components.
2. Battery Replacement
When the display dims or the clock functions become erratic, it is time to replace the batteries.
- Follow the battery installation steps outlined in the "Setup" section.
- Dispose of old batteries responsibly according to local regulations.
- After replacing batteries, you may need to reset the time and date.
Troubleshooting
| Problem | Possible Cause | Solution |
|---|---|---|
| Display is blank or dim. | Low or depleted batteries. | Replace batteries with new ones. |
| Incorrect time or date. | Time/date not set correctly after battery installation or power interruption. | Refer to "Initial Power-On and Time/Date Setting" in the Setup section to reset. |
| Alarm does not sound. | Alarm not activated or set incorrectly. | Ensure the alarm is set and the alarm icon is visible on the display. Check alarm volume if adjustable. |
| Temperature reading seems inaccurate. | Clock placed near a heat source or in direct sunlight; sensor malfunction. | Relocate the clock to an area with stable ambient temperature. If problem persists, contact support. |
Specifications
| Feature | Detail |
|---|---|
| Brand | Kooltech |
| Model | SL-500 |
| Display Type | Digital |
| Shape | Rectangular |
| Frame Material | Metal |
| Product Dimensions (L x W x H) | 17.5 x 3.5 x 23.5 cm |
| Item Weight | 350 grams |
| Batteries Included | Yes |
Note: While some product data may list "Round" for shape, the product image clearly depicts a rectangular design. Please refer to the visual representation for the actual product shape.