Olideauto SW100
Olideauto Automatic Electric Swing Door Opener
Model: SW100
Instruction Manual
1. Product Overview
The Olideauto Automatic Electric Swing Door Opener (Model SW100) is a versatile and robust system designed for both commercial and residential swing doors. It offers automatic and manual operation modes, activated by push buttons or remote control. Its advanced wide voltage technology ensures stable performance across various power supplies (110-220VAC +/-10%).

Figure 1.1: Complete kit of the Olideauto Automatic Electric Swing Door Opener, including the main operator unit, arm, power cables, handheld programmer, two remote controls, and two wired exit buttons.
Key Features:
- Automatic Operation: Activated by fob keychains or exit buttons for fast and convenient entry.
- Safety Features: Automatically re-opens the door if an object is detected in the closing path, ensuring safety.
- Adjustable Parameters: Many settings, such as manually push force, opening direction, and hold-open time, can be easily adjusted via the handheld programmer.
- Long Service Life Motor: Designed for durability with a wide voltage range (AC100V to AC240V) to withstand unstable input voltage.
- Versatile Application: Suitable for both inswing and outswing doors, ideal for commercial settings, disabled access, and high-traffic areas.

Figure 1.2: Illustration of the two primary door opening configurations: Outswing Pull Open and Inswing Push Open, supported by the Olideauto SW100.
Product Dimensions:

Figure 1.3: Detailed dimensions of the Olideauto SW100 main unit and its arm, provided in both inches and millimeters for precise installation planning.
2. Setup and Installation
Proper installation is crucial for the optimal performance and safety of your Olideauto door opener. It is recommended to consult the official installation manual (PDF) for detailed instructions. Key steps and considerations are outlined below.
2.1 Mounting the Main Unit
The main unit should be securely mounted above the door frame. Ensure the bayonet side of the mounting plate is facing up. Maintain a 30mm gap between the plate bottom and the door crack. Align the left edge of the plate with the center of the door hinge.
Video 2.1: Installation guide for the Olide SW100 Automatic Electric Swing Door Opener, demonstrating the mounting process of the main unit and arm.
2.2 Arm Installation
Install the arm ensuring the distance between the left edge of the bar and the hinge center is 160mm. Fix the screws, slide the slider into the slot, and fix the other side of the slider to the machine.
Video 2.2: Detailed installation video for the Olideauto Low Energy ADA Electric Swing Door Operators, showing the arm attachment and adjustment.
2.3 Wiring and Power Connection
Connect the power wire to the designated terminals. The power wire connection is not polarity-sensitive (regardless of negative or positive). Ensure all connections are secure.
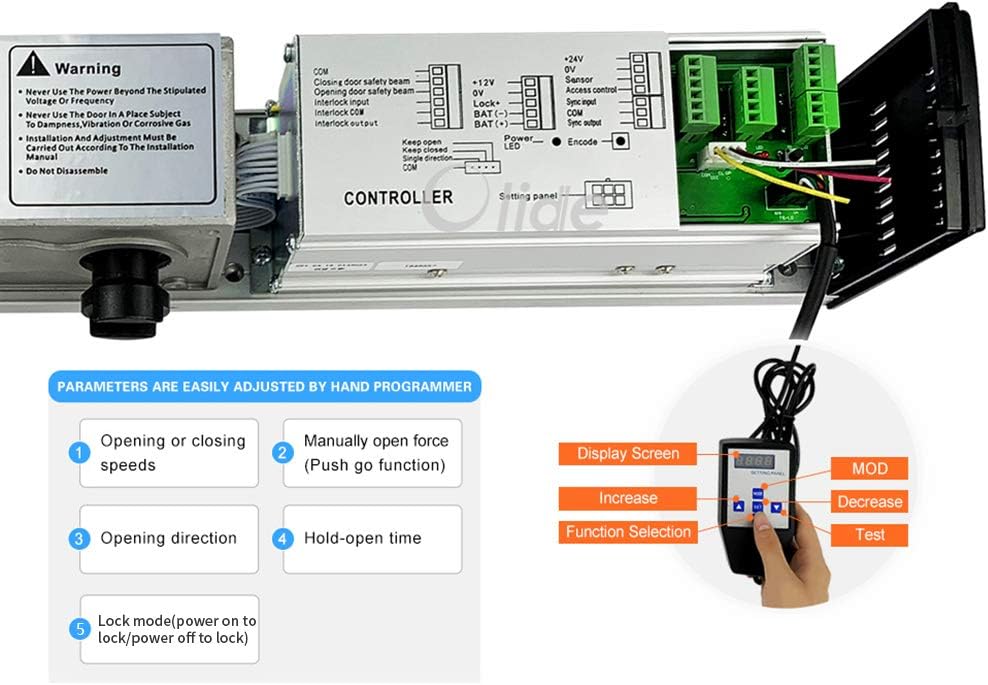
Figure 2.1: The controller panel of the Olideauto SW100, showing the wiring terminals for power, sensors, and access keypads, along with the handheld programmer for adjustments.
3. Operating Instructions
The Olideauto SW100 offers multiple ways to operate the door, ensuring convenience and accessibility.
3.1 Using the Wired Exit Buttons
The included wired exit buttons provide a simple and reliable method for opening the door. Press the button to activate the automatic opening function.

Figure 3.1: Dimensions of the wired exit button, which can be installed for convenient door activation.
Video 3.1: Demonstration of the Handicap Door Opener, Automatic Electric Swinging Open Door, showing ease of use for accessibility.
Video 3.2: Illustrates how the Olide-120B Auto Door allows for easy manual push open, providing flexibility in operation.
3.2 Remote Control Operation
The included remote controls allow for convenient wireless operation of the door opener. Ensure the remote is properly encoded with the main unit.

Figure 3.2: The remote control unit, showing its four buttons (A, B, C, D) for various functions and the battery compartment for an LR23A 12V alkaline battery.
Video 3.3: Instructions on how to encode the wireless remote control with the Olideauto 120B automatic door opener.
Video 3.4: Demonstrates the Wireless Remote Open Electric Automatic Swing Door Opener in action, highlighting its convenience.
3.3 Adjusting Parameters with Handheld Programmer
The handheld programmer allows for fine-tuning various operational parameters, including opening/closing speeds, manual open force, opening direction, and hold-open time.
Video 3.5: Shows the Olide automatic swing door opener in operation, demonstrating its smooth functionality after parameter adjustments.
Video 3.6: Operational video of the Olideauto Electric swing Automatic door opener/operator, showcasing its various modes.
Video 3.7: A short preview video demonstrating the Olide Touchless Auto Door Opener Swing Door Opener, highlighting its touchless activation.
4. Maintenance
To ensure the longevity and reliable operation of your Olideauto door opener, regular maintenance is recommended.
- Regular Cleaning: Keep the main unit, arm, and tracks clean from dust and debris. Use a soft, dry cloth.
- Check Connections: Periodically inspect all electrical connections and mounting screws to ensure they are secure.
- Lubrication: If any moving parts show signs of friction, apply a small amount of silicone-based lubricant.
- Sensor Check: Test the safety sensors regularly by placing an object in the door's path during closing to ensure it re-opens.
5. Troubleshooting
If you encounter issues with your door opener, refer to the following common troubleshooting tips:
- Door Not Opening/Closing: Check power supply, ensure all cables are securely connected, and verify remote control battery.
- Door Stops Mid-Operation: This could be due to an obstruction. Clear the path and check safety sensor alignment.
- Unusual Noises: Inspect moving parts for any obstructions or wear. Lubricate if necessary.
- Remote Not Responding: Re-encode the remote control following the instructions in Video 3.3. Replace battery if needed.
- Incorrect Speed/Force: Adjust parameters using the handheld programmer as described in Section 3.3.
6. Specifications
| Feature | Specification |
|---|---|
| Model Number | SW100 |
| Voltage | 110-220 VAC +/-10% |
| Motor | DC 24V brushless motor |
| Power Consumption | 50W |
| Opening Time | 3-7 sec. @ 90 degrees |
| Hold Open Time | 1-30 sec. Adjustable |
| Max. Door Width | Max. 1200mm / 47.2" Min. 660mm / 26" |
| Max. Opening Angle | 120 degrees |
| Environment Temperature | -20C to 50C (-4F to 122F) |
| Operation Noise | Less than 55db |
| Opener Size (L*W*H) | 21.45'' x 3.35'' x 3.74'' |
| Opener Weight | 9.5kg / 20.9 LBS |
| Maximum Weight Capacity | 264 Pounds |
| Material | Metal |
| Color | Silver Gray |
7. Warranty and Support
Olideauto is committed to providing high-quality automatic entry systems with excellent after-sales service.
- Warranty: The product comes with a 60-month (5-year) product warranty.
- Technical Support: USA Technical phone support is available for easy installation and debugging.
- Official Documents: For further details, refer to the Installation Manual (PDF).
Ask a question about this manual
Ask about setup, troubleshooting, compatibility, parts, safety, or missing instructions. Manuals+ will review the question and use this page’s manual context to help answer it.